Tutorials

Making groundwork for a diorama

Posted by T. Dürrschmidt on 21 Jan 2010, 22:09

This is an older tutorial. But I moved it to the right section now and made some additions.

The groundwork for "Hussite Wars".


Following materials are needed:
    prepared wooden diorama frame
    ready painted figs and vehicles you want to use for the dio
    rubber glove
    masking tape
    old spoon
    tweezers
    super glue
    white glue
    wood filler
    fine sand ("bird sand"), little stones
    acrylic color (black, brown, beige)
    grass tufts, static grass, roots and fine bits of wood from the forest.
    "Squeeze rubber bottle" for static grass (from "Noch")


Mix wood filler with acrylic color (black and brown) and fine sand. Depending the ground you want you can add some small stones, little pieces of wood or other natural stuff. 6 parts wood filler, 2 parts sand, 1/2 part color. So you get a dark greyish or brownish sandy mixture. Applying the color from start helps you to save one step of basic painting and you can be sure that everything is covered with color.


Preparing the material....just for the photo :-)
Image


Applying the mixture after masking the frame. Use old spoon and your fingers (but better with a glove)
Image


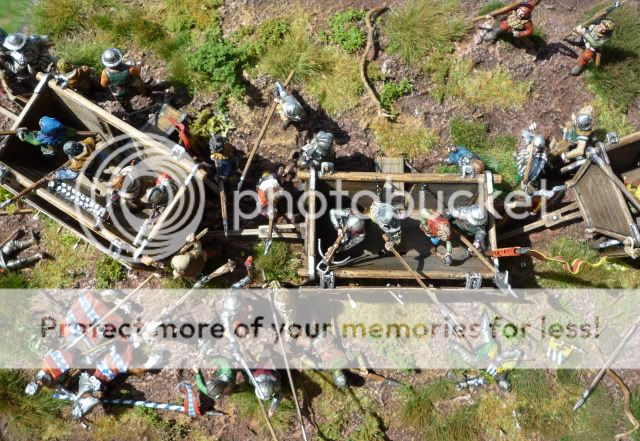
Put on the models while the ground is still smooth. It is useful to take a bird view photo to know the positions for the figs. This helps the figs fit more into the landscape and don´t stand only "on top".
Image


Removing the models after some hours of drying and start painting (drybrushing in several steps from dark brown to beige).
Image


Put the models back to the ground, glue them on with superglue and start applying grass tufts. (also to be glued). Do this in one step. So the grass does not "grow" just around the wagons.
Image


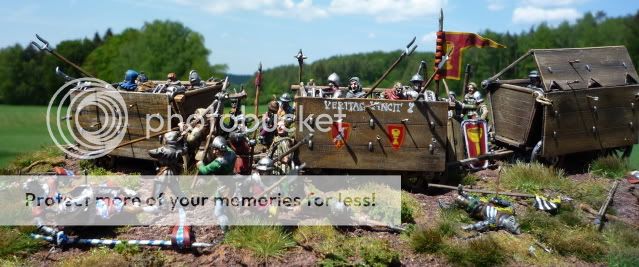
After adding some bushes, roots, static grass and drybrushing the plants in the colors you used for the groundwork....it should look like this...
Image

Image

Image[/quote]
User avatar
T. Dürrschmidt  Germany
Silver Brush winner
 
Posts: 2230
Member since:
01 Oct 2008, 18:33


Posted by The Observer on 21 Jan 2010, 22:56

Thank you Thomas! :love: :love:
This is what i call a "step by step" learning lesson! :thumbup: :thumbup: :thumbup:
Will try it and as i can make use of these gloves in a thousand of millions-i will have enough time and patience to learn!
Great Work-i loved this dio-i love it until now!
User avatar
The Observer  
 
Posts: 665
Member since:
11 May 2009, 21:31

Posted by Paul on 22 Jan 2010, 14:07

Nice one Thomas :thumbup: So simple but so effective.
Did you take a photo of the figures laid out first time , before you took them off and painted the base or did you use another method of finding the positions after the groundwork was finished??
User avatar
Paul  China
 
Posts: 11724
Member since:
25 Nov 2008, 09:31

Posted by monty on 22 Jan 2010, 16:45

cheers for tips thomas :thumbup:
User avatar
monty  United Kingdom
 
Posts: 1795
Member since:
08 Aug 2009, 11:52

Posted by west1871 on 22 Jan 2010, 18:31

Great tutorial :thumbup: Pushing the figure in is a good idea :thumbup:
User avatar
west1871  United Kingdom
 
Posts: 2225
Member since:
06 May 2009, 17:08

Posted by Michael Robert on 23 Jan 2010, 21:05

Very good tutorial. All you guys teaching the secrets of your trade.
Ver instructive
Many thanks Michael
User avatar
Michael Robert  France

Supporting Member (Bronze) Supporting Member (Bronze)
 
Posts: 825
Member since:
14 Oct 2009, 19:22

Help keep the forum online!
or become a supporting member

Posted by k.b. on 30 Aug 2010, 18:47

Absolutely briiiilliiiiaaannnnnt Thomas! Mind you I'd love to see some larger photos of the finished groundwork! Thanks for being so generous in your exp-lanation! :thumbup: :thumbup: :thumbup:
k.b.  Brazil
Bronze Brush winner
 
Posts: 1086
Member since:
04 Apr 2010, 03:50

Posted by Peter on 30 Aug 2010, 18:52

You can see some more pictures here Keith:

viewtopic.php?f=14&t=2243

I hope these are what you want?
User avatar
Peter  Belgium

Moderator Moderator
 
Posts: 22508
Member since:
25 Mar 2008, 18:51

Posted by k.b. on 30 Aug 2010, 21:33

Thanks Peter but to be honest I had seen these and they still aren't as big as I'd like them to be. Thomas is obviously not fool enough to give all his little secrets away.......but if we can see them.. we might be able to steal them without him noticing but sshhhhh...don't tell him that! ;-)
k.b.  Brazil
Bronze Brush winner
 
Posts: 1086
Member since:
04 Apr 2010, 03:50

Posted by Alois Nebel on 31 Aug 2010, 12:35

Thank you for this tutorial. It is very useful. I will try your method of making grounwork in one of my planned projects.

V.
User avatar
Alois Nebel  Czech Republic
 
Posts: 795
Member since:
01 May 2009, 18:40

Posted by Wheeling Turn on 31 Aug 2010, 20:47

wonderful step by step instruction, nice to see the way you make your dios. It is a well of informatons for al of us..
User avatar
Wheeling Turn  Germany
 
Posts: 1396
Member since:
14 Dec 2008, 14:05

Posted by Nono on 01 Sep 2010, 20:20

wonderful!! :love: :thumbup: :thumbup: :thumbup:
User avatar
Nono  France
 
Posts: 1245
Member since:
11 Apr 2008, 18:00

Posted by FrankM on 02 Sep 2010, 22:19

G R E A T !

The idea to put the figures, etc. on the ground in an early working phase is very interesting.

Best regards

Frank
FrankM  Germany
 
Posts: 270
Member since:
31 Jul 2010, 23:39


Return to Tutorials