Work in Progress

Movement bases

Posted by Ochoin on 11 Sep 2020, 07:59

I have a lot of unfinished ones because it's such a fiddly task.

Image

As you can appreciate, you can't have excess glue & terrain materials going into the depression.

Anyone know a quick way of doing this?

donald
User avatar
Ochoin  Scotland
 
Posts: 2406
Member since:
16 Jan 2010, 04:00


Posted by CliosPaintingBench on 14 Sep 2020, 02:08

I don't know of a quick way, but they do look neat. They also look removable, is that the point? If you're going to have wooden, unpainted edges it looks like a quick way to differentiate between what you can take out.

Hope quarantine isn't going too badly, we get news update on our end.
User avatar
CliosPaintingBench  Australia
 
Posts: 800
Member since:
14 Jan 2020, 06:46

Posted by Bessiere on 14 Sep 2020, 02:26

Magnets might be easier in the end.
Bessiere  United States of America
 
Posts: 1116
Member since:
23 May 2019, 15:50

Posted by Ochoin on 14 Sep 2020, 06:52

Owen, as you'd appreciate, wargamers moved away from singly based figures several decades ago in favour of multiple figure bases....& then went back for certain rule sets.
So of course rather than have to move 2-300 individual figures, you have unit-sized movement trays.

It does make casualty removal (vital in low figure ratio games) easier. And you take the figures out when you get down to shooting & stabbing range.

@ Bessieres. You're probably correct but I probably own about 10 painted & 60 unpainted movement trays. Too late to go back.

I'll just have to slowly & carefully "terrain' the tray edges.

donald
User avatar
Ochoin  Scotland
 
Posts: 2406
Member since:
16 Jan 2010, 04:00

Posted by CliosPaintingBench on 14 Sep 2020, 10:26

Ochoin wrote:Owen, as you'd appreciate, wargamers moved away from singly based figures several decades ago in favour of multiple figure bases....& then went back for certain rule sets.
So of course rather than have to move 2-300 individual figures, you have unit-sized movement trays.

It does make casualty removal (vital in low figure ratio games) easier. And you take the figures out when you get down to shooting & stabbing range.


HAHA, Oh I had this exact discussion about basing in my wargaming group and how it was amazing that after decades, no one has worked out a universally accepted way to base and it was the cause of many sleepless nights. If I had to rebase my minis I would have a fit.
User avatar
CliosPaintingBench  Australia
 
Posts: 800
Member since:
14 Jan 2020, 06:46

Posted by steve_pickstock on 14 Sep 2020, 11:18

I use a lot of singly-based figures at the moment, with movement trays. I think matching the landscaping on the trays to the bases is important, if only for the 'shock and awe' value when you out them on the table.
Some of my Amazons
Image
Image
Image

And some 28mm figures
Image
Image
Image
Image
User avatar
steve_pickstock  England
 
Posts: 1311
Member since:
20 Jun 2010, 19:56

Help keep the forum online!
or become a supporting member

Posted by PaulRPetri on 14 Sep 2020, 15:16

Donald I know of no easy and fast method for making movement trays. I like your's a lot! I am a lazy cheap skate and usually use foam core base with very thin balsa wood trim on the edges. I usually then paint the edges black.

Steve your movement trays are excellent! Beyond my skills.
PaulRPetri  United States of America
 
Posts: 620
Member since:
02 Apr 2019, 00:59

Posted by steve_pickstock on 14 Sep 2020, 16:19

PaulRPetri wrote:Steve your movement trays are excellent! Beyond my skills.

I always take the easiest route, so what I do anyone can do.

I texture the tray surafce using superglue and baking soda, I also add any twigs at this point. Then every thing gets a coat of yellow ochre. Then it's dry brushes with two - successively lighter - colours. Finally add tufts, flowers and flock to suit. Figure bases get the same treatment.

The trays are by Warbases, https://warbases.co.uk/product-category/movement-trays/20mm-trays/ and the figure bases normally 20mm round (Green) from Renedra Moldings https://www.renedra.co.uk/product.php?product=129.
User avatar
steve_pickstock  England
 
Posts: 1311
Member since:
20 Jun 2010, 19:56

Posted by PaulRPetri on 14 Sep 2020, 20:23

Thanks for the info on bases Steve. Don't short change yourself you do outstanding work. Those skeletons by the way are excellent!!
PaulRPetri  United States of America
 
Posts: 620
Member since:
02 Apr 2019, 00:59

Posted by Ochoin on 14 Sep 2020, 21:10

Steve, a percentage of mine are textured: just not as good as yours.

At one stage I used GW's "cracking paint" : very expensive for a so-so effect.

Tell me more about this super-glue-&-baking-soda.

donald
User avatar
Ochoin  Scotland
 
Posts: 2406
Member since:
16 Jan 2010, 04:00

Posted by steve_pickstock on 14 Sep 2020, 23:29

Ochoin wrote:Steve, a percentage of mine are textured: just not as good as yours.

At one stage I used GW's "cracking paint" : very expensive for a so-so effect.

Tell me more about this super-glue-&-baking-soda.

donald

Never tried the cracking paints, I may have to have a go.
Super glue/baking powder is very simple. I saw it mentioned on a youtube video and gave it a go for myself.
If I am basing figures I normally glue the figures to the base using a 'clear' glue like Bostick or similar. Once that has set - take a cheap superglue - preferably a fairly runny one with a nozzle for better control - the ten packs you get for a quid in Poundland and places like that are good.

Working in a well-ventilated area (sorry but the fumes can be something else) apply the glue to the base. I usually slop it on, covering the edge of the pill base, to cover that joint, and fill in any blank areas. Obviously take every care to not get any superglue on the figure.

Then I take a tray of baking powder and dip the figure base into the powder and shake the excess off.
The glue/powder mix hardens virtually instantly! You can paint it seconds later. It's as hard as nails, stuck like stuff on a blanket, and it has a really good scale texture. It's finer than the finest sand, so in 1/72nd scale it looks spot on.

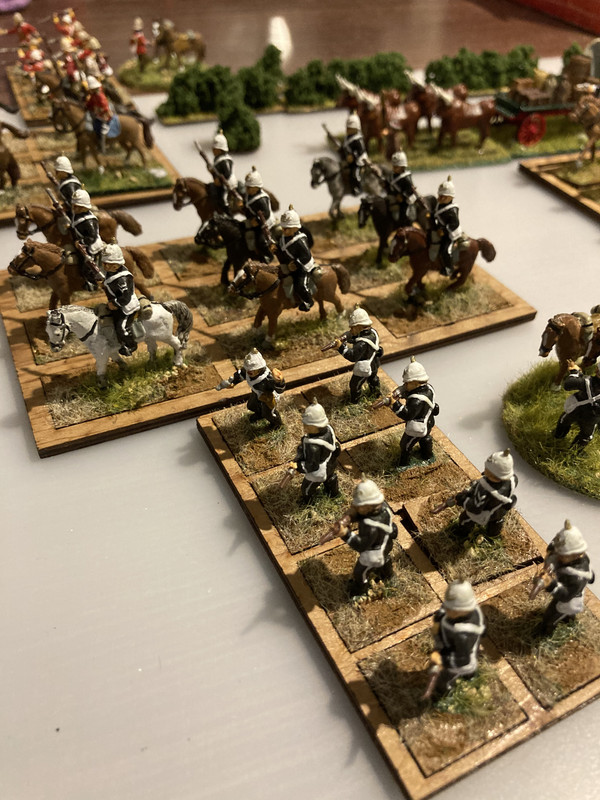
This first picture shows how it smooths out the edge of the base and how good the texture looks.
Image

The same technique is used when doing movement trays, however avoid getting any glue/powder mix into the slots (the Warbase one are pretty snug to begin with). There is nothing to stop you building the layers up with more superglue and then more powder. Take care not to touch the nozzle of the glue to any powder on the base as it will react and solidify in the nozzle.

When you are ready to paint the bases, first give them a good brushing with a fairly stiff old paintbrush to get any remaining powder off the bases and the figures/models. Once I've done the basic colour on the base, I dry-brush it a couple of times to get a depth of colour, and then tufts and flock are applied over that. These figures had scenic bases so you can see how the glue/powder blends them in quite nicely.
Image
Image

In this picture you can see that I used some smears of Miliput on the movement tray, which the got the glue/powder treatment, along with little bits of twig, to add a wasteland feel to the bases.
Image
I added a skull to Danthe's base and then textured it in, to look like it had been there a long time.
Image

Another thing you can do with the glue/powder mix is to use it to texture polystyrene. Put super glue on the surface - cover it completely, sprinkle on the powder and wallop! you have quite an effective rock texture. It is exothermic, so it does give off a fair bit of heat while it is setting, but not enough to melt the styrene.
These are broken bits of masonry wielded by Amon Bob the Pyramid Builder, which he then throws at the enemy.
Image

Hope this is useful.
User avatar
steve_pickstock  England
 
Posts: 1311
Member since:
20 Jun 2010, 19:56

Posted by Ochoin on 15 Sep 2020, 00:05

Very useful.

I'll give it a go.

Thanks, donald
User avatar
Ochoin  Scotland
 
Posts: 2406
Member since:
16 Jan 2010, 04:00

Posted by PaulRPetri on 15 Sep 2020, 14:44

Very Informative Steve. Many thanks!

On a side note using the super thin super glue and baking soda is excellent for gluing men on to horses and adding different heads. The baking soda reacts immediately and very securely. I sprinkle the baking soda from above and blow the excess towards the joint. Works really well. Any type of gel super glues doesn't seem to work with this method.
PaulRPetri  United States of America
 
Posts: 620
Member since:
02 Apr 2019, 00:59

Posted by steve_pickstock on 15 Sep 2020, 16:54

PaulRPetri wrote:Very Informative Steve. Many thanks!

On a side note using the super thin super glue and baking soda is excellent for gluing men on to horses and adding different heads. The baking soda reacts immediately and very securely. I sprinkle the baking soda from above and blow the excess towards the joint. Works really well. Any type of gel super glues doesn't seem to work with this method.


Superglue/baking powder really does appear to be the wonderstuff. I haven't used it for figure conversions but I have used it as a filler when making model buildings.
It also occurred to me that if you have horses without a base, like say the Airfix and the Italeri Artillery draught horses, and used this to glue them to a base, they ain't going to go anywhere! Plus the bases will have a good texture to them.

I have been trying out this ulta-violet activated plastic, and I can't help but thing that the glue/powder mix is just as effective.
User avatar
steve_pickstock  England
 
Posts: 1311
Member since:
20 Jun 2010, 19:56

Posted by PaulRPetri on 15 Sep 2020, 21:05

I have glued plenty of shields, figures to bases, and figures onto horses with this method and it really works. And I know for a fact that if you have even the slightest bit of wet super glue on your finger and backing soda comes in contact with it, it will burn the heck out of you.
PaulRPetri  United States of America
 
Posts: 620
Member since:
02 Apr 2019, 00:59


Return to Work in Progress