 Go on, go on, go on ... !
Work in Progress
Airfix 1/76 Sherman Crab
49 posts
• Page 2 of 3 • 1, 2, 3
And these white added parts to the ugly grey thing will detect the mines now better ?

Go on, go on, go on ... !
Go on, go on, go on ... !-

Wiking
- Posts: 2825
- Member since:
14 Sep 2015, 10:03
Wiking wrote:And these white added parts to the ugly grey thing will detect the mines now better ?
By "detecting" mines do you mean giving them a good wack with a chain and having them go off? Expanded definition...
-

Bluefalchion
- Posts: 3575
- Member since:
23 Dec 2010, 07:57
Constructing the flail

Now the Airfix flail chains are completely straight. That is quite rediculous, as even during flailing these chains were bent by the rotating force. This picture shows how the Airfix model would look when built straight OOB.

And here a real Crab in action. The chains are not straight at all.
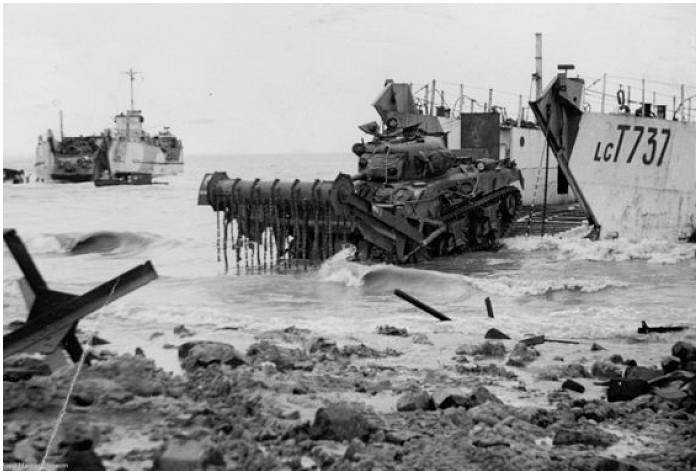
But I deciced to build the flail in a resting/transport position, like on this picture, as I think it is too difficult to depict the dynamic effect of a rotating flail in a static model.
As I showed already, my first step was.....

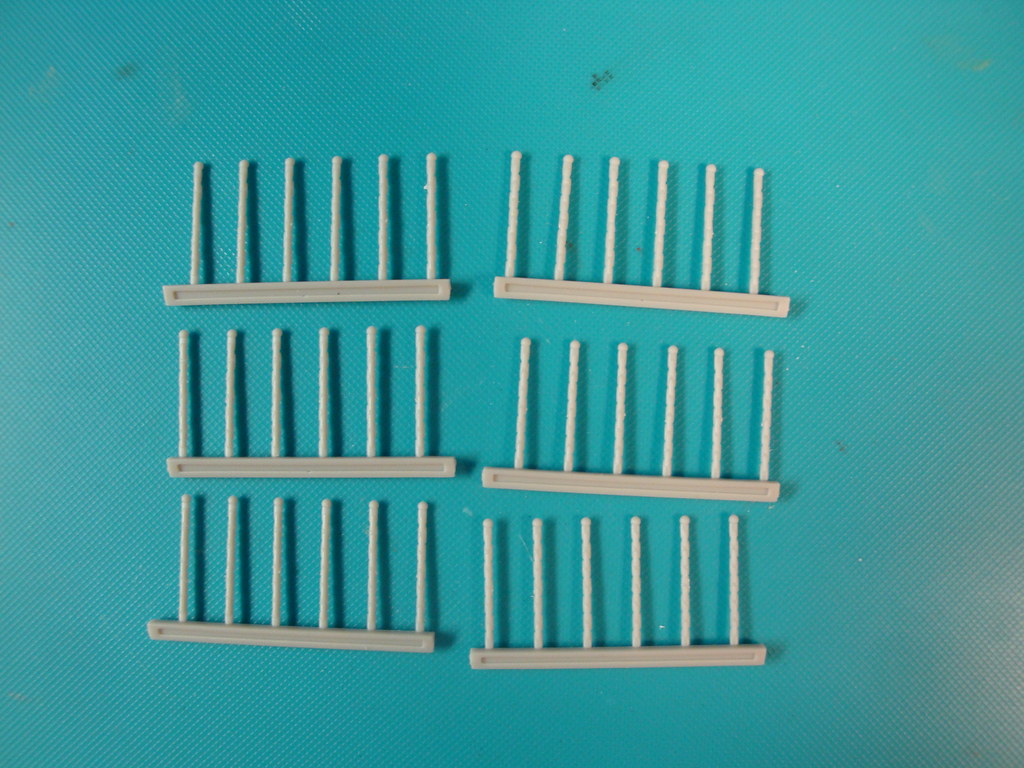
To cut off all the chains from the drum.
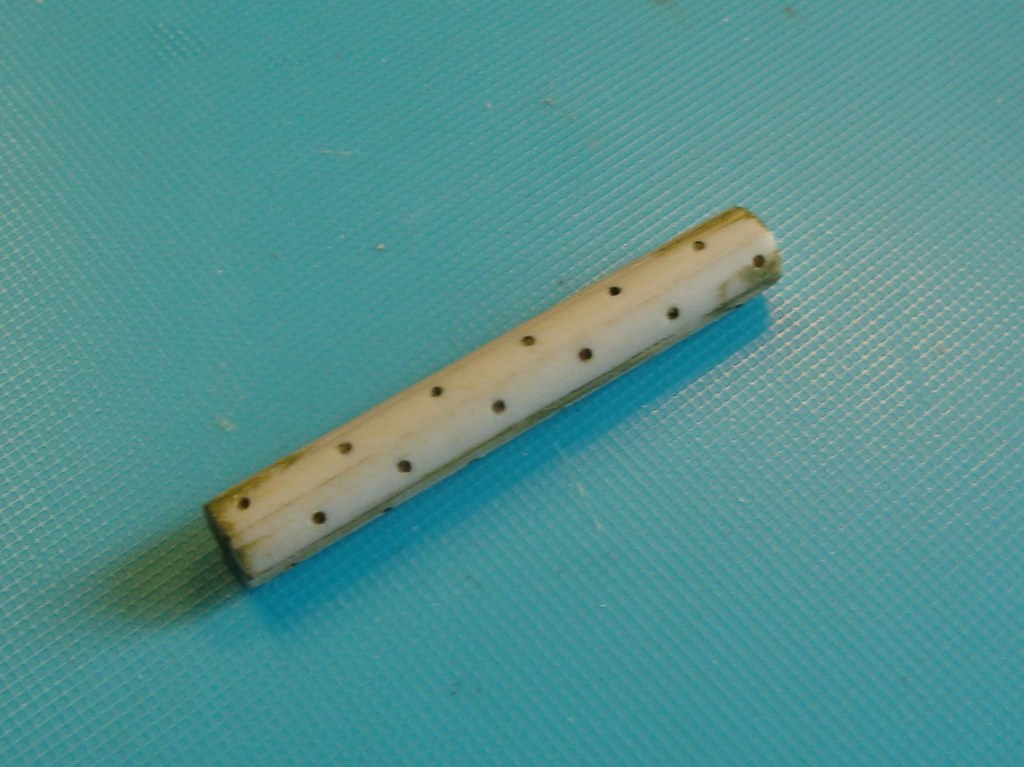
Then it was quite a job to glue, file, fill and sand the six parts of the drum to a smooth looking cylinder without seams. I drilled out the attachment points of the chains to preserve their exact locations during sanding, and to provide good attachment point for glueing the chains back later on.

I decided to use the original Airfix chains, as they are reasonably on scale, are moulded as chains and have the little ball on the end. An alternative would be to use jewellers chain, but it looks often overscale, and the type of chain is different. So I softened the chains in hot water above a candle, and bent them into the desired shapes.
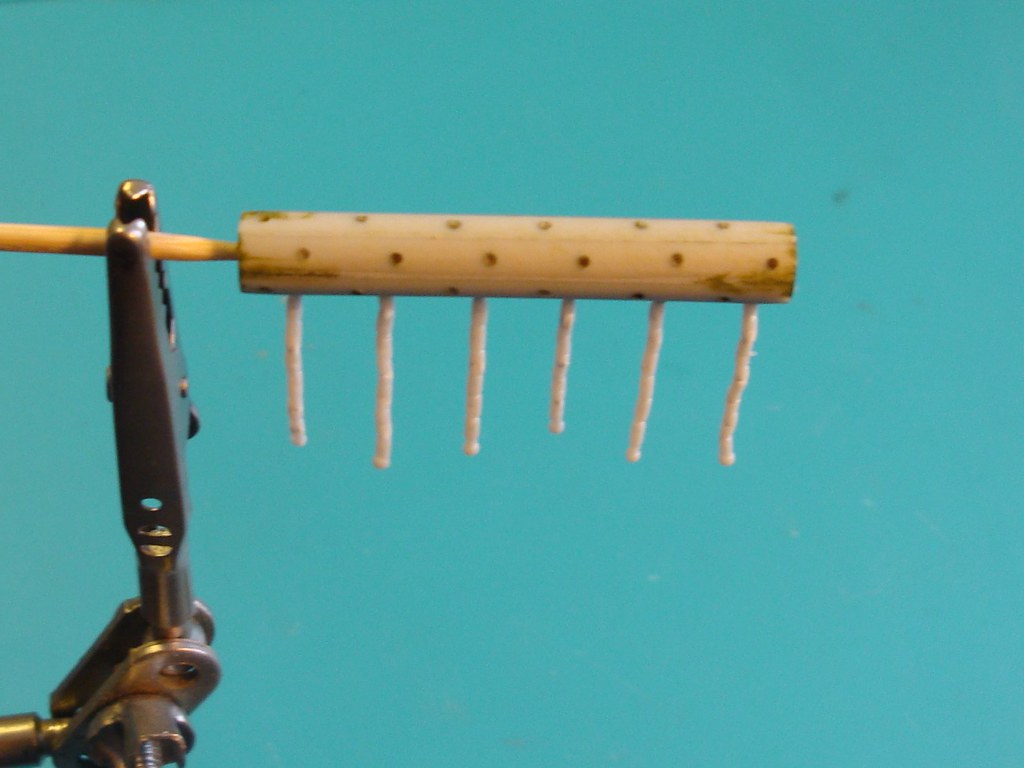
Then they were glued back to the drum, row by row.

The final result, with all chains in position.
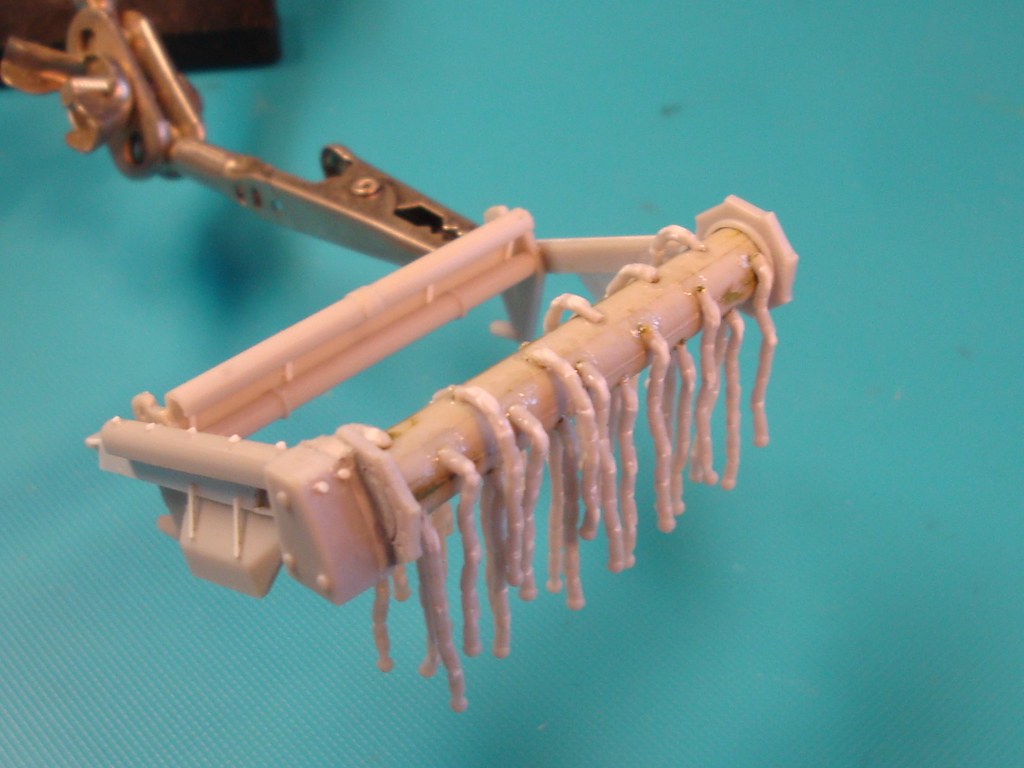
And a dryfit with the flail arms.
Now the flail mechanism has to be attached to the Sherman hull. But I think I have to attach the wheels and tracks first, as the flail will be in the way. So I am deliberating a bit about the order of build.
Now the Airfix flail chains are completely straight. That is quite rediculous, as even during flailing these chains were bent by the rotating force. This picture shows how the Airfix model would look when built straight OOB.
And here a real Crab in action. The chains are not straight at all.
But I deciced to build the flail in a resting/transport position, like on this picture, as I think it is too difficult to depict the dynamic effect of a rotating flail in a static model.
As I showed already, my first step was.....
To cut off all the chains from the drum.
Then it was quite a job to glue, file, fill and sand the six parts of the drum to a smooth looking cylinder without seams. I drilled out the attachment points of the chains to preserve their exact locations during sanding, and to provide good attachment point for glueing the chains back later on.
I decided to use the original Airfix chains, as they are reasonably on scale, are moulded as chains and have the little ball on the end. An alternative would be to use jewellers chain, but it looks often overscale, and the type of chain is different. So I softened the chains in hot water above a candle, and bent them into the desired shapes.
Then they were glued back to the drum, row by row.
The final result, with all chains in position.
And a dryfit with the flail arms.
Now the flail mechanism has to be attached to the Sherman hull. But I think I have to attach the wheels and tracks first, as the flail will be in the way. So I am deliberating a bit about the order of build.
-

huib
- Posts: 962
- Member since:
12 Dec 2015, 15:57
Pretty sure you get quite a few bonus points for melting the original straight Airfix chains into the proper droopy position.
As Wiking would say: "Go on go on go on!"
As Wiking would say: "Go on go on go on!"
-
Bluefalchion
- Posts: 3575
- Member since:
23 Dec 2010, 07:57


Help keep the forum online!
or become a supporting member
Thank you, guys!
Wheels and tracks
My last update before the holidays.
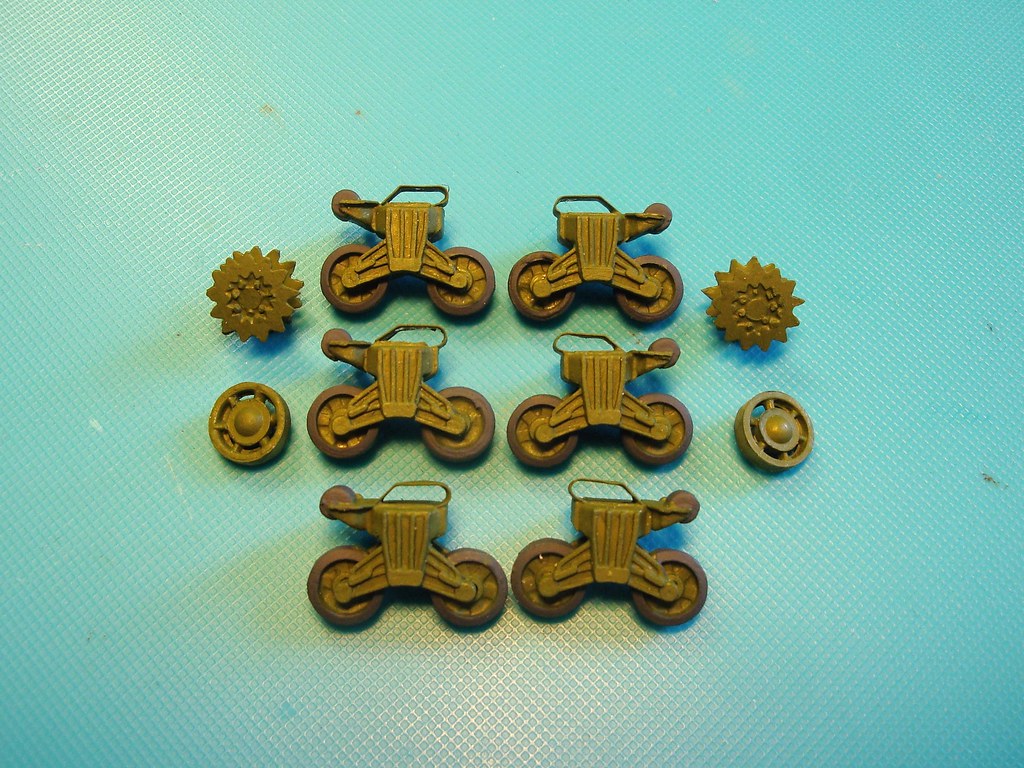
Wheels and bogies painted.
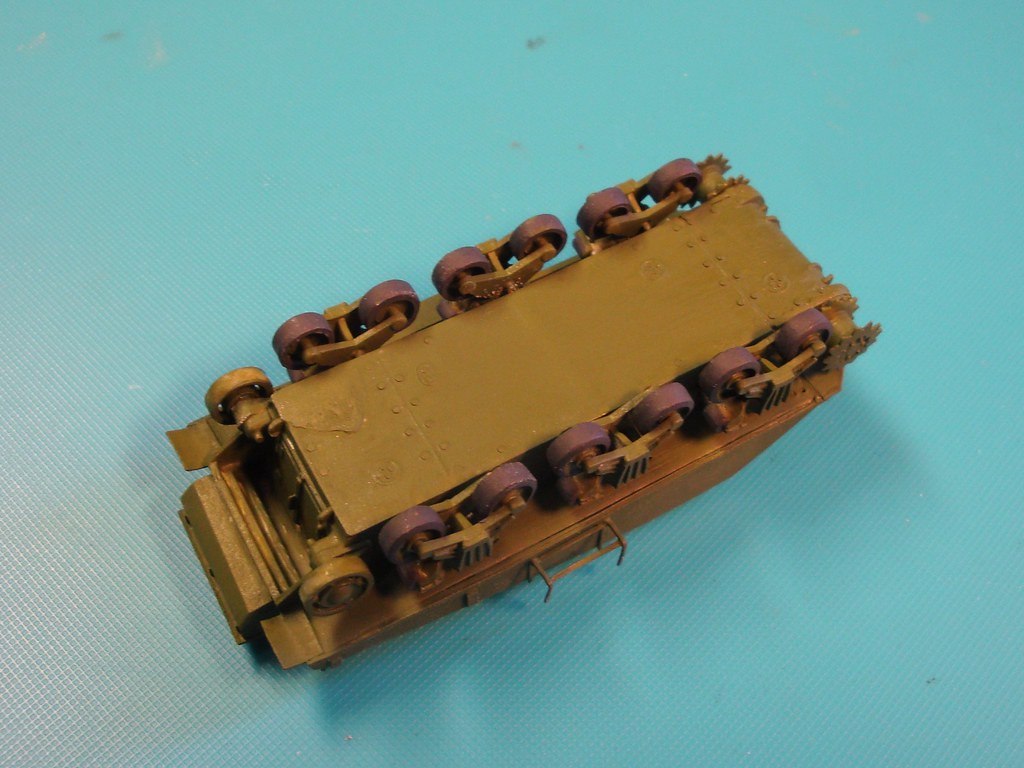
And glued to the hull.
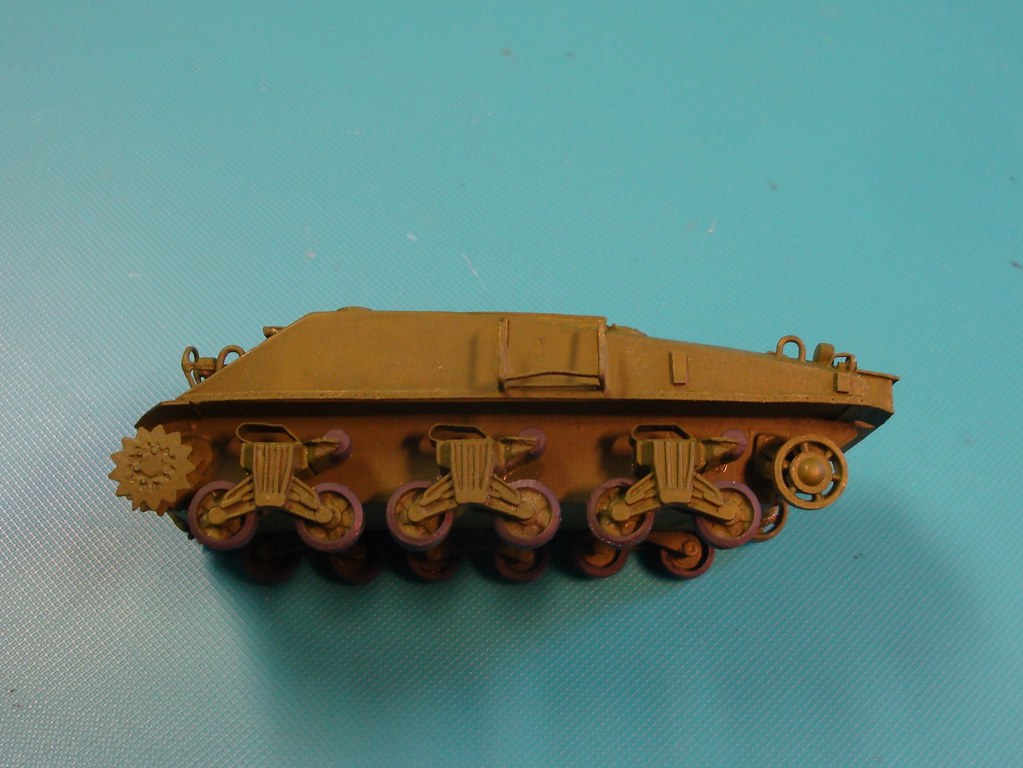
Sideview.

The old fashioned and difficult to work with Airfix rubber band tracks.

The tracks painted and weathered.

The tracks attached with CA glue.

Side view of the track. Through the lengthening of the hull the tracks are a few mm short. The gap will be hidden behind the chalk dispensers.

Apart from the conspicious boxes it looks like a normal M4A4 now. That will end when I return from my holidays, and will atach the flail to the hull.
See you in August! 
Wheels and tracks
My last update before the holidays.
Wheels and bogies painted.
And glued to the hull.
Sideview.
The old fashioned and difficult to work with Airfix rubber band tracks.
The tracks painted and weathered.
The tracks attached with CA glue.
Side view of the track. Through the lengthening of the hull the tracks are a few mm short. The gap will be hidden behind the chalk dispensers.
Apart from the conspicious boxes it looks like a normal M4A4 now. That will end when I return from my holidays, and will atach the flail to the hull.
See you in August!
-
huib
- Posts: 962
- Member since:
12 Dec 2015, 15:57
Hi huib,
excellent work again. For the chains, i use some really fine chains from ship modelling aftermarket. I try to find out, which brand it is. I often find such nice and useful things model exhibitions.
cheers Oke
excellent work again. For the chains, i use some really fine chains from ship modelling aftermarket. I try to find out, which brand it is. I often find such nice and useful things model exhibitions.
cheers Oke
-
GumSmith
- Posts: 376
- Member since:
09 Apr 2009, 16:38
Wiking wrote:August !

Have a nice holliday.

Do not forget your groupies are waiting.
I prefer to consider myself an admirer.
-
Bluefalchion
- Posts: 3575
- Member since:
23 Dec 2010, 07:57

Thank you very much guys, for all kind words! Back from holiday, and back to the bench. Below the first developments of a new modelling season:
How to connect a flail to a tank?
Well there is special construction for that. But first this:

This is the Airfix power-take-off, using the power of the tank engine, to rotate the flail.
From a modelling perspective more could be done with that. I'll make a new driveshaft of exact length later.

The construction on which the flail is hanging constructed on the Sherman, including the power-take-off.

A bit of olive green paint.

A dryfit including the turret, the chalk dispensers and the flail. The flail is temporarily fixed with two pieces of iron wire around with it can move up and down. I will replace threse later with proper axles.
Apart from a few details, the build is finished now, as is the base layer of paint. So now it's time for deacals and weathering and such.
How to connect a flail to a tank?
Well there is special construction for that. But first this:
This is the Airfix power-take-off, using the power of the tank engine, to rotate the flail.
From a modelling perspective more could be done with that. I'll make a new driveshaft of exact length later.
The construction on which the flail is hanging constructed on the Sherman, including the power-take-off.
A bit of olive green paint.
A dryfit including the turret, the chalk dispensers and the flail. The flail is temporarily fixed with two pieces of iron wire around with it can move up and down. I will replace threse later with proper axles.
Apart from a few details, the build is finished now, as is the base layer of paint. So now it's time for deacals and weathering and such.
-
huib
- Posts: 962
- Member since:
12 Dec 2015, 15:57
Very nice indeed.
I was watching these guys in action in the Scheldt campaign last night.
Fascinating stuff for which the Canadians got little recognition.
Best wishes,
Chris
I was watching these guys in action in the Scheldt campaign last night.
Fascinating stuff for which the Canadians got little recognition.
Best wishes,
Chris
-
C M Dodson

- Posts: 2568
- Member since:
01 May 2015, 18:48
C M Dodson wrote:I was watching these guys in action in the Scheldt campaign last night.
Fascinating stuff for which the Canadians got little recognition.
Indeed, nicknamed the Cinderella Army.
Luckily the Canadians get quite some recognition at memorials in the Netherlands, as they liberated big parts of the country in 1944 and 1945.
-
Santi Pérez likes this post. •
- Reply
-
huib
- Posts: 962
- Member since:
12 Dec 2015, 15:57
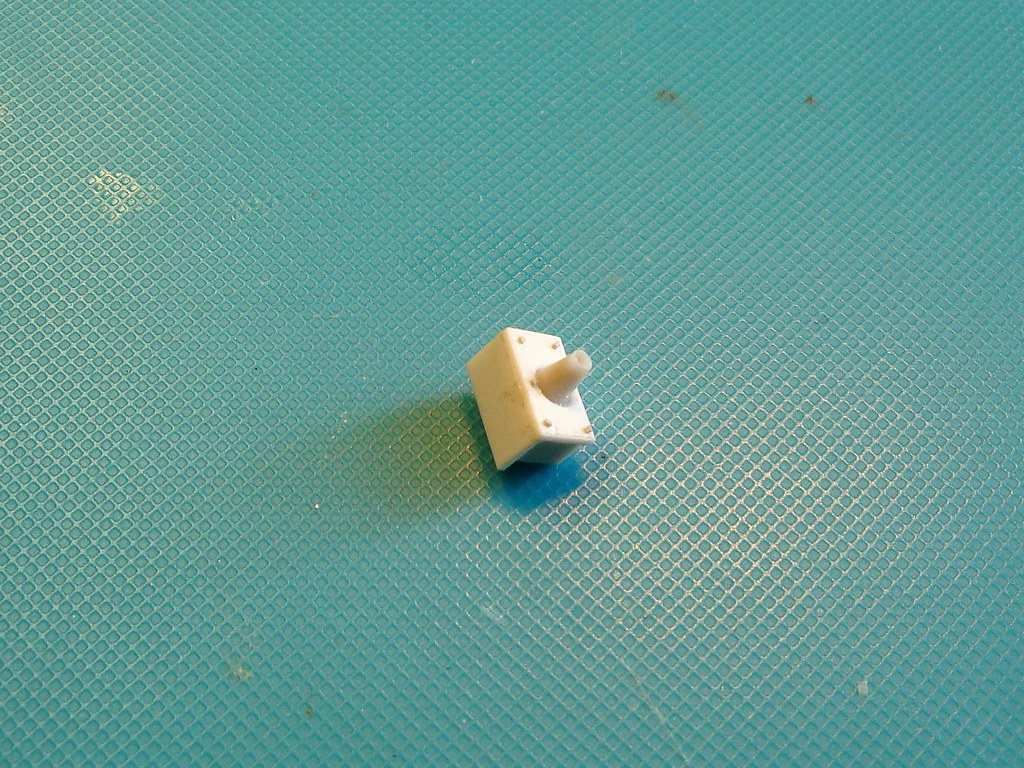
Hydraulic line
This summer I had the privilege to visit The Tank Museum in Bovington. And they have a beautiful Sherman Crab in their collection. There I discovered this detail, I missed until now:
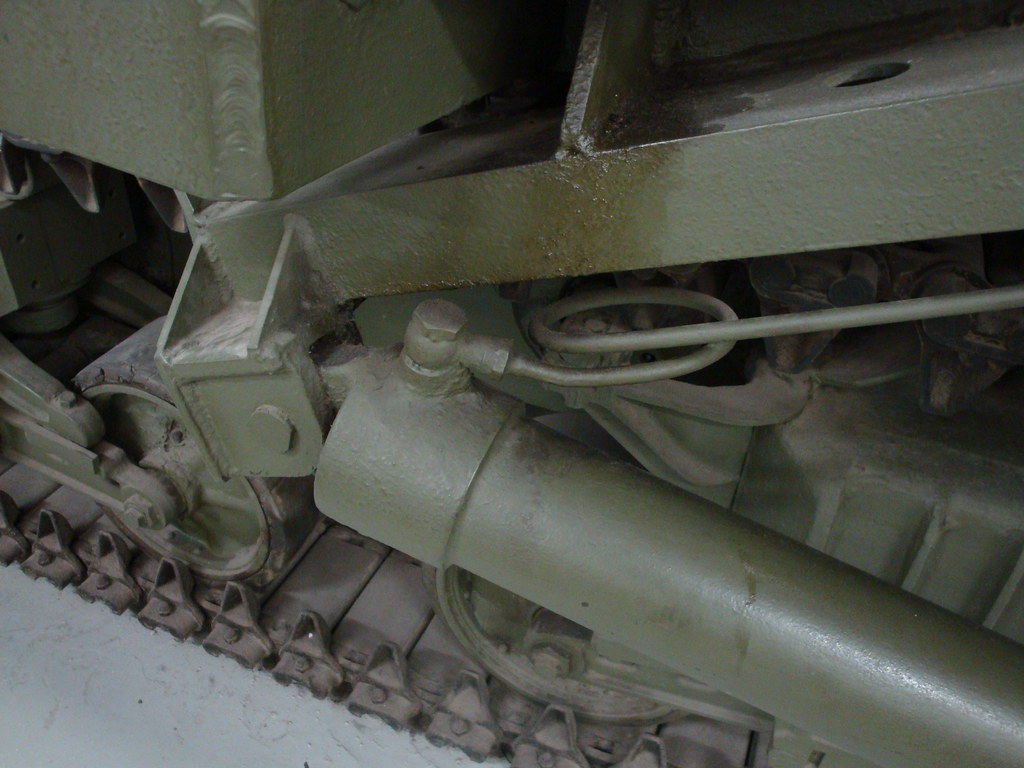
An hydraulic line, serving the cilinder that raises and lowers the flail.

With a bit of fiddling I managed to add it to my model.
This summer I had the privilege to visit The Tank Museum in Bovington. And they have a beautiful Sherman Crab in their collection. There I discovered this detail, I missed until now:
An hydraulic line, serving the cilinder that raises and lowers the flail.
With a bit of fiddling I managed to add it to my model.
-
huib
- Posts: 962
- Member since:
12 Dec 2015, 15:57
Decals and such
After two layers of gloss cote, the Sherman received a filter of olive green oil paint. I can't see anything of it with my bare eyes, neither on my pictures, so I think we can consider it extremely subtle color nuances!
After another coat of gloss I applied the decals:

The stars on the roof and sides are from an old Esci Sherman kit. Excellent decals of 35 years old!

The unit signs are from the Airfix kit: Westminster Dragoons of 79th Armoured Division. Also the tools and other details received some paint.

The turret numbers are a bit too small but are from Hesegawa and intended for German tanks!. The best I had in my sparebox.
The flail received a sloshwash with ocre oil paint in preparation for much more mud.
And now a small change of plan, as I decided to add some stowage before continuing the weathering process.
After two layers of gloss cote, the Sherman received a filter of olive green oil paint. I can't see anything of it with my bare eyes, neither on my pictures, so I think we can consider it extremely subtle color nuances!
After another coat of gloss I applied the decals:
The stars on the roof and sides are from an old Esci Sherman kit. Excellent decals of 35 years old!
The unit signs are from the Airfix kit: Westminster Dragoons of 79th Armoured Division. Also the tools and other details received some paint.
The turret numbers are a bit too small but are from Hesegawa and intended for German tanks!. The best I had in my sparebox.
The flail received a sloshwash with ocre oil paint in preparation for much more mud.
And now a small change of plan, as I decided to add some stowage before continuing the weathering process.
-
huib
- Posts: 962
- Member since:
12 Dec 2015, 15:57
Help keep the forum online!
or become a supporting member
Thanks, Gumsmith!
Stowage
To add some more interest to the Sherman I made some stowage and attached it to the tank.

Some duffle bags, packs and haversacks made from Milliput, an ammmunition box made of scrap plastic, and a tarp from paper tissue. The stowage is fixed on the engine deck with a piece of sewing thread.
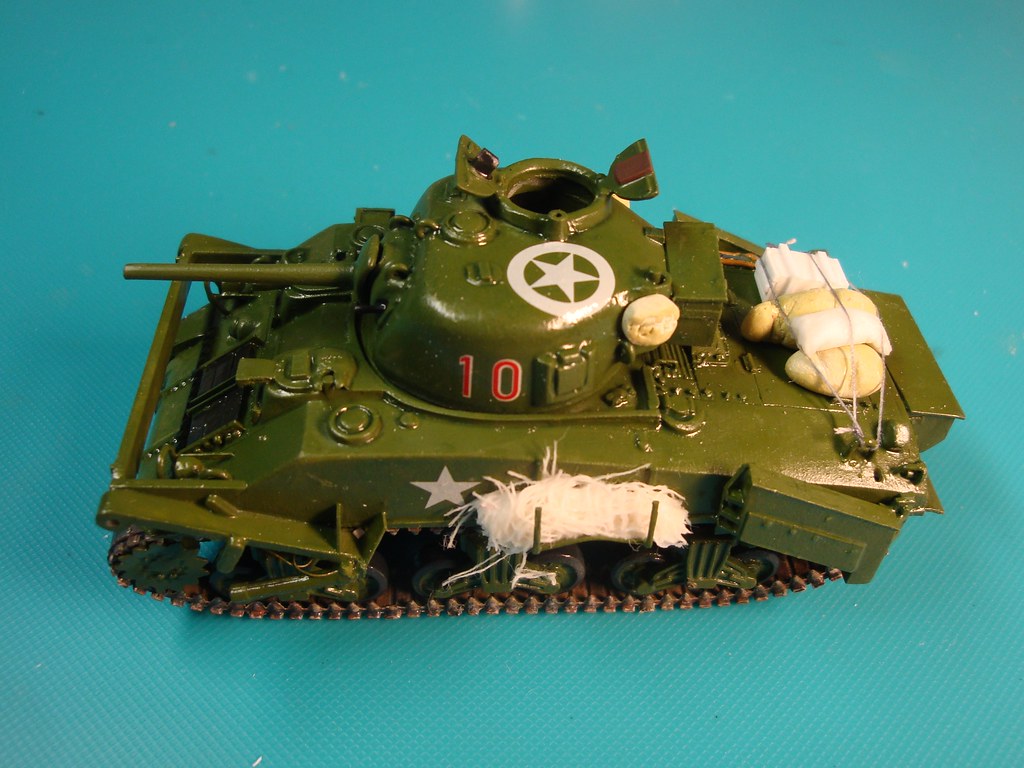
By lack of spare chains, I put a camouflage net in the rack, made from medical gauze. I still have to remove the ends sticking out.
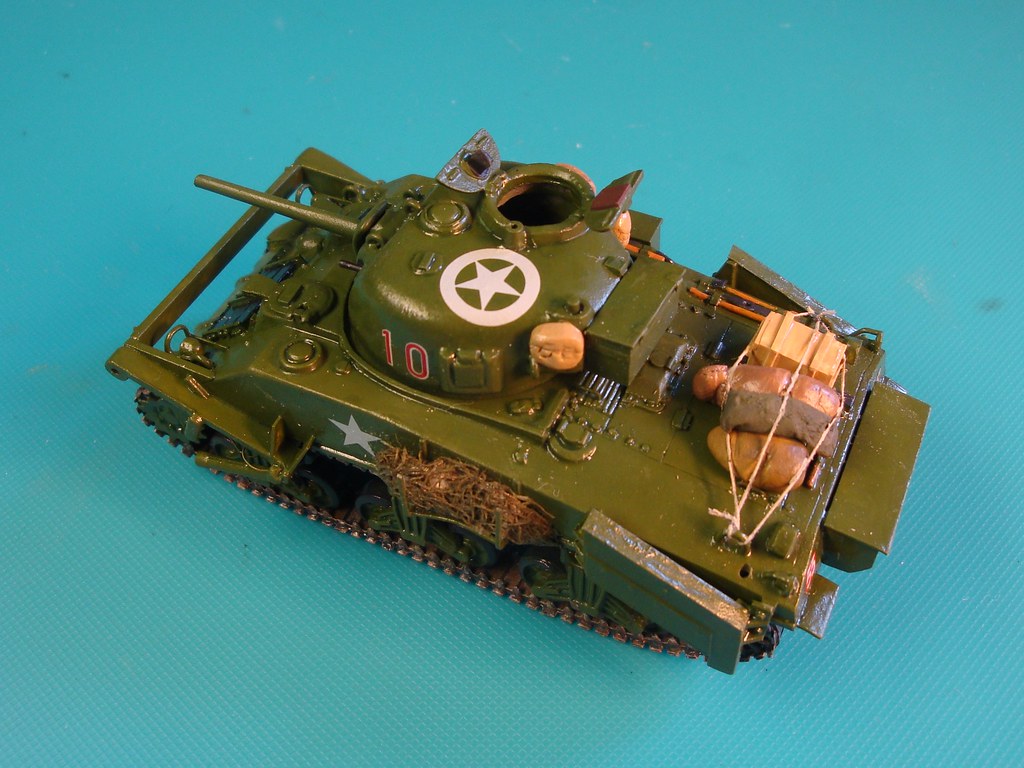
And a bit of paint on the stowage.
Now for a wash....
Stowage
To add some more interest to the Sherman I made some stowage and attached it to the tank.
Some duffle bags, packs and haversacks made from Milliput, an ammmunition box made of scrap plastic, and a tarp from paper tissue. The stowage is fixed on the engine deck with a piece of sewing thread.
By lack of spare chains, I put a camouflage net in the rack, made from medical gauze. I still have to remove the ends sticking out.
And a bit of paint on the stowage.
Now for a wash....
-
huib
- Posts: 962
- Member since:
12 Dec 2015, 15:57
I'm always happy when I can build a model straight from the box and that it looks like a tank at the end, but you?
I hate you! So many details and addiings that I get sick of it! = Not true! I admire what you can make of such a simple model! Keep it coming Huib and use lot's of these:

My favorite beer!

I hate you! So many details and addiings that I get sick of it! = Not true!
My favorite beer!
-

Peter
 Moderator
- Posts: 22507
- Member since:
25 Mar 2008, 18:51
Thanks, Peter, and take another beer. That will calm you down!
Weathering (1)
On the road with weathering the Sherman Crab:

A wash with diluted dark brown oil paint.

The excess of the wash removed again.

Some chipping with dark grey and dark brown paint on the flail arms...

....and on the turret.

Some rust on the heavy battered flail arms.

Some rain streaks and a bit of rust on the turret.

Rust and rainstreeks on the hull, and some remains of chalk on the chalkdispensers.

Fuel stains around the fuel caps.
The process of weathering is still going on. Some drybrushes, chipping with a pencil and a load of mud to come. And I also am still making changes to rust and rain streaks.
Weathering (1)
On the road with weathering the Sherman Crab:
A wash with diluted dark brown oil paint.
The excess of the wash removed again.
Some chipping with dark grey and dark brown paint on the flail arms...
....and on the turret.
Some rust on the heavy battered flail arms.
Some rain streaks and a bit of rust on the turret.
Rust and rainstreeks on the hull, and some remains of chalk on the chalkdispensers.
Fuel stains around the fuel caps.
The process of weathering is still going on. Some drybrushes, chipping with a pencil and a load of mud to come. And I also am still making changes to rust and rain streaks.
-
huib
- Posts: 962
- Member since:
12 Dec 2015, 15:57
49 posts
• Page 2 of 3 • 1, 2, 3