We make an experiment without canals and see were we have bubble(s). In that place(s), air can not escape. So we make a canal(s) that way the air can go in the canal(s) and leave from the copy

Work in Progress
Ancient Temple
86 posts
• Page 3 of 5 • 1, 2, 3, 4, 5
Just an opinion on canals.
We make an experiment without canals and see were we have bubble(s). In that place(s), air can not escape. So we make a canal(s) that way the air can go in the canal(s) and leave from the copy
We make an experiment without canals and see were we have bubble(s). In that place(s), air can not escape. So we make a canal(s) that way the air can go in the canal(s) and leave from the copy
-

Kostis Ornerakis
In memoriam- Posts: 1280
- Member since:
14 Feb 2016, 18:16
Kostis Ornerakis wrote:We make an experiment without canals and see were we have bubble(s). In that place(s), air can not escape. So we make a canal(s) that way the air can go in the canal(s) and leave from the copy
Kostis that is exactly what I did:
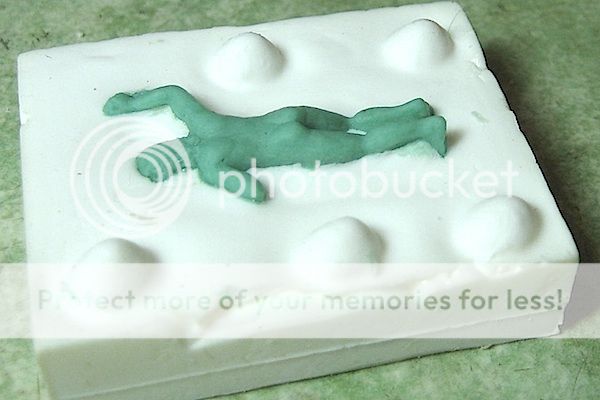
Airbubbles appeared especially in the face so I made handcut canals including one from the face like shown here in this 3 part mold:
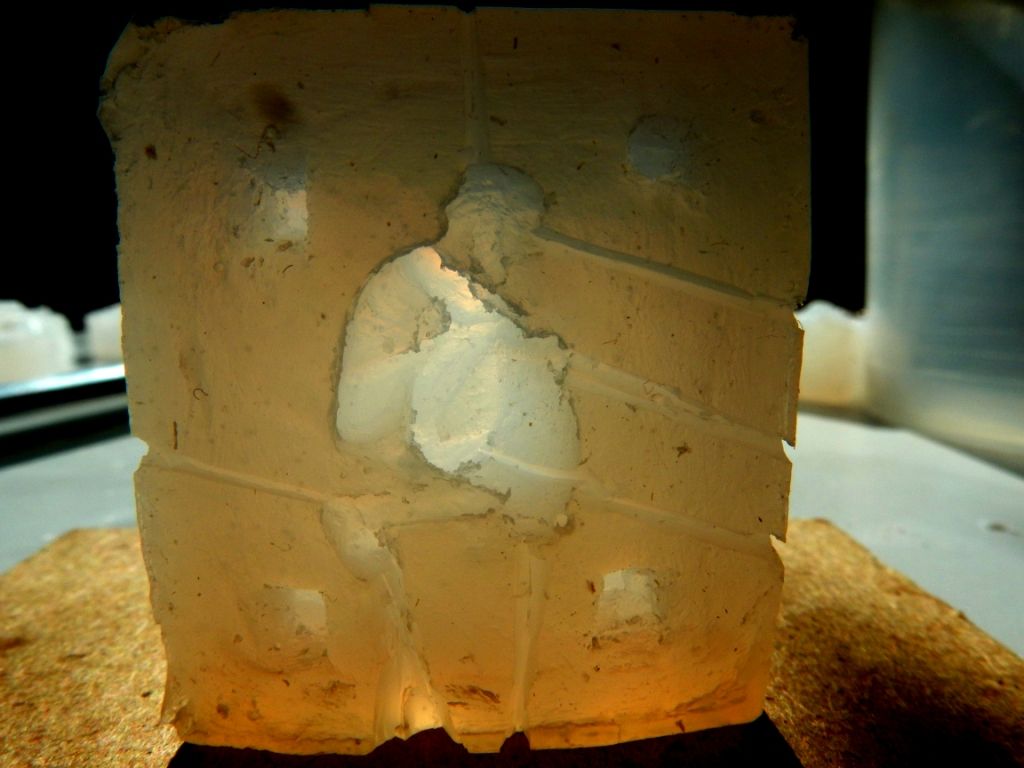
But a canal in the face is ruining my sculpting work.
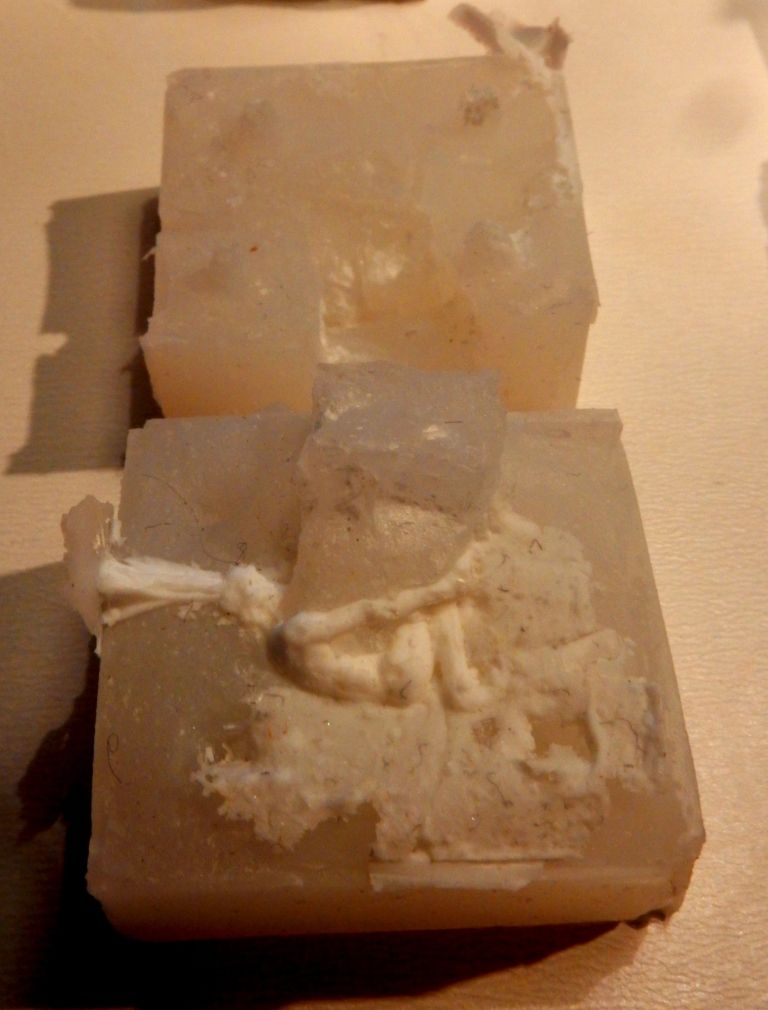
And if even with those extra canals from nose and chin, air bubbles appear like giant holes somewhere else in the face like shown here....
... so I started loosing hope. Thats why we need a vacuum machine.
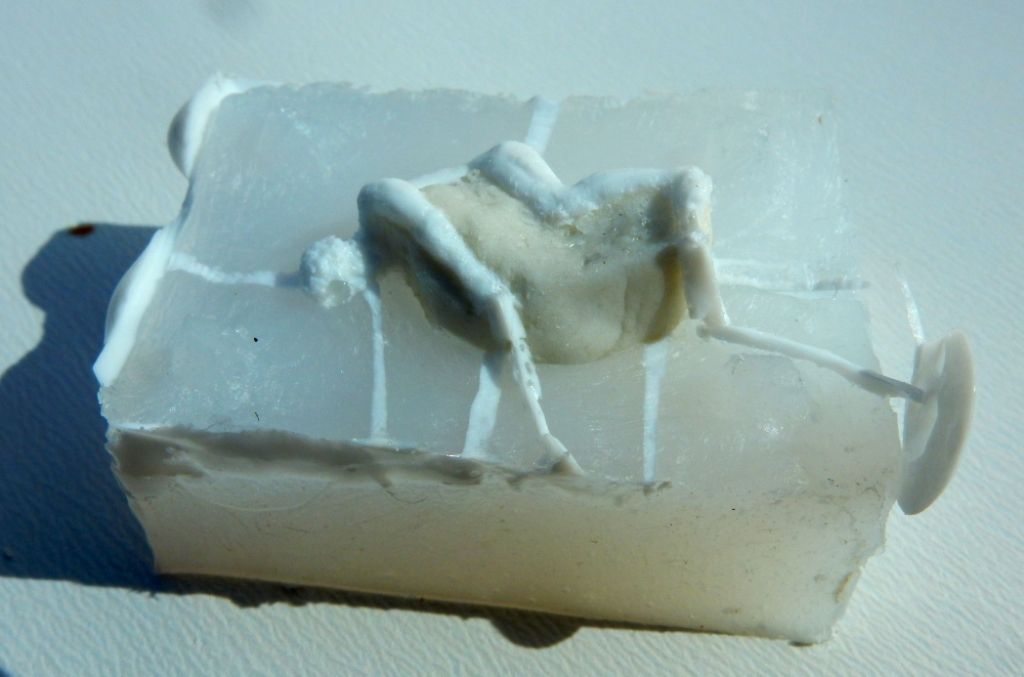
Notice the casting hole is at the ass (back) side of this standing figure and by injecting the resin I was expecting the airbubbles to go up and appear in the back of the head in stead of the downward face.... which did not happen.
Here you see another 3 part mold without any air canal at all. Instead I used baby powder and there appeared no air bubbles at the figures surface at all.
-

Cryns
 Supporting Business
- Posts: 1254
- Member since:
11 Nov 2015, 15:33


 Moderator
Frankzett wrote: I think these are satyrs in action....
Almost right Frankzett.
Pompeii?
Almost right Peter. Not every chunky sculpting is supposed to represent a burned body from Pompeii.
So try again.
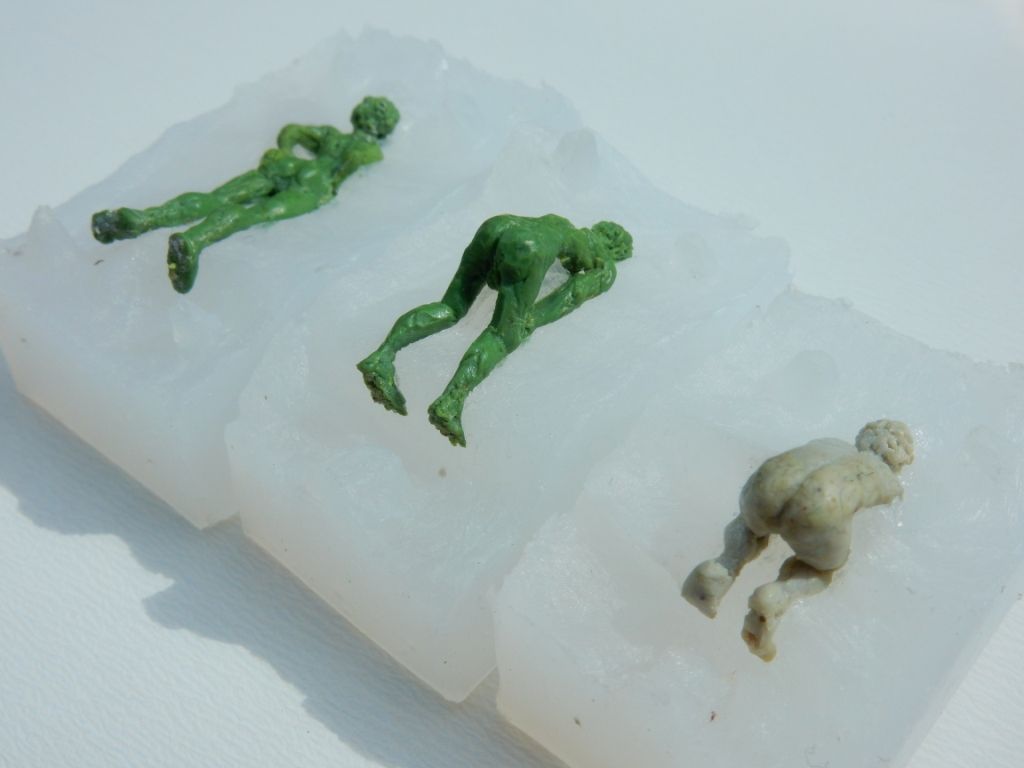
These guys say hello to both of you from Amsterdam
-
Cryns
- Supporting Business
- Posts: 1254
- Member since:
11 Nov 2015, 15:33
I think it's rather rude to say hello with your rear end! But that's maybe the way you do it in Amsterdam...
-

Susofrick
") Supporting Member (Gold)
Supporting Member (Gold) - Posts: 7681
- Member since:
19 Feb 2008, 12:10
Help keep the forum online!
or become a supporting member
I got mad for 3 or 4 year at the beginning, trying in different castin and moldmaking ways, then I gave up most of them, and a bit at time develped the method I explained... which I use nearly always, apart some particular cases of easy castings which I do in "traditional" ways...
Howevere is always good to know different ways, in order to choose the best one depending from the case.
All these tricks are useful, but require time and extra work, and in my particular case i prefer that other way, despite all the flash and the increased resin consumption… I still get some scraps, but less than in any other way I tried.
I tried siring injection too, and also even aspiration from air vents ducts system… but the resin was dripping everywhere, and the pressure often deformed the castings too much, due the soft molds.
I agree with Kostis, it's better do one or more tests without air vents, and then cut only where is needed…
Talcum powder or graphite often improve the casting and prevent many bubbles.
Vacuum chamber also works fine, but I doubt it can prevent some bubbles which get trapped in the difficult places... with my method I actually remove them manually (well, at least I try, not always succesfully as some unnoticed bubble sometimes come out)
It is also very important, in some cases, how to make the mold… a good choice of shape and mold lines, where and how the figure is positioned inside, a smooth surface, turning and shacking the mold while the resin is hardening… all these and other tricks can minimize the problems and scraps and improve the quality.
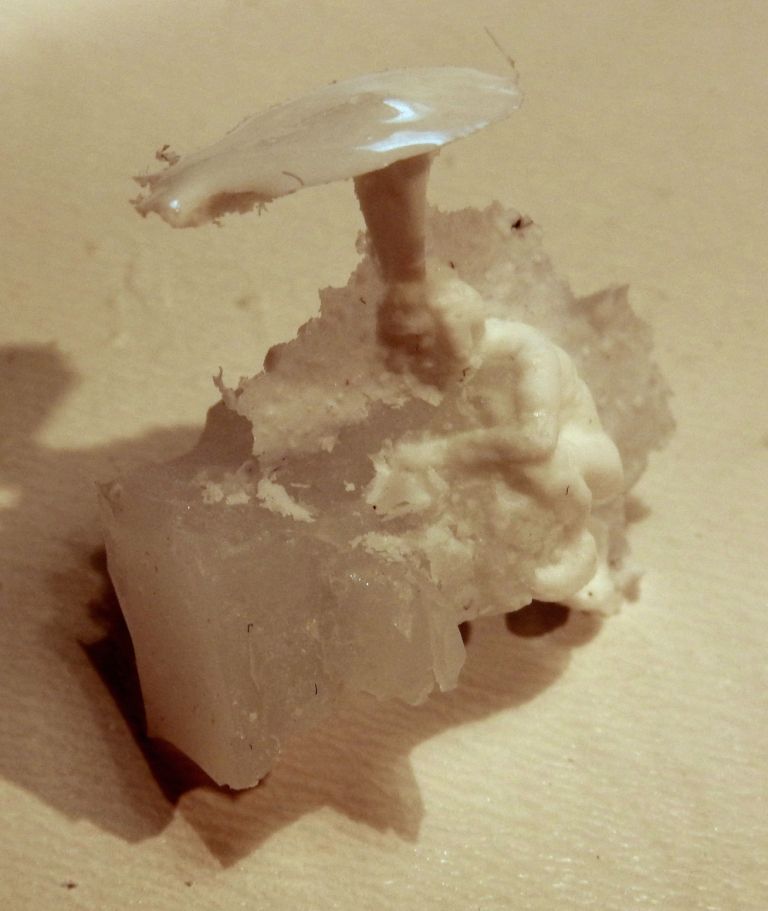
I'm not sure what you mean as matrix for the Chimera... once sculpted I just apply liquid wax and put the masters directly in the mold.
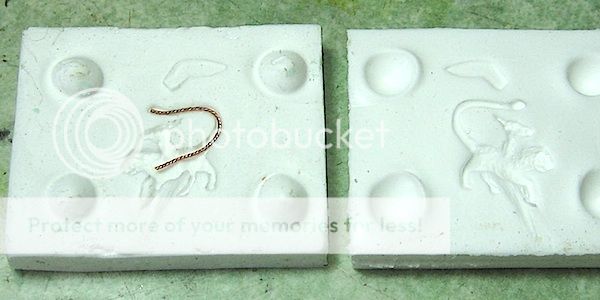
You can see the copper wire plait support in the mold
And in the other photos you can see Dionysos arm is inside the valve, you can tell also by the resin flash layer on the figures casted, where the relative cut allow to release the arm from the mold.
I make a little cut once the mold is hardened, or put a thin layer between the arm and the body (or to the inner surface of the mold), so I just have to spread a bit the hole bending the mold, and insert few drops to fill the hole before rest of the mold cavity.

Sometimes instead I give the mold a shape with mold lines which follow the sottosquadra, it depends from how deep and which position is the protrusion, and also from the softness of the mold… if I choose this or the other way.
Sometimes if the casting is too difficult I also make figures with separate parts to be assembled.
What else… a good trick for moldmaking, despite it waste a bit of silicon...
when i use molding silicon (non liquid bi-component) and the back of the figure have many details, sometimes I put the master on a first thin temporary valve which will be deleted, once made the second valve I remove that first one, and do it all over again to be sure the silicon fills all the details and cavities.
Very strong and interesting subjects those of the bodies of Pompeii!

I was asked to sculpt a similar set some time ago, but I made only the dog… another quite difficult shape to cast, I drove mad to cast few copies but I forgot to put it on my website.
Howevere is always good to know different ways, in order to choose the best one depending from the case.
All these tricks are useful, but require time and extra work, and in my particular case i prefer that other way, despite all the flash and the increased resin consumption… I still get some scraps, but less than in any other way I tried.
I tried siring injection too, and also even aspiration from air vents ducts system… but the resin was dripping everywhere, and the pressure often deformed the castings too much, due the soft molds.
I agree with Kostis, it's better do one or more tests without air vents, and then cut only where is needed…
Talcum powder or graphite often improve the casting and prevent many bubbles.
Vacuum chamber also works fine, but I doubt it can prevent some bubbles which get trapped in the difficult places... with my method I actually remove them manually (well, at least I try, not always succesfully as some unnoticed bubble sometimes come out)
It is also very important, in some cases, how to make the mold… a good choice of shape and mold lines, where and how the figure is positioned inside, a smooth surface, turning and shacking the mold while the resin is hardening… all these and other tricks can minimize the problems and scraps and improve the quality.
MrCyrns
Did you make a matrix first for this Chimera before you made the first silicon mold halve?
And how did you cast Dyonisus' left arm and hand with the wine cup since that part is projecting forward?
I'm not sure what you mean as matrix for the Chimera... once sculpted I just apply liquid wax and put the masters directly in the mold.
You can see the copper wire plait support in the mold
And in the other photos you can see Dionysos arm is inside the valve, you can tell also by the resin flash layer on the figures casted, where the relative cut allow to release the arm from the mold.
I make a little cut once the mold is hardened, or put a thin layer between the arm and the body (or to the inner surface of the mold), so I just have to spread a bit the hole bending the mold, and insert few drops to fill the hole before rest of the mold cavity.
Sometimes instead I give the mold a shape with mold lines which follow the sottosquadra, it depends from how deep and which position is the protrusion, and also from the softness of the mold… if I choose this or the other way.
Sometimes if the casting is too difficult I also make figures with separate parts to be assembled.
What else… a good trick for moldmaking, despite it waste a bit of silicon...
when i use molding silicon (non liquid bi-component) and the back of the figure have many details, sometimes I put the master on a first thin temporary valve which will be deleted, once made the second valve I remove that first one, and do it all over again to be sure the silicon fills all the details and cavities.
Very strong and interesting subjects those of the bodies of Pompeii!
I was asked to sculpt a similar set some time ago, but I made only the dog… another quite difficult shape to cast, I drove mad to cast few copies but I forgot to put it on my website.
-

Phersu
In memoriam- Posts: 706
- Member since:
15 May 2009, 19:13
Leonardo
I also used the same method as you do, successfully with 2 parts moulds, but I used a dental acrylic resin composed of powder and a water-like catalyst. The problem was that the final copy was a little shrinked.
If I had used a 1 part mould, things would be easier enough, as I could pour the catalyst first and add the powder then. Unfortunetly I can't remember the brand's name.
On the other hand when I tried with the epoxy resin I use now, as it is more liquid, never managed to find the correct timing to close the 2 halves.
I suggested Mr. Cryns at his begining to make 1 part moulds and to use small pieces of plastic as exactly you did with Dionysos hand with the cup.
Mr. Cryns
Try to pour from the legs. A base is handy. If I was you I should make the air vent from the back of the head.
-
Kostis Ornerakis
In memoriam- Posts: 1280
- Member since:
14 Feb 2016, 18:16

Kostis Ornerakis
I also used the same method as you do, successfully with 2 parts moulds, but I used a dental acrylic resin composed of powder and a water-like catalyst. The problem was that the final copy was a little shrinked.
If I had used a 1 part mould, things would be easier enough, as I could pour the catalyst first and add the powder then. Unfortunetly I can't remember the brand's name.
On the other hand when I tried with the epoxy resin I use now, as it is more liquid, never managed to find the correct timing to close the 2 halves.
Resin and even silicon have a little percent of shrinkage too, but is almost unnoticeable... bi component epoxy compounds always develope heat when hardening, and a warm or hot piece just hardened tent to shrink when cooling, and I think is unavoidanle... if I pay attention I notice the difference between summer and winter castings!
There are some things that can be casted with 1 part mold, but it takes a softer silicon, and as far as I know only some relatively simple shape can be done with one valve mold, because air bubbles remain trapped in the complex shapes, and such complex shapes are too difficult to pull out from the mold, without damaging the casting itself or the mold.
Besides, I casted all the temple parts and the altar and pedestals this way, except the columns and figures which of course need bi valves molds.
It's a tricky thing closing the sandwich mold in the right time... if the resin is too liquid there's te risk that it leaks out from the cavity, if it's becoming too dense the casting will come out deformed and with avery thick flash all around.
Is not easy to learn to fully exploit the "pot life" (liquid state) time of resin, it takes a lot of practice (and eventually an allarm clock) to get all the things done in the right time... mixing and leaking resin, filling all the gaps, removing all the bubbles, and eventually close the mold in our case)

Sometines even just 10 or 20 seconds can make the difference... and differences of temperature may make quicker the pot life, or extend it.
However, there are several different resins available, most modelling resins have a pot life of 30 seconds to one minute, but some others remain liquid much longer.
For difficult and large castings in fact I use a resin with a pot life of two or three minutes, that allow enough time to pour the compound and eliminate the bubbles, the hardening also takes much longer.
It is also cheaper too, but the only problem is that is available only in 5 kilograms cans... which means 10 litres of resin compound to cast, and the resin expires after a while!
I know that there are some compounds to extend the pot life and delay the the hardening, but i never used them.
And now, the last character I just finished today, as announced: Asklepios!

-
Phersu
In memoriam- Posts: 706
- Member since:
15 May 2009, 19:13
Wow! This Asklepios is really stunning! And it is one of those things that have (to my knowledge) never been done before in our 1/72 world. Which means it really fills a gap, given the popularity and omnipresence of this god in antiquity.
-

sberry
- Posts: 934
- Member since:
12 Mar 2010, 20:37
Thank you so much for answering my questions and explaining all these techniques
I love your Asklepios!
And sorry for messing up your topic with items and jokes that are very off topic
To stop that I started my own casting, molding & sculpting topic yesterday.
That is what I would expect to happen too. Phersu what kind and brand is that grey resin you use?
I tried all that. Small pieces of plastic (in my case a glue membrane) worked very well.
Several one valve cylindric molds were less succesfull: with or without talcum powder inside, injecting or pouring the resin, even with a simple amphora shape I still kept having problems with filling up the lowest parts of the mold properly.
Kostis do you cut (in this case: drill) air canals in your cylindric molds?
This is my experience too. The bearded head got stuck in the bottom of the mold.
My experience is there is less air bubbles in the faces when I inject resin from the top of the head and cut two air vent canals at both feet just below the toes.
Thats just a word I copied from Sho but he may use an unusual translation for this temporary clay or plasticine mold.
Where do you apply wax? And why? Since the sculpting will not stick to the silicone. I do use cooking oil as parting agent but only to keep the two rubber valves separate from each other when casting the second valve.
Why use non liquid bi-component silicon in the first place?
How do you apply that? With a brush? Or pressing it?
What I do not get: you press your figure in the first valve when it is a wet, silicon surface.
After 3 days that is dry.
How do you add the other valve: I would say: pour it on top of that.
But that is not possible with silicone kit.
Do you press it on top of the first valve?
But then there will be air bubbles under it.
Or do you apply different thin layers by brush, like when making a latex casting?
I love your Pompeii dog! Thats the most difficult shape I have ever seen.
Please don't show this to Stenfalk, he will not sleep for days after seeing this suffering animal.
Why didn't you finish the rest of the Pompeii figures?
I love your Asklepios!
And sorry for messing up your topic with items and jokes that are very off topic
To stop that I started my own casting, molding & sculpting topic yesterday.
Kostis Ornerakis wrote:when I tried with the epoxy resin I use now, as it is more liquid, never managed to find the correct timing to close the 2 halves.
That is what I would expect to happen too. Phersu what kind and brand is that grey resin you use?
Kostis Ornerakis wrote:I suggested Mr. Cryns at his begining to make 1 part moulds and to use small pieces of plastic as exactly you did with Dionysos hand with the cup.
I tried all that. Small pieces of plastic (in my case a glue membrane) worked very well.
Several one valve cylindric molds were less succesfull: with or without talcum powder inside, injecting or pouring the resin, even with a simple amphora shape I still kept having problems with filling up the lowest parts of the mold properly.
Kostis do you cut (in this case: drill) air canals in your cylindric molds?
Phersu wrote:only some relatively simple shape can be done with one valve mold, because air bubbles remain trapped in the complex shapes, and such complex shapes are too difficult to pull out from the mold, without damaging the casting itself or the mold.
This is my experience too. The bearded head got stuck in the bottom of the mold.
Kostis Ornerakis wrote:Try to pour from the legs.
My experience is there is less air bubbles in the faces when I inject resin from the top of the head and cut two air vent canals at both feet just below the toes.
Phersu wrote:I'm not sure what you mean as matrix for the Chimera
Thats just a word I copied from Sho but he may use an unusual translation for this temporary clay or plasticine mold.
Phersu wrote:once sculpted I just apply liquid wax and put the masters directly in the mold.
Where do you apply wax? And why? Since the sculpting will not stick to the silicone. I do use cooking oil as parting agent but only to keep the two rubber valves separate from each other when casting the second valve.
Phersu wrote:when i use molding silicon (non liquid bi-component) and the back of the figure have many details, sometimes I put the master on a first thin temporary valve which will be deleted
Why use non liquid bi-component silicon in the first place?
How do you apply that? With a brush? Or pressing it?
What I do not get: you press your figure in the first valve when it is a wet, silicon surface.
After 3 days that is dry.
How do you add the other valve: I would say: pour it on top of that.
But that is not possible with silicone kit.
Do you press it on top of the first valve?
But then there will be air bubbles under it.
Or do you apply different thin layers by brush, like when making a latex casting?
I love your Pompeii dog! Thats the most difficult shape I have ever seen.
Please don't show this to Stenfalk, he will not sleep for days after seeing this suffering animal.
Why didn't you finish the rest of the Pompeii figures?
-
Kostis Ornerakis likes this post. •
- Reply
-
Cryns
- Supporting Business
- Posts: 1254
- Member since:
11 Nov 2015, 15:33
Kostis do you cut (in this case: drill) air canals in your cylindric molds?
No but I make a cut with a fresh 11 blade through the hole, after I have pull out the master. In the copy you can see a much thinner line than this remaining from a 2 parts mould. Practically, I convert the single to a double mould, without having 2 pieces.
The advantages: you have not to worry if the 2 halves fit together and having cut much lower than the head top, I can brush resin to every detail of the face. Don't forget to shake the mould half full with resin to any direction as an extra measure against bubbles.
-
Kostis Ornerakis
In memoriam- Posts: 1280
- Member since:
14 Feb 2016, 18:16
Yes, I remember that way of yours very well.
The reason I did not try that applying with a brush and shaking the first half of resin is because the potlife is only 30 seconds: that is not even enough to mix two components properly together, insert it in the syringe, remove the air from the syringe and inject it into the mold . But if a try to work extremely fast, it might work.
And you probably don't use the syringe at all for this.
I'll try again.
-
Cryns
- Supporting Business
- Posts: 1254
- Member since:
11 Nov 2015, 15:33
Help keep the forum online!
or become a supporting member
Thank you my friends!
Yes, a set of such mithological and historical famous characters is a good idea!
As far as I know the only relatively similar figure existing was the man with the stick from the Atlantic set "Life in the Acropolis"
I thought to use it some time ago converting him in some kind of Asklepios, simply rolling a snake in a spyral on his stick... but now I preferred to make a totally brand new proper figure for such important character.
And this time Asklepios came out better than the previous figures... I definitely needed a little practice to return at ease sculpting figures… after some months spent making buildings and casting!
Perhaps all those off topics would deserve a thread about moldmaking and casting… but with the right keywords on forum search engine and a little patience who's looking for these subjects can find our discussion anyway.
And jokes are always welcome and mostly appreciated too! 
I used Syntafoam resin from Prochima, I colored it green just adding a drop of matt enamel in the compound.
I discovered colored resins recently, and I started few months ago because the details become much more visible, and imperfections too (so I can avoid primer and paints)
Details can be seen much cleare both in reality and in photos… and I think the colored figures look nicer too, compared to white or light yellow raw resin.
Sometimes I use dry pigments powder, I know someone uses inks but I think it reduces less the translucent look of resin, I perfer matt looking.
I'm not expert in this, I'm still experimenting...
The only recommendations I know are to avoid too hich percent of extra addings that may alterate the compound (I never exceed a 5% ot total)...
And water based colors are to be avoided, as water and even just excess of humidity cause many problems to the castings!
Of course coloring resin have pros and cons...
A slight change of of the hardened resin thickness and structure is obvios, which may be a problem or not, for example I noticed that dry pigments podwer don't alterate much the hardened thickness, while with enamels instead I noticed is more difficult to smooth the surfaces once hardened, and the resin seem to remain slightly more flexible.
What else... most modeling resins are transparent when liquid, they become translucent and gain opacity hardening, so when pouring you can see eventual bubbles remained in the cavity and remove hem before to close the mold, the colored resin, colored resin loses transparency already when liquid.
Single valve molds are very good for large objects without deep protrusions, especially when they miniature have a large base which makes easier to pull it out from the mold.
I don't make any air vent in the single valve molds, and I don't pay much care about bubbles when filling the cavity,.. once almost filled I deep a tip in the liquid resin, and move it along the corners where eventual bubbles may get stuck, gently but quickly... so hopefully all the bubbles (or at least most) come up to the surface and can be eliminated, before to fill completely the mold.
Those problems of bubbles made me gave up the traditional castings, in my case I would just fill manually the beards and other protruding sottosquadras, before to fill all the rest... like for Dionysos glass of wine.
Despite this way I can't cast more than 2 or 3 figures at time, and just one in case of difficult shapes... of course i want to avoid scraps and get good quality castings.
Oh, I get it now...
Yes, that's what I mets as forst provisory bottom base, I'll explain below with the moldmaking.
I apply liquid wax because not all silicons don't stuck to models, sometimes it depends from the materials of the model is made of… resin also seals eventual tiny holes and gaps in the sculpting, which tent to grip to the mold.
I still remember when I was a beginner, when I ruined a couple of quite valuable figures because they welded to the silicon of the mold!
However, after that bad experience, I always use wax just for safety, also because it makes much more easier the releasing of the master, reducing the risk of damages and breaking...
Another good point for using release agents is that liquid wax comes in two kind: glossy or matt finish... it doesn't work with all silicons and resins (and I stii haven't understood why )
Of course I prefer matt finishing, so the castings surfaces are still smooth but a with a very fine and invisible roughness, which make the painting much easier afterwards.
Paste silicon is very useful in some situations, and can be a practical alternative to the first bottom base in plasticine... which I find very annoying and difficult to remove
A provisory bottom base in silicon instead comes away completely in just one piece, withour any remains, and it takes fes seconds just pulling it away gently.
Usually for bi valves I fill a frame of lego bricks with paste silicon, and flat the surface with a wet finger, then I press the figures on it at the right depth. Sometimes I leave the flat surface, sometimes instead I add more silicon bits to reach the parts lifted from the surface... just like with plasticine, despite it's more difficult to flat the silicon surface (evrything have pros and cons).
Ar this point the first valve (or the provisory bottom base is done, just like in the previous photo of the Chimera and Dionysos molds.
Once hardened I add further lego bricks to make the frame higher, apply liquid wax, and then I may drop the liquid silicon for the first valve….
Or otherwise, I can apply the paste instead, directly from the silcon tube nozzle in cae of simle shapes, or with a spatula (a bit tricky) to be sure all the figure surface is covered and the details filled, and no air bubbles remain on the mold surface… hopefully! (and possibly also inside, especially close to the figure cavity, to avoid bumps in the casting.
Is possible to make more layers with paste silicon, but sometimes is not advisable as the mold would result weaker, and probably it will suffer more and more unregular shrinkage… different silicone parts hardened at different times don't weld perfectly, is not like one single block.
Once the paste silicon is dried the mold is ready… In case of first provisory valve I open the bottom of the frame and I pull it away, and I repeat the process to make a second (third actually) definitive valve.
Thank you, the Pompey dog has a shape that is a real nightmare for moldmaking and casting.
I didn't make human bodies because other works to do, despite quite simple and easy to do... pity! also because we didn't went ahead planning which bodies to do with the friend who asked for this first dog at beginning.
That's another good way! is very practical with some shapes and especially with softer molds... despite is a bit difficult to cut the mold in the right and better way, and sometimes there's the risk to damage the master inside.
Another problem is that without positioning dents and studs is difficult to keep the two valves perfectly alligned... besides, sometimes the mold don't have to be completely splitted in two, in some cases it can be enough just to cut till one half, which is sufficient to release some pieces, while the mold will keep positioned automatically by itself, kept hold from the part uncut.
Yes, a set of such mithological and historical famous characters is a good idea!
sberry
Wow! This Asklepios is really stunning! And it is one of those things that have (to my knowledge) never been done before in our 1/72 world. Which means it really fills a gap, given the popularity and omnipresence of this god in antiquity.
As far as I know the only relatively similar figure existing was the man with the stick from the Atlantic set "Life in the Acropolis"
I thought to use it some time ago converting him in some kind of Asklepios, simply rolling a snake in a spyral on his stick... but now I preferred to make a totally brand new proper figure for such important character.
And this time Asklepios came out better than the previous figures... I definitely needed a little practice to return at ease sculpting figures… after some months spent making buildings and casting!
Mr. Cryns
Thank you so much for answering my questions and explaining all these techniques
I love your Asklepios!
And sorry for messing up your topic with items and jokes that are very off topic
To stop that I started my own casting, molding & sculpting topic yesterday.
Perhaps all those off topics would deserve a thread about moldmaking and casting…
And jokes are always welcome and mostly appreciated too!
Mr. Cyrns
That is what I would expect to happen too. Phersu what kind and brand is that grey resin you use?
I used Syntafoam resin from Prochima, I colored it green just adding a drop of matt enamel in the compound.
I discovered colored resins recently, and I started few months ago because the details become much more visible, and imperfections too (so I can avoid primer and paints)
Details can be seen much cleare both in reality and in photos… and I think the colored figures look nicer too, compared to white or light yellow raw resin.
Sometimes I use dry pigments powder, I know someone uses inks but I think it reduces less the translucent look of resin, I perfer matt looking.
I'm not expert in this, I'm still experimenting...
The only recommendations I know are to avoid too hich percent of extra addings that may alterate the compound (I never exceed a 5% ot total)...
And water based colors are to be avoided, as water and even just excess of humidity cause many problems to the castings!
Of course coloring resin have pros and cons...
A slight change of of the hardened resin thickness and structure is obvios, which may be a problem or not, for example I noticed that dry pigments podwer don't alterate much the hardened thickness, while with enamels instead I noticed is more difficult to smooth the surfaces once hardened, and the resin seem to remain slightly more flexible.
What else... most modeling resins are transparent when liquid, they become translucent and gain opacity hardening, so when pouring you can see eventual bubbles remained in the cavity and remove hem before to close the mold, the colored resin, colored resin loses transparency already when liquid.
Mr. Cyrns
I tried all that. Small pieces of plastic (in my case a glue membrane) worked very well.
Several one valve cylindric molds were less succesfull: with or without talcum powder inside, injecting or pouring the resin, even with a simple amphora shape I still kept having problems with filling up the lowest parts of the mold properly.
Single valve molds are very good for large objects without deep protrusions, especially when they miniature have a large base which makes easier to pull it out from the mold.
I don't make any air vent in the single valve molds, and I don't pay much care about bubbles when filling the cavity,.. once almost filled I deep a tip in the liquid resin, and move it along the corners where eventual bubbles may get stuck, gently but quickly... so hopefully all the bubbles (or at least most) come up to the surface and can be eliminated, before to fill completely the mold.
Those problems of bubbles made me gave up the traditional castings, in my case I would just fill manually the beards and other protruding sottosquadras, before to fill all the rest... like for Dionysos glass of wine.
Despite this way I can't cast more than 2 or 3 figures at time, and just one in case of difficult shapes... of course i want to avoid scraps and get good quality castings.
Mr. Cyrns
Thats just a word I copied from Sho but he may use an unusual translation for this temporary clay or plasticine mold.
Oh, I get it now...
Yes, that's what I mets as forst provisory bottom base, I'll explain below with the moldmaking.
Mr.Cyrns
Where do you apply wax? And why? Since the sculpting will not stick to the silicone. I do use cooking oil as parting agent but only to keep the two rubber valves separate from each other when casting the second valve.
I apply liquid wax because not all silicons don't stuck to models, sometimes it depends from the materials of the model is made of… resin also seals eventual tiny holes and gaps in the sculpting, which tent to grip to the mold.
I still remember when I was a beginner, when I ruined a couple of quite valuable figures because they welded to the silicon of the mold!
However, after that bad experience, I always use wax just for safety, also because it makes much more easier the releasing of the master, reducing the risk of damages and breaking...
Another good point for using release agents is that liquid wax comes in two kind: glossy or matt finish... it doesn't work with all silicons and resins (and I stii haven't understood why
Of course I prefer matt finishing, so the castings surfaces are still smooth but a with a very fine and invisible roughness, which make the painting much easier afterwards.
Mr.Cyrns
Why use non liquid bi-component silicon in the first place?
How do you apply that? With a brush? Or pressing it?
What I do not get: you press your figure in the first valve when it is a wet, silicon surface.
After 3 days that is dry.
How do you add the other valve: I would say: pour it on top of that.
But that is not possible with silicone kit.
Do you press it on top of the first valve?
But then there will be air bubbles under it.
Or do you apply different thin layers by brush, like when making a latex casting?
Paste silicon is very useful in some situations, and can be a practical alternative to the first bottom base in plasticine... which I find very annoying and difficult to remove
A provisory bottom base in silicon instead comes away completely in just one piece, withour any remains, and it takes fes seconds just pulling it away gently.
Usually for bi valves I fill a frame of lego bricks with paste silicon, and flat the surface with a wet finger, then I press the figures on it at the right depth. Sometimes I leave the flat surface, sometimes instead I add more silicon bits to reach the parts lifted from the surface... just like with plasticine, despite it's more difficult to flat the silicon surface (evrything have pros and cons).
Ar this point the first valve (or the provisory bottom base is done, just like in the previous photo of the Chimera and Dionysos molds.
Once hardened I add further lego bricks to make the frame higher, apply liquid wax, and then I may drop the liquid silicon for the first valve….
Or otherwise, I can apply the paste instead, directly from the silcon tube nozzle in cae of simle shapes, or with a spatula (a bit tricky) to be sure all the figure surface is covered and the details filled, and no air bubbles remain on the mold surface… hopefully! (and possibly also inside, especially close to the figure cavity, to avoid bumps in the casting.
Is possible to make more layers with paste silicon, but sometimes is not advisable as the mold would result weaker, and probably it will suffer more and more unregular shrinkage… different silicone parts hardened at different times don't weld perfectly, is not like one single block.
Once the paste silicon is dried the mold is ready… In case of first provisory valve I open the bottom of the frame and I pull it away, and I repeat the process to make a second (third actually) definitive valve.
Mr. Cyrns
I love your Pompeii dog! Thats the most difficult shape I have ever seen.
Please don't show this to Stenfalk, he will not sleep for days after seeing this suffering animal.
Why didn't you finish the rest of the Pompeii figures?
Thank you, the Pompey dog has a shape that is a real nightmare for moldmaking and casting.
I didn't make human bodies because other works to do, despite quite simple and easy to do... pity! also because we didn't went ahead planning which bodies to do with the friend who asked for this first dog at beginning.
Kostis Ornerakis
Kostis do you cut (in this case: drill) air canals in your cylindric molds?
No but I make a cut with a fresh 11 blade through the hole, after I have pull out the master. In the copy you can see a much thinner line than this remaining from a 2 parts mould. Practically, I convert the single to a double mould, without having 2 pieces.
The advantages: you have not to worry if the 2 halves fit together and having cut much lower than the head top, I can brush resin to every detail of the face. Don't forget to shake the mould half full with resin to any direction as an extra measure against bubbles.
That's another good way! is very practical with some shapes and especially with softer molds... despite is a bit difficult to cut the mold in the right and better way, and sometimes there's the risk to damage the master inside.
Another problem is that without positioning dents and studs is difficult to keep the two valves perfectly alligned... besides, sometimes the mold don't have to be completely splitted in two, in some cases it can be enough just to cut till one half, which is sufficient to release some pieces, while the mold will keep positioned automatically by itself, kept hold from the part uncut.
-
Phersu
In memoriam- Posts: 706
- Member since:
15 May 2009, 19:13
Mr. Cryns wrote:Yes, I remember that way of yours very well.
The reason I did not try that applying with a brush and shaking the first half of resin is because the potlife is only 30 seconds: that is not even enough to mix two components properly together, insert it in the syringe, remove the air from the syringe and inject it into the mold . But if a try to work extremely fast, it might work.
And you probably don't use the syringe at all for this.
I'll try again.
Gosh! only 30 seconds are a very short time indeed...
It can work and be useful for small simple shapes, but if even mixing properly the compound is a problem... it many result in a bad quality casting with parts not hardened properly.
The quickest resin I use for figures have to be mixed for 10-20 seconds, depending from the temperature and the amount of compound, to be sure the compound gets homogeneous properly.
Then I have about 30-40 second while is very liquid, and further 20-30 seconds while it's still fluid enough to allow some operations.
Of course talking about small quantities of quick resin to cast one or two difficult figures at time... the pot life of the other resin I use is 2 or 3 times longer, very useful for vey difficult castings and large simple objects (like the temple parts)
-
Phersu
In memoriam- Posts: 706
- Member since:
15 May 2009, 19:13
Mr. Cryns wrote:The reason I did not try that applying with a brush
This reminds me my "stampede" to cast the temple roof!
Quick quick quick!

Despite the longer pot life resin, it was a challenge to drop the resin along the corners, and fill all the rest trying to brush the resin meanwhile, all along all those rows of tyles, on such large surface!
All to be done before the resin begin to harden... to avoid, or at least reduce the eventual air bubbles.
-
Phersu
In memoriam- Posts: 706
- Member since:
15 May 2009, 19:13
Phersu wrote:
Another problem is that without positioning dents and studs is difficult to keep the two valves perfectly alligned... besides, sometimes the mold don't have to be completely splitted in two, in some cases it can be enough just to cut till one half, which is sufficient to release some pieces, while the mold will keep positioned automatically by itself, kept hold from the part uncut.
I completely agree with you
In this post I have 2 photos of what I mean cut: viewtopic.php?f=78&t=18851&start=20
Mr. Cryns
The potlife of the resin I use is more than 2 min. And I also add 1-2 drops of enamel in Polyol.
-
Kostis Ornerakis
In memoriam- Posts: 1280
- Member since:
14 Feb 2016, 18:16
86 posts
• Page 3 of 5 • 1, 2, 3, 4, 5