Gallery

1/90 Santa Maria's crew

Posted by Cryns on 21 Jun 2016, 11:38

Dear Kostis,

Thanks for your Greek hospitality! I look forward to make a Cretan ancient and medieval history tour with you as our guide and having salted olives and sardines for breakfast 8)

Thank you so much for the casting information. Some questions:

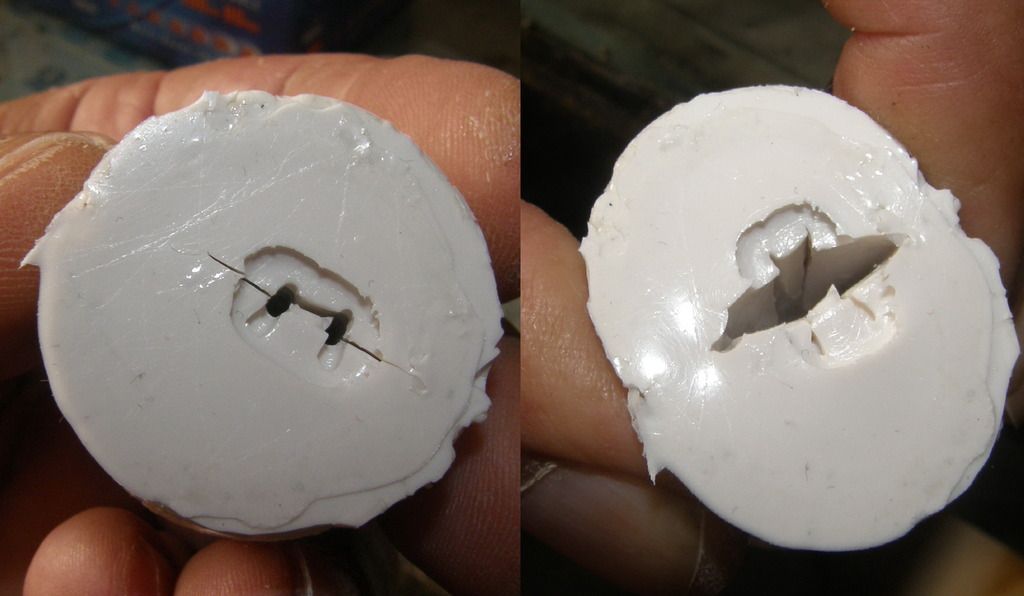
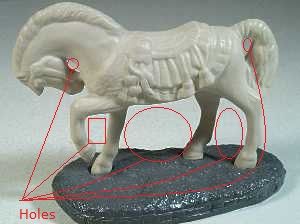
Kostis Ornerakis wrote:gluing thin pieces of plastic sheet to the holes


What holes? Is this the part where you explain how to make the mold itself by building a casting-chamber using four plastic 'walls'? Or are you referring to the casting of the resin itself?

If the last is the case: You mean the single cut you made into the rubber cylinder to take your original out? Or the funnel-hole for pouring the resin into the mould?

Is this the cylindrical technique you are referring to?

https://www.youtube.com/watch?v=Zs9SBpday84

I tried this technique but I could not find my tiny figure anymore in my tiny cylindre since my rubber is not transparent. Also my master figures have no stand to fix them with glue at the bottom of the cylinder so it sank to the bottom side of the cylinder.
Did you glue your (also stand-less) sailors with their feet to the base of the cylinder before adding the liquid moulding rubber?

Kostis Ornerakis wrote:with my thump on the hole I shake the mold


This is very interesting Kostis! I will try this at home!
So it is not poisonous like the epoxy I made my rivers with? I had to wear gloves and safety glasses for that but it was called 'Tar Bender' so another product.

Kostis Ornerakis wrote:Do I avoid bubbles at all? NO but i fill here and there with streched sprue.
You mean heating some plastic with a lighter? You use that as sculpting emulsion?

Anyway, it is very good you remind me my own casts don't have to be perfect and I can always repair faults with putty.

Our moderator Paul posted a very interesting video many years ago somewhere on this forum. Thanks for that Paul, it looks very helpfull for me too:

http://mold-making.com

Though this is a two-part mold, it is one of the few tutorials I found about working in this small scale.

I will show results of my castings in other topics since this one should be about Portugese Sailors!

Thanks once more.
User avatar
Cryns  Netherlands

Supporting Business Supporting Business
 
Posts: 1254
Member since:
11 Nov 2015, 15:33


Posted by Beano Boy on 21 Jun 2016, 14:13

Mr Cryns, i had to laugh about you not finding your figure within that mould. It`s so funny how experimental modelling can be such great fun especially when things go wrong. :-D
In your case your figure resorted no doubt under protest at being covered in that stuff, to playing Hide and Seek! :mrgreen:
At the end of each day what ever bright adventures might come into play, we all learn hopefully from our own mistakes,and try to help others avoid them.BB
Beano Boy  England
Supporting Member (Gold) Supporting Member (Gold)
 
Posts: 8086
Member since:
03 Sep 2013, 14:45

Posted by Kostis Ornerakis on 21 Jun 2016, 17:31

.Please take a look in the photo of the resin master of the Revell's captain. I mean the piece among his legs. Of course in that case it's from resin (and no plastic ), as the figure I worked as a master, is a copy itself. The point is the master is to be solid so it cannot get penetrated by the silicon.
In the same photo there is a piece of wood as base. I glue it on a board, that I use as working bench.


I also use a tube to pour silikon in, but twice in diameter at least, referring to the link.
Let us use the link as reference. The piece of wood gives me the hole in the mold in which I pour the resin and put my thump to avoid loss of resin through saking. As far the use of thin plastic, one can understand that we can take our master back without cutting the mold ( at this moment ).
My straight cut ( not like a snake ) is from inside and I am very careful not to cut all the way.
Image

Instead of putty, it works better for me streched sprue. By this I mean I put pieces from the trees of ship's kits ( harder plastic than figures) above a candle flame and when the plastic softens I strech it.
With a little practice you can achive whatever diameter you want. At first we pull gently from the 2 ends and when we have the correct diameter we pull stable and fast. We then leave one end so the line cools straight. So it's easy to have lengths of different diameters in no time.
I cut a piece with the appropriate diameter and attach with cyanocrylate to the hole.
As far the second excellent link, I sould add a base big enough to glue to the 3 feet of the horse AND the chanel to the raised one.
Don't misunderstand me, I find the technique of http://mold-making.com excellent, but as an example if I wanted to make a single mold I'd put plastic in the following "holes".
Image
Feel free to post any photo here or to any of my posts
User avatar
Kostis Ornerakis  Greece

In memoriam
 
Posts: 1280
Member since:
14 Feb 2016, 18:16

Posted by Cryns on 22 Jun 2016, 12:26

Dear Kostis,

Thanks a lot again. This really explains most of your technique to me.
So last night I made my first cylindric mold made of SILLI silicon mold putty.
I choose the simplest master sculpt I made up til now and filled up both holes between arms and torso, since the hands are touching the hips on both sides.
I had two copper wires sticking out of the masters' feet which made the silicon mold look like a plastic bomb or electric relais so I was sure (don't laugh Beano Boy!) I could trace my master back into the green putty.

Today I tried to take out my master from the mold. I only needed to make an incision between the legs... I thought. I could not get my master out of the mold at all. I made the incision bigger and bigger, on both sides of its body, like you did AFTER you took your master out. When the mold was almost cut up in two halves, I opened it and pulled my master...and pulled...and pulled.... until it came out without his head. I found the head, it got stuck in the putty because of its wild beard, and took it out with pincers.

These are my thoughts:
1) I should have greased my master before adding the molding putty.
2) I should have used proper molding rubber.
3) My figure is not flat and massive enough to be suitable for a cylindric mold.
I am experimenting with 2 parted molds at the moments.
But my sculpts are so complicated, I may even cut of some limbs before molding and cast them as a separate part.

Now I am casting the cylindric mold with polyester resin (normally used for insect preparates) which is the only resin I could find in the many artists shops here in Amsterdam.
User avatar
Cryns  Netherlands

Supporting Business Supporting Business
 
Posts: 1254
Member since:
11 Nov 2015, 15:33

Posted by Kostis Ornerakis on 22 Jun 2016, 16:43

Good evening,
The problem is with the materials. I am afraid that resin molds is no so good idea. :( Greasing is handy between rubber halves in a 2 part rubber mold.
The big secret is the rubber. It sould be pulling resistant and soft enough to allow you to pull out the master. Secondary base is at least handy if not necessary. (and the plastic piece between legs).
You are right if the figure is too complicate, it is better to separate arms from the soulders.
I believe you can find Silastic everywhere. Please insist to that. Here to say I have nothing common with this company or any dealer, but is far the better to my knoledge.
I am sure that in the next post you'll announse: success ;-)
User avatar
Kostis Ornerakis  Greece

In memoriam
 
Posts: 1280
Member since:
14 Feb 2016, 18:16

Posted by Cryns on 23 Jun 2016, 07:37

Mr. Cryns wrote:Now I am casting the cylindric mold with polyester resin


Kostis Ornerakis wrote:I am afraid that resin molds is no so good idea.


NO don't worry. I agree my text is confusing. The mold itself is rubber but I pour (cast) the resin into it like you do

Kostis Ornerakis wrote:I am sure that in the next post you'll announse: success
.

You know me well.

My first succesful casting was yesterday when a resin man with 4 complete limbs and one head came out of a 2-part rubber mold with 5 ventilation canals.
User avatar
Cryns  Netherlands

Supporting Business Supporting Business
 
Posts: 1254
Member since:
11 Nov 2015, 15:33

Help keep the forum online!
or become a supporting member

Posted by Kostis Ornerakis on 23 Jun 2016, 12:22

Though, I was sure for your success, I am really happy to hear. :-D
User avatar
Kostis Ornerakis  Greece

In memoriam
 
Posts: 1280
Member since:
14 Feb 2016, 18:16

Posted by Beano Boy on 23 Jun 2016, 13:46

Bravo! To Both Of You! BB
Beano Boy  England
Supporting Member (Gold) Supporting Member (Gold)
 
Posts: 8086
Member since:
03 Sep 2013, 14:45

Posted by sberry on 01 Aug 2017, 10:19

Wow! Painting those tiny guys is really a challenge (at least it wozuld be one for me), but you have mastered it!
A ship together with crew looks so much more life-like and impressive than a clean model without any humans. It is really a pitty when companies produce their ship models without crew.
User avatar
sberry  Germany
 
Posts: 932
Member since:
12 Mar 2010, 20:37

Previous page

Return to Gallery