Tutorials

Gabions and fences

Posted by Paul on 28 Aug 2009, 13:53

I can´t remember which post asked about how to make these so I´ll stick it in here, if that´s ok.

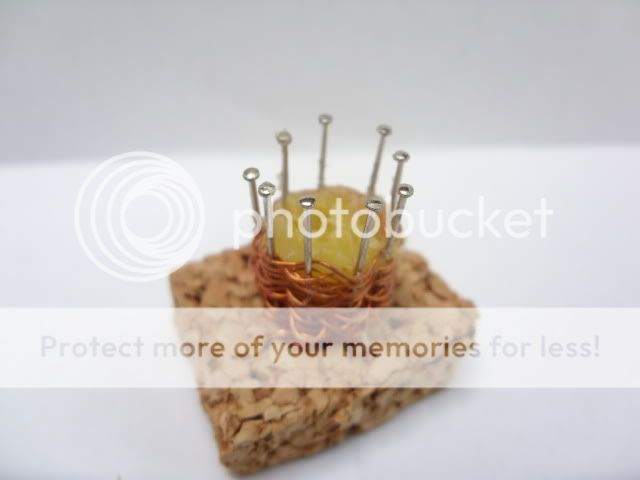
1. Stick a line of pins in a suitable base that will hold them firmly, here bits of old cork board. Bases for Gabions can be made from slices of wine corks.
For the fence they are in a line but for the gabion I´ve used a small piece of circular wood as a template. (or draw a circle)
For the fence it doesn´t matter how many pins, the length wanted dictates that.
For the gabion it HAS to be an un-even number of pins, because later when "weaving" an even number means that instead of the wire giong alternatively in and out, it will always come in or out at the same place.

Image

2. Thread can be used to do the "weaving" but here I´ve used copper wire. For a fence I cut it in lenghts but for a gabion, the longer the better. The thickness of the wire/thread, that´s up to you.

Image

3. "weave" the wire into the fence or the Gabion always taking care to start alternatively to the front or back of the 1st pin and then to the back or front for the next .

Image

4. The Gabion I fill, here with baby bell wax (yes I know I use it for everthing) to represent earth. Both Gabion and fence is then given a light smear of wood glue. The Gabion doesn´t really need glueing but the fence does.

Image

5. Cut off the pin heads. It´s better to keep them on whilst "weaving" to avoid being scratched. Here I´ve cut them off at differing heights to give a more "natural" look. Base paint. I recommend (although I don´t like it myself due to the enviromental factor) if there´s a lot to base, Spray paint. Then paint for desired effect.

Image

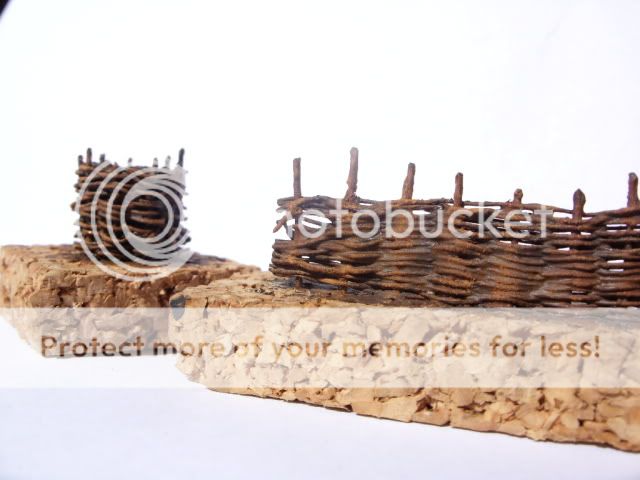
I find that the advantage of home made fences/bastions is that I can make the fences any length/height I want, also I can put curves into them or even gates. Also the Gabions can be made as "fat" or tall as I want.

Comments? Suggestions ? 8)
User avatar
Paul  China
 
Posts: 11724
Member since:
25 Nov 2008, 09:31


Posted by je_touche on 28 Aug 2009, 13:58

Good work, Paul. I also find they look much more realistic than the ready-made items you can buy.
je_touche  
 
Posts: 836
Member since:
20 Oct 2007, 10:35

Posted by Maurice on 28 Aug 2009, 14:30

This is a very handy thing to know :) thanks for sharing.
User avatar
Maurice  
 
Posts: 2925
Member since:
04 Jan 2009, 15:59

Posted by ColeF on 28 Aug 2009, 14:30

Thanx Paul. :thumbup:
User avatar
ColeF  United States of America
 
Posts: 2269
Member since:
20 Dec 2008, 16:05

Posted by nybot on 28 Aug 2009, 14:34

Cheers mate,

I really like the idea of this.

They look very good too.
User avatar
nybot  United Kingdom
 
Posts: 260
Member since:
03 Jul 2008, 16:20

Posted by Adam on 28 Aug 2009, 14:35

You can also use thick linen/acrylic thread for the woven branches. It is very easy to weave with, and you will find after a coat of glue and paint, the twist of the thread is invisible, and just looks "wood textured".

Nice stuff Paul :thumbup:
User avatar
Adam  United Kingdom
 
Posts: 781
Member since:
08 Oct 2007, 20:44

Help keep the forum online!
or become a supporting member

Posted by Phalanx on 28 Aug 2009, 15:47

Brilliant idea my friend.

good painting too.
cheers
Phalanx  Germany

In memoriam
 
Posts: 1175
Member since:
12 Nov 2008, 17:34

Posted by Wheeling Turn on 28 Aug 2009, 15:53

cheap easy nice....
cool thing thx
:thumbup:
User avatar
Wheeling Turn  Germany
 
Posts: 1396
Member since:
14 Dec 2008, 14:05

Posted by T. Dürrschmidt on 28 Aug 2009, 16:18

Great Idea! Thanks for posting.

One historical question...does anyone know, in which periods (or eras) these gambions were used? (I mean the round ones).

The earliest paintings I know are from early 16th century, the latest are from late 19th century. Has anyone other informations? Would be great to use them in medieval times and in WW1...
User avatar
T. Dürrschmidt  Germany
Silver Brush winner
 
Posts: 2230
Member since:
01 Oct 2008, 18:33

Posted by Paul on 28 Aug 2009, 17:22

only info so far seems to be;
http://en.wikipedia.org/wiki/Gabion
User avatar
Paul  China
 
Posts: 11724
Member since:
25 Nov 2008, 09:31

Posted by Peter on 28 Aug 2009, 17:40

This is good stuff Paul! :thumbup: Thank you for showing us :thumbup:

Greetings Peter
User avatar
Peter  Belgium

Moderator Moderator
 
Posts: 22510
Member since:
25 Mar 2008, 18:51

Posted by je_touche on 28 Aug 2009, 17:41

T. Dürrschmidt wrote:Great Idea! Thanks for posting.

One historical question...does anyone know, in which periods (or eras) these gambions were used? (I mean the round ones).

The earliest paintings I know are from early 16th century, the latest are from late 19th century. Has anyone other informations? Would be great to use them in medieval times and in WW1...


Seems correct to me that gabions first appeared early in the 16th century. To the best of my knowledge they were still in use during the ACW but replaced with sandbags round about the time of the Second Boer War and the Russo-Japanese War when trench warfare first came about.

One idea to add to what Paul has been showing would be to cut into or ripp off little bits of the wire from the defense works to simulate battle damage (musket and grape shot). A nice idea is also to topple over one of the gabions as if hit by a roundshot, emptying its contents into the emplacement. Never seen that in a model as yet, but must have occured quite often. Gabions were musketproof but not artilleryproof.
je_touche  
 
Posts: 836
Member since:
20 Oct 2007, 10:35

Posted by Paul on 28 Aug 2009, 17:50

..and that´s the grand thing about these home made ones, you can "bash" em up a bit. :-) 8) I´m considering building a ancient house using the same principle.
or I might just take up basket weaving, I hear it´s "calming" ;-)
User avatar
Paul  China
 
Posts: 11724
Member since:
25 Nov 2008, 09:31

Posted by paul haring on 28 Aug 2009, 18:11

Yes,yes,yes, this is just what I wanted to see. Can't wait starting
paul haring  Netherlands
 
Posts: 198
Member since:
20 Oct 2008, 18:51

Posted by paul haring on 29 Aug 2009, 17:11

Last evening I started making a fence and it works!
Instead of cork I used an piece of wood in which I drilled small holes.
It's placed already on the dio.
As soon as possible I will post pics in Work in Progress

Thanks everybody for your great help
paul haring  Netherlands
 
Posts: 198
Member since:
20 Oct 2008, 18:51

Posted by west1871 on 29 Aug 2009, 17:26

paul haring wrote:Last evening I started making a fence and it works!
Instead of cork I used an piece of wood in which I drilled small holes.
It's placed already on the dio.
As soon as possible I will post pics in Work in Progress

Thanks everybody for your great help


dont be shy post it here and share your joy :thumbup: I was thinking of donig it with yard brush hair.I have been at the cleaners brush at work with a pair of scissors on the sly. ;-) my granddad used to make fences like this at a famous horse racing track.he used to teach tree surgeons and taught my mother how to make them aswell.(shame he never taught her how to cook ;-) )luck I work with a cabling dept at work and have a good supply of copper wire :thumbup:

cheers paul for a great tutorial
User avatar
west1871  United Kingdom
 
Posts: 2225
Member since:
06 May 2009, 17:08

Help keep the forum online!
or become a supporting member

Posted by Paul on 29 Aug 2009, 18:04

It´d be great to see the photos Paul, stick em up here like West suggested. Glad my little tutorial has helped. I hope yours will be a bit "neater".
(oooh how I like it when something goes right, it gives me a ready-brek glow)
User avatar
Paul  China
 
Posts: 11724
Member since:
25 Nov 2008, 09:31

Posted by Paul on 30 Aug 2009, 19:07

Came up with a mild variation on the theme, instead of wire I´ve used Pineneedles, the greener ones look a bit "fresh" but just brown ones were used it would save painting them up, just the poles would need that. They are also much easier to bend and free!
Image
User avatar
Paul  China
 
Posts: 11724
Member since:
25 Nov 2008, 09:31

Posted by je_touche on 30 Aug 2009, 19:15

Paul wrote:the greener ones look a bit "fresh" but just brown ones were used it would save painting them up, just the poles would need that.


I would rather always paint everything in a model because unpainted surfaces tend to look a bit unfinished, also you need to paint highlights and shadows as on the figures imo.
je_touche  
 
Posts: 836
Member since:
20 Oct 2007, 10:35

Posted by ColeF on 30 Aug 2009, 19:18

Now that is a good idea, especially since we have about 15 pine trees. :-)

:thumbup: :thumbup:
User avatar
ColeF  United States of America
 
Posts: 2269
Member since:
20 Dec 2008, 16:05

Next page

Return to Tutorials