Tutorials

Silicone moulding and resin casting

Posted by Cryns on 29 Jun 2021, 17:06

Dear Forummembers,

For those of you who are interested in silicone moulding and resin casting, here is a picture report of reproducing the scale 1:72 Crynsminiaturen Holkas 520 BC shipmodel kit.

The original woden master:
Image

The separate parts of the master model:
Image

All small and flat wooden parts are embedded in a plasticine pre-mould. A reservoir, pouring chanals, positioning pins and fluid-stop-rims are included:
Image

Image

Boxing the plasticine pre-mould:
Image

A giant paella pan with polycarbonate lid is big enough for the pre-mould for being cast horizontally. An open-cut white coax television cable is used as rubber ring making the lid air tight:
Image

The pan is connected to a vacuum pump:
Image

After pouring degassed silicone onto the pre-mould box, the lid of the paella pan is closed and all is de-gassed again to take out all air that has been trapped inside:
Image

After the first silicone half is cured, the plasticine pre-mould is removed. The inner surface of the mould is treated with mould release liquid. Then the second silicone half is poured into the box and degassed again. After curing, the wooden master parts are removed and the supply- and vent ducts are cut with a knive into the silicone :
Image

The cotton made sail is embedded in plasticine, boxed with lego:
Image

Brown silicone is poured and degassed:
Image

A piece of styrodur foam is pressed into the silicone without touching the sail itself. This safes expensive silicone:
Image

After curing the first silicone half, the plasticine pre-mould is removed. A system of pouring canals is inserted and all is boxed again in lego before the second silicone half is poured. Both halfs are kept separate by using mould release liquid:
Image

The bigger, massive parts like hull and cargo, are cast in single piece moulds. Using soft silicone to enable removing the original master and the cured resin casts without having to cut the rubber:
Image

To be continued soon with the resin casting process. I hope it will be of any interest to some of you.

Regards from Cryns

http://www.crynsminiaturen.nl
User avatar
Cryns  Netherlands

Supporting Business Supporting Business
 
Posts: 1254
Member since:
11 Nov 2015, 15:33


Posted by despertaferro on 29 Jun 2021, 17:59

Looks like witchcraft to me... :shock: :shock: :shock: :eh: :-D
User avatar
despertaferro  
 
Posts: 1754
Member since:
25 Apr 2009, 18:18

Posted by Bluefalchion on 29 Jun 2021, 22:39

My humble brain tried to fathom each step by looking at the pictures and reading the descriptions, but after two or three steps I just did not have the human bandwidth to keep up.

Marvelous works of wonder and wizardry!
User avatar
Bluefalchion  United States of America
 
Posts: 3575
Member since:
23 Dec 2010, 07:57

Posted by Kostis Ornerakis on 30 Jun 2021, 17:53

Now this is totally professional!!
Respect, my friend!! :notworthy: :notworthy: :-D
Although this time, your technique is less detailed. ;-) :-D
Finally the most important: Olkas is wonderful!! :yeah: :-D
User avatar
Kostis Ornerakis  Greece

In memoriam
 
Posts: 1280
Member since:
14 Feb 2016, 18:16

Posted by Bluefalchion on 30 Jun 2021, 18:32

Okay, I got a good night's sleep, drank some coffee, ate some oatmeal with blueberries, and tried to understand the steps again.

Still no luck. But the procedure is sound, to judge only by the final results.
User avatar
Bluefalchion  United States of America
 
Posts: 3575
Member since:
23 Dec 2010, 07:57

Posted by Susofrick on 01 Jul 2021, 07:35

Agree totally with Joan, Aaron and Kostis! Feel like I'm in Saalem or something similar.
User avatar
Susofrick  Sweden
Supporting Member (Gold) Supporting Member (Gold)
 
Posts: 7678
Member since:
19 Feb 2008, 12:10

Help keep the forum online!
or become a supporting member

Posted by Cryns on 01 Jul 2021, 13:24

Thank you dear Despertaferro, Bluefalchion, Kostis and Susofrick for your response. :-D

Susofrick wrote:I'm in Saalem or something similar.


What is Saalem?

Bluefalchion wrote:after two or three steps I just did not have the human bandwidth to keep up.


I am sorry for this. I skipped the basic steps of moulding like mixing two silicone components, degassing it when it is still in the mixing cup and pouring it into the pre-mould. Because that has been explained before already, several times in other tutorials here in this forum I remember.

Kostis Ornerakis wrote:Although this time, your technique is less detailed. ;-)

I am sorry, the Old Days here at Benno's are over, when I spend whole weeks taking hundreds of pictures for a single tutorial of which our moderator Peter wrote: 'Cryns has been writing a complete book'.
So I only photographed and presented the extraordinary elements I have been developing recently..

Here comes PART 2: casting the resin. I hope this explaines a bit more:

These resin cast parts come out of the pink soft silicone single part moulds:
Image

All thin, vulnerable parts are reinforced by metal rods and wire inserted into one half of the stiff silicone two-part mould, before the resin is poured into it:
Image

Both halves of the two-part mould are closed and pressed together with heavy boards do devide the pressure equally and with clamps with wing nuts to adjust the pressure locally by hand:
Image

The resin is colored with brown paint and injected into the mould by using a giant syringe:
Image

The mould is placed into a 32cm wide aircompressiontank. By creating high airpressure when the tank is closed, the airbubbles trapped inside the mould and inside the fluid resin are compressed, making its size so small that the bubbles are hardly visible anymore. This happens during the curing time of the resin:
Image

After the resin is cured hard, the mould is taken out of the aircompressiontank and opened:
Image

Image

Metal wire is inserted in the tips of the brown silicone made sail-mould to prevent the tips from snapping off when the sail is rigged with wire onto the ship later on:
Image

Steel rod reinforcement within the tips of the yard of the sail, preventing the tips to snapp off during rigging when the modelkit will be build by the modeler.
Image

For pouring the white resin into the sail mould, a pipe is used to increase the hight of the insert hole creating more gravity for the fluid resin. The resin can be seen streaming out of the two vent duct canals at a lower level:
Image

After the resin has been cured in the aircompression tank, the mould is opened. The pouring canal has been cut away in the picture. It ran from the reservoir (left) to the distribution-canal (right):
Image

The mould and cured resin cast for the reefed sail:
Image

Image

The fabric texture of the original cotton made master sail is still visible in the resin copy. That is of importance for the modeller who has to paint the sail by using the dry brush technique:
Image

Drawing a rigging manual by hand using old fashioned pencil and gummy eraser:
Image

After the drawings have been scanned, some assembling and corrections are made with a computerprogram:
Image

Drawing the manual for the shipmodel was too much work. Pictures are used to explain how to assemble the resin parts:
Image

Another part of the manual:
Image

The final Holkas shipmodel after assembling all resin parts. Only the wire rigging and the rigging blocks are still missing:
Image

The original kylix painting the shipmodel has been based upon:
Image

And the resin reproduction:
Image

I hope it was of any interest to some of you.
http://www.crynsminiaturen.nl
User avatar
Cryns  Netherlands

Supporting Business Supporting Business
 
Posts: 1254
Member since:
11 Nov 2015, 15:33

Posted by Bluefalchion on 01 Jul 2021, 15:09

I think Salem is what Susofrick is referring to. As in, Salem, Massachusettes, USA, a town famous for its witch trials during the late 1600s.

Which I take to mean: "Cryns's process is so complicated and elegant that it appears to be witchcraft to we mere mortals."

In all seriousness, I see that the painful lessons of your early attempts (bubbles in the resin, mould not setting evenly, parts coming out warped, loss of texture and detail, thin parts snapping off) have been addressed in turn with superior techniques, new mediums, and even small adjustments.

Which is, in fact, a highly scientific process, the 100% opposite of superstition, voodoo, and witchcraft of any kind.

I can only extend my deepest compliments and congratulations. You have every right to be proud of the tremendous progress you have made.

I mentioned before that I love this hobby, but I have very little interest in ancient ships. And yet, seeing the models you have created and learning something about your process has still produced in me pure joy.
User avatar
Bluefalchion  United States of America
 
Posts: 3575
Member since:
23 Dec 2010, 07:57

Posted by Kostis Ornerakis on 02 Jul 2021, 01:53

Cryns wrote:I am sorry for this. I skipped the basic steps of moulding like ........... degassing it when it is still in the mixing cup and pouring it into the pre-mould.

Is it too much to ask you to send the proper link?

Cryns wrote:..............the lid of the paella pan is closed and all is de-gassed again to take out all air that has been trapped inside:

I thought that if someone uses a vacuum pump after pouring the silicone, there will be chaos in the pan. :oops:

I have to admit that your second post is much more detailed. :-D
I don't intend to buy either vacuum pump or aircompressiontank, but thank you for posting this tutopial. :yeah: :-D

Hello from Chania. :-D
User avatar
Kostis Ornerakis  Greece

In memoriam
 
Posts: 1280
Member since:
14 Feb 2016, 18:16

Posted by Susofrick on 02 Jul 2021, 11:09

Yes, Aaron explains pretty much what I meant. It is great to follow something like this. So huge thanks for showing us!
User avatar
Susofrick  Sweden
Supporting Member (Gold) Supporting Member (Gold)
 
Posts: 7678
Member since:
19 Feb 2008, 12:10

Posted by Cryns on 03 Jul 2021, 12:25

Bluefalchion, thanks for your very nice words.

Bluefalchion wrote:Which is, in fact, a highly scientific process, the 100% opposite of superstition, voodoo, and witchcraft of any kind.


Well said. Its phrases such as this one still making you such a great analyst here in this forum :-D

Susofrick thanks and nice to hear from you. I hope you and your wife survived last year in relatively good circumstances.

Kostis I have to admit you confront us with a very good and relevant question: :oops:

Is it too much to ask you to send the proper link?


Back in 2010 moderator Paul posted a weblink to an excellent tutorial on how to mould and cast a scale 1:35 horse. I know this because around 2015 I went through every tutorial here at Benno's forum to see what had been presented here already and what had not. The link is still there.... but sadly the original webpage has been replaced by a commercial Chinese steel mould factory:

viewtopic.php?f=15&t=5554&p=70139&hilit=mold#p70139

That tutorial was very good and clear. Its gone though. Only at Pinterest some original pictures of that horse mould can still be seen. Its the vanity of the online medium :(

I found another one instead, made by someone calling himself Tesselate, which will be very easy to understand for everyone, also for our oatmeal-with-blueberry eater ;-)

https://madebytesselate.com/guide-a-two-part-mould/

But we should realise Tesselate is moulding and casting a very simple, massive and large object, making it expensive at the one hand but relatively easy at the other hand. Because no difficult details, complicated vent duct and pouring channels nor syringes are needed to use this mould.

Apart from this we had some interesting forum sessions here with Phersu (I still miss him), please have a look at the bottom of page 2 and most of page 3:
viewtopic.php?f=11&t=19354&hilit=mold&start=20

And you could have a look at my own first try outs with silicone rubber and resin casting, half way at page 12:
viewtopic.php?f=11&t=18962&hilit=tyre+silicone&start=220
User avatar
Cryns  Netherlands

Supporting Business Supporting Business
 
Posts: 1254
Member since:
11 Nov 2015, 15:33

Posted by Kostis Ornerakis on 03 Jul 2021, 14:52

Dear friend thank you for your reply, but my question was : what means degassing silicon and why?

I have already found: https://www.youtube.com/watch?v=0DD1IZGcSKo
and: https://www.youtube.com/watch?v=Ps-boHiWxz8

and I think the links have a place in such a great tutorial. :-D
User avatar
Kostis Ornerakis  Greece

In memoriam
 
Posts: 1280
Member since:
14 Feb 2016, 18:16

Posted by Kostis Ornerakis on 03 Jul 2021, 15:36

My questions came from what I have not done so far ;-) , so here comes my second question:
What is pressure casting?
And I have found an answer again: https://www.smooth-on.com/support/faq/156/
but Smooth-On suggests we also do the mold under pressure, so I would like to have your opinion on that. :-D
User avatar
Kostis Ornerakis  Greece

In memoriam
 
Posts: 1280
Member since:
14 Feb 2016, 18:16

Posted by Cryns on 04 Jul 2021, 11:02

Yes Kostis, I forgot to clear this up, last friday:

Kostis Ornerakis wrote:I thought that if someone uses a vacuum pump after pouring the silicone, there will be chaos in the pan.


Degassing the mixed silicone when it is still in the mixing cup is common practice by everyone who has a vacuum pot or vacuum chambre.

Degassing the poured silicone when its already in the mouldingbox is NOT common as far as I know.

Kostis Ornerakis wrote:what means degassing silicon and why?


By stirring both silicone components together with a small wooden stirrer, lots of air gets trapped and is mixed permanently with the silicone. Only a small percentage of that air pops up in bubbles to the surface by normal gravity. After the pouring, the bubbles stick to the mastermodel that is moulded.
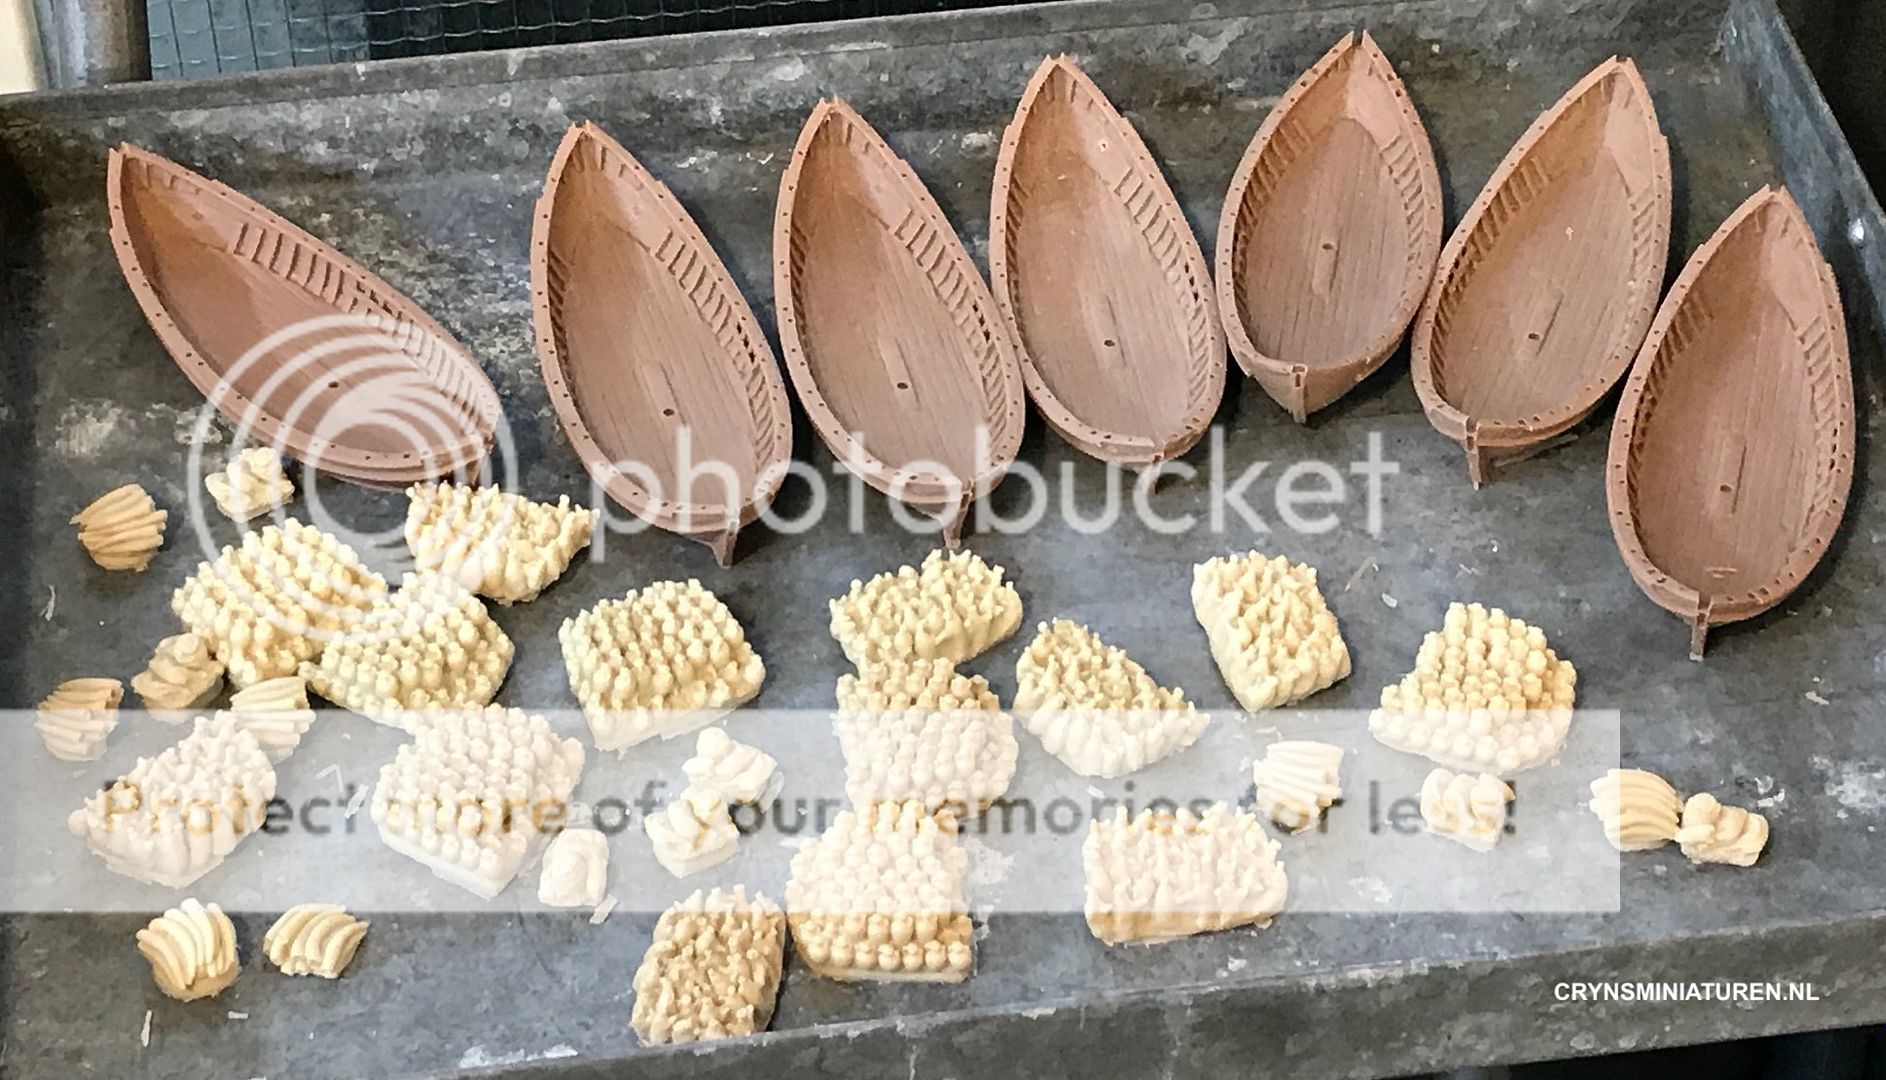
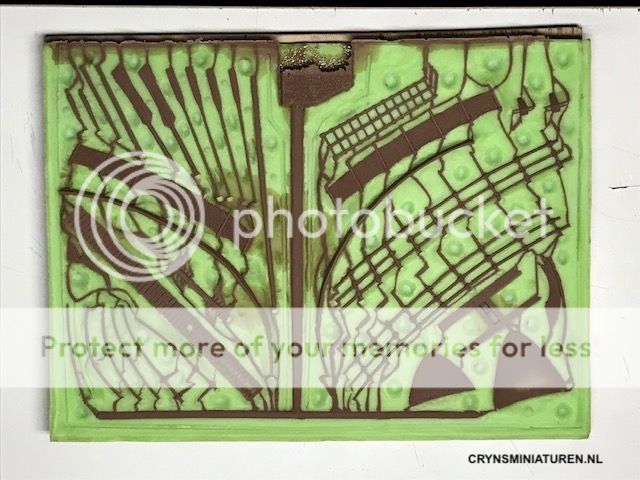
These bubbles appear in the final resin model in the shape of small resin balls on the exterior of the resin model.

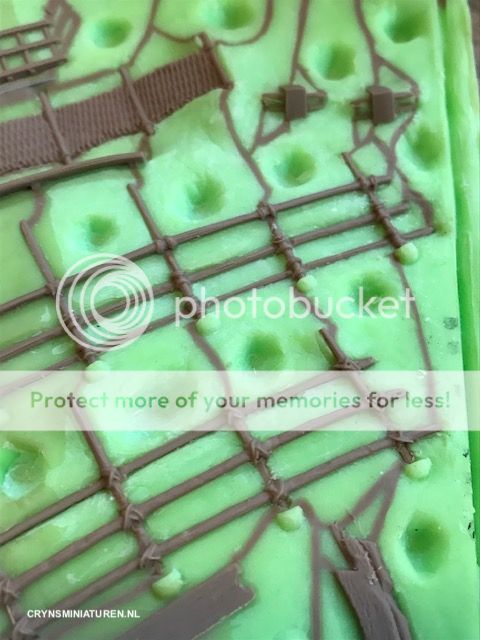
When we use an air compression tank for casting resin, another unwanted effect appears with silicone moulds that have not been degassed: The airbubbles trapped into the silicone mould are reduced and squeezed together by the high air pressure, leaving lots of small depressions on the surface of the silicone mould (when still under pressure) and leaving a similar number of projecting bulbs on the surface of the cured resin cast object (when its not under pressure anymore)

Now, when we as amateur modellers make a silicone mould for reproducing one or maybe ten resin objects, it is acceptable to have resin balls stick to the surface or airbubbles holes inside the resin. These can be removed or filled up by hand. Thats part of our hobby. Thats what I did for the past years.

But when dozens of copies of the same object have to be corrected and repaired by hand before they can be sold to customers, the fun is over. That is when someone wants to buy a vacuumpot and a compression tank.

Degassing the poured silicone when its already in the mouldingbox is not common.
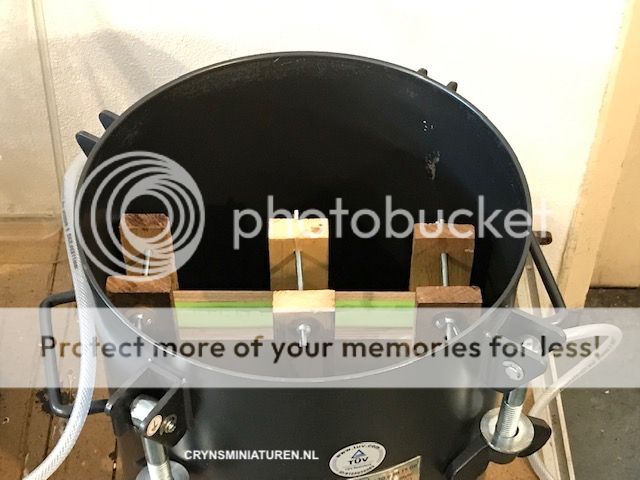
Partly this is because many vacuum pots are too small, especially for horizontal moulds.
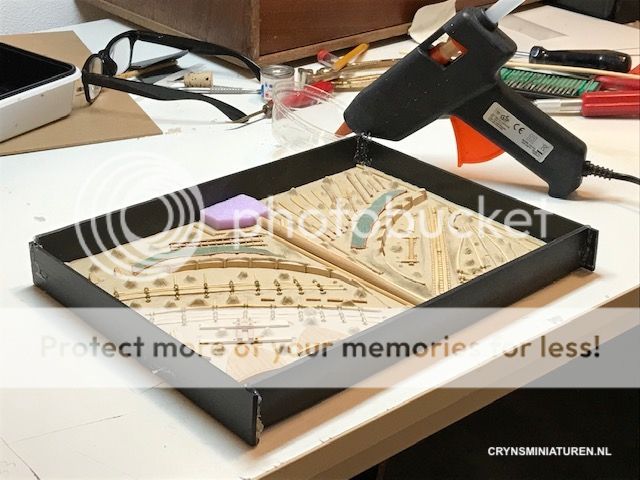
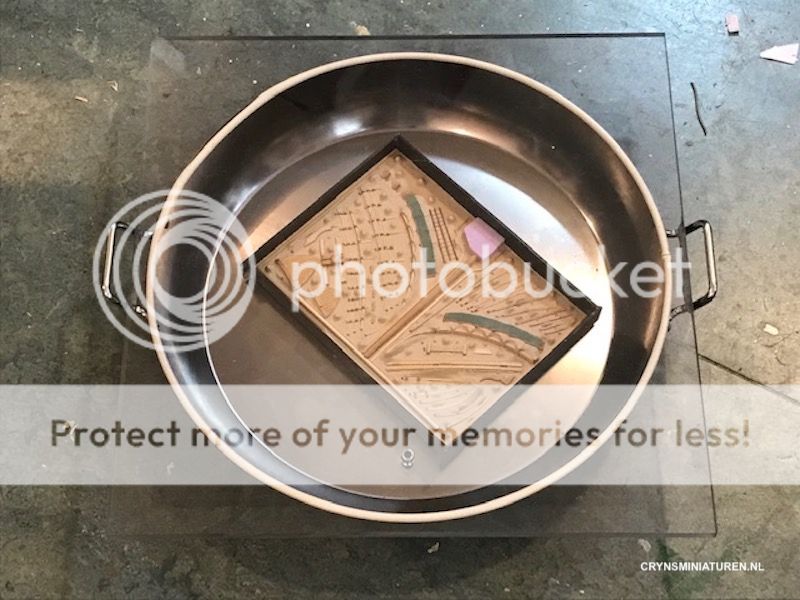
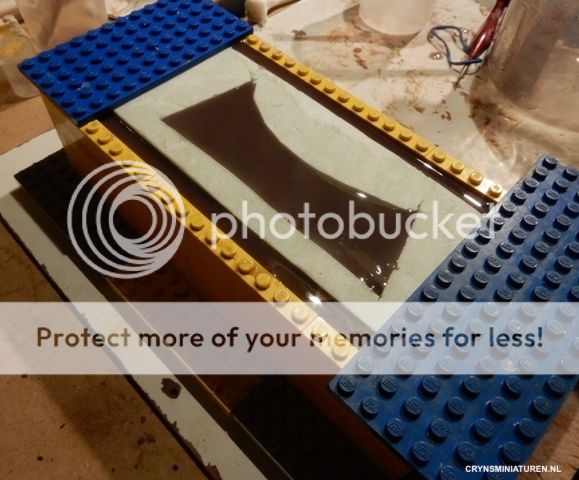
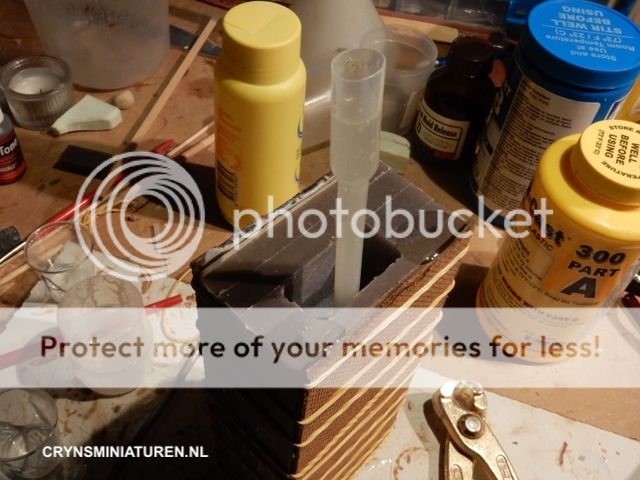
That is why I build the paella pan vacuum chambre.
But also I got the impression, moulders find it unnecesary to degass the silicone again after it has been poured into the mouldingbox because it is degassed already.

My experience is that no single step works 100% perfect.
So degassing the poured silicone once again helps removing air bubbles that got trapped between the silicone, the master model parts and the plasticine clay bed.
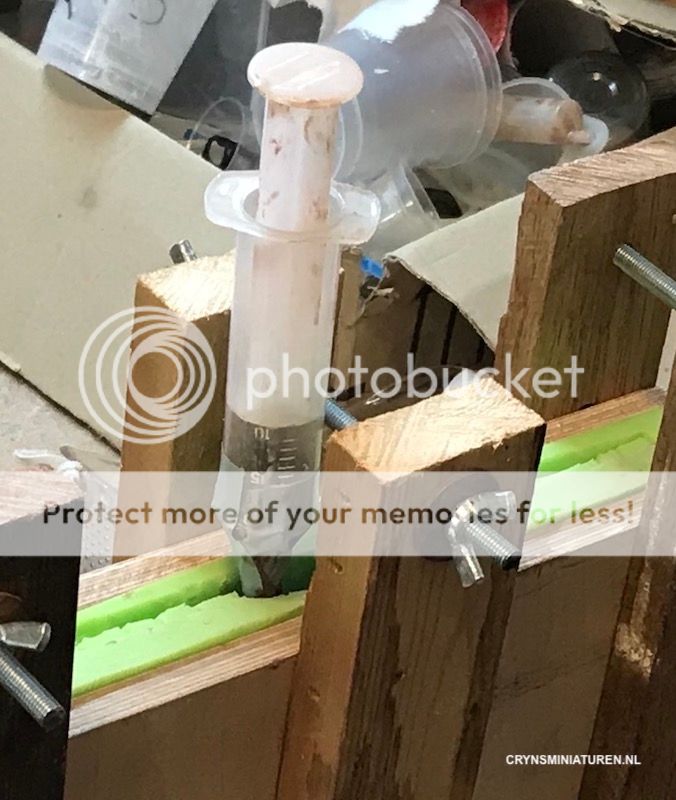
There are ways to provent those bubbles getting trapped, like pouring the silicone in a narrow stream from some hight right into the lowest place of the pre-mould.
But still its not 100% sure.

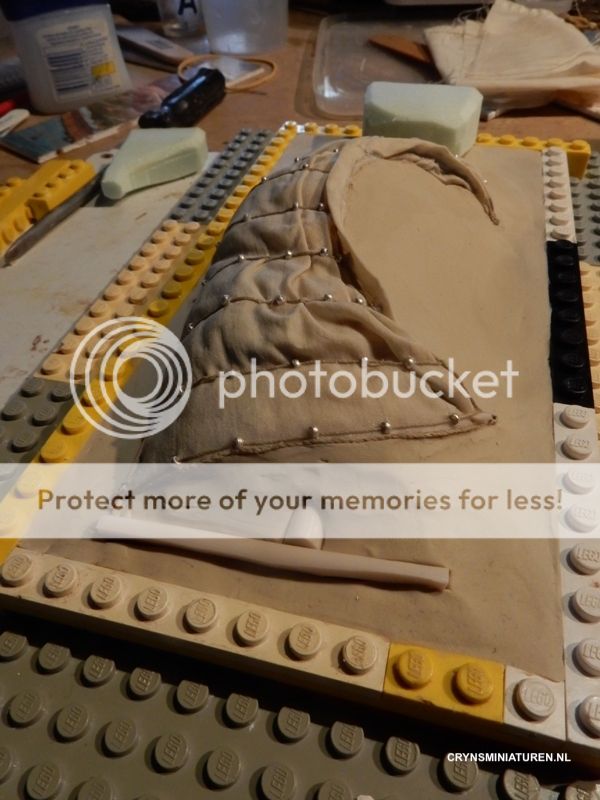
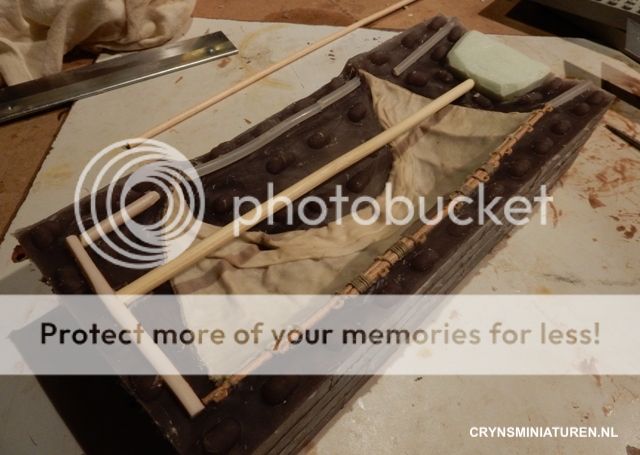
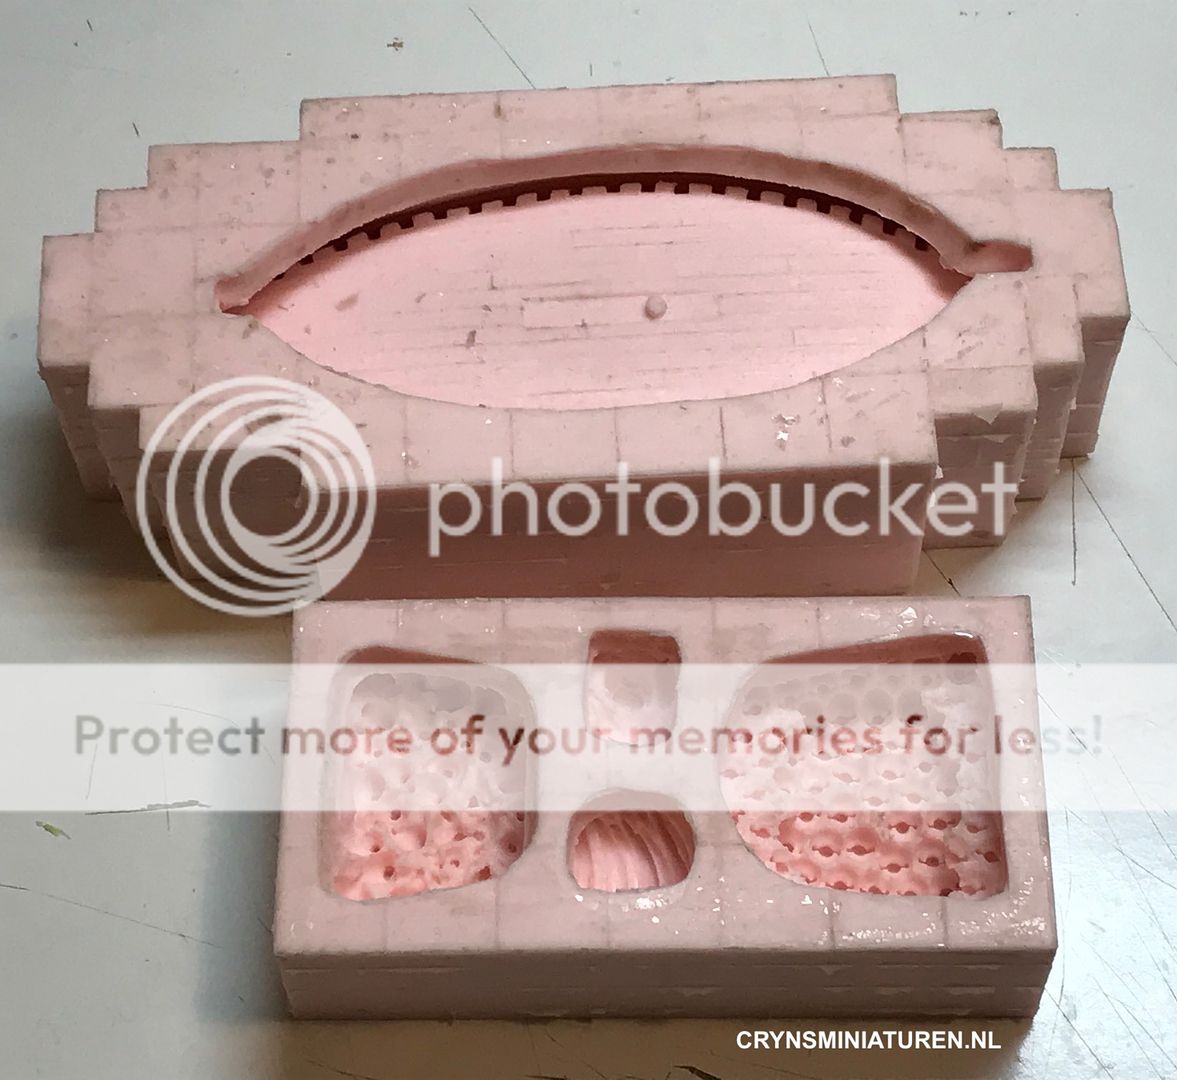
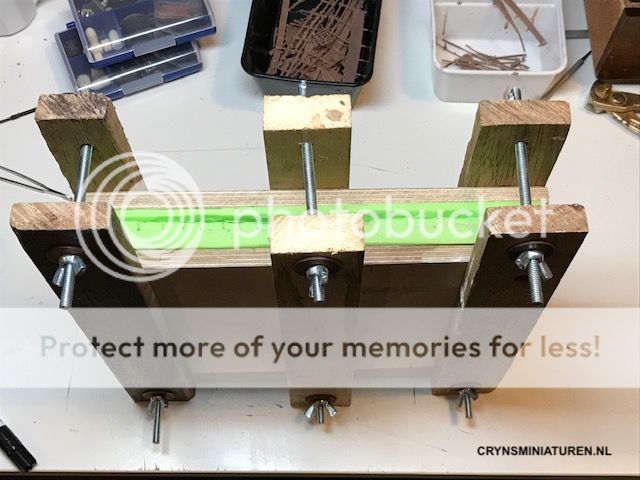
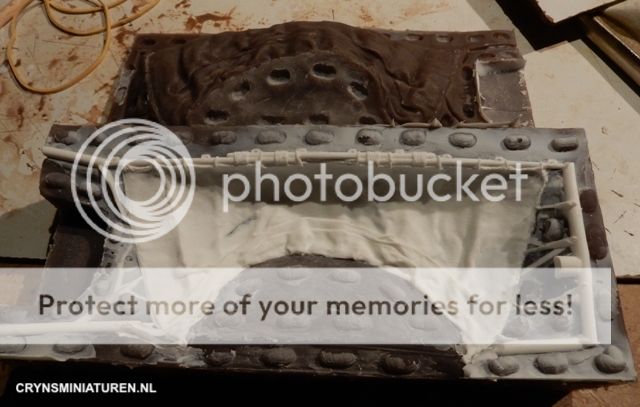
Another, very easy and very effective step is to attach a first layer of mixed silicone (degassed or un-degassed is both possible) onto the master model before the rest of the silicone is poured on top of it. For example: I place a very complicated block of amphorae jugs on the plasticine bed. I cover this object with silicone by using a pig hair brush. When all exterior holes and depressions are filled up by the silicone, I put the (lego build) moulding box in place around the object and pour the rest of the silicone in the box.
This must all be done quickly, before the silicone cures hard.

This can be done with or without degassing the silicone before or after pouring it into the moulding box.

Kostis Ornerakis wrote:Smooth-On suggests we also do the mold under pressure, so I would like to have your opinion on that.


I have never tried this but I should. Thanks for the suggestion! I will let you know what the result is.

NOW ABOUT RESIN CASTING:

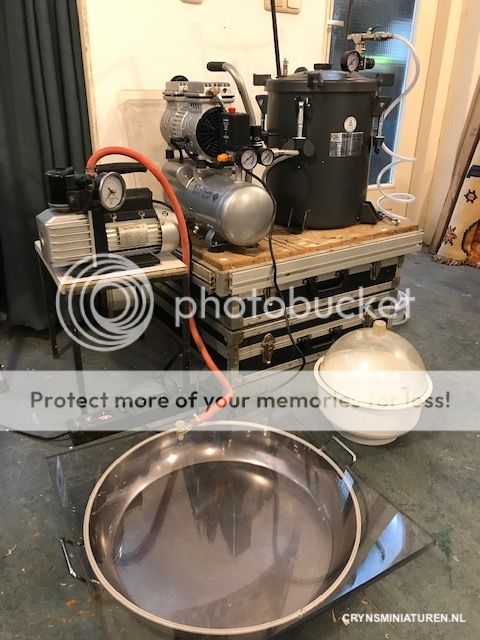
For resin casting I sometimes use both the vacuum pot AND the compression tank.

The vacuum pot is for removing as much airbubbles from the resin as possible.
This can be done after stirring the two resin components, when the resin is still in the mixing cup.
The effect is minimal though. I decided to skip this step.

More effective it is, to pour the resin in the silicone mould and then place it in the vacuum chambre/pot.
Especially with very difficult complicated shaped objects, this may help a lot to remove trapped airbubbles from inside the mould.

But be carefull: this turnes out a disaster when using the wrong resin in a closed mould.

(This degassing of resin inside the silicone mould has the same effect as the way you once showed me when you made your cylindrical one piece mould, in which you inserted a pin or spatle or un-sharp tool and removed trapped airbubbles inside.)

This vacuum pot degassing method is fine as long as you use an OPEN mould, which means a single part mould with a huge opening in which we both pour the resin, and out of which the air escapes at the same time.

Problems may appear when we use a CLOSED mould, like a two-part mould with small vent duct canals for letting out the air inside. In the process of degassing the resin starts to boil, creating much more bubbles inside than that will come out. So the opposite will be achieved of what we want.

There are two types of resin and both behave different when we insert them into a vacuum pot. Some types of resin make a chemical reaction. Because of underpression, so in circustances of less air density, the resin very quickly becomes so hot (chemical reaction), it starts to boil. This will destroy the resincast inside a closed silicone mould. The boiling resin streams out of all vent duct holes and out of the pouring chanal but inside its just a bubble mess after curing hard.

I found a you tube tutorial showing a man who is using a vacuum pot to degass the fluid resin inside his 'closed' silicone mould. It looked so simple. He did not need a compressiontank at all because his resin was perfect for the vacuum pot. The vacuumpot sucked all airbubbles out of the resin cast before it cured hard. I tried it many times but it never succeeded, it became a mess over and over again.
This has to be because I use the wrong resin.

Kostis Ornerakis wrote:What is pressure casting?


After removing airbubbles from the resin with a vacuum pot, the silicone mould filled with fluid resin is placed into the high air pressure tank. During the increasing of the air pressure, the airbubbles are 'pressed together' to such a small size so that we can hardly see them anymore. Because the air is still inside the resin model (but compressed) we have to keep the resincast inside the tank under pressure until the resin is cured hard. In case we take the cast out of the tank before the resin is cured hard, the compressed air bubbles will extend again until they have reached their original size back again. That would make the process useless. So it needs to be inside the tank for many hours. That is why professional resin casters leave their casts inside the tank 'overnight'.

I hope I cleared up some things for you my friend. :-D

But as long as you make just one or a few copies of resin, you don't need a vacuumpot and no compression tank.
User avatar
Cryns  Netherlands

Supporting Business Supporting Business
 
Posts: 1254
Member since:
11 Nov 2015, 15:33

Posted by Bluefalchion on 04 Jul 2021, 14:45

Ever since Phersu and the Speira Miniatures creator died, and the guy that did those great animals got too sick to continue, I started to worry about our friends who are creating their own moulds and casting in resin (or metal).

What precautions should a careful modelor take to protect him or herself from exposure to chemical fumes, resin residue, burns, and other hazards?
User avatar
Bluefalchion  United States of America
 
Posts: 3575
Member since:
23 Dec 2010, 07:57

Posted by Kostis Ornerakis on 04 Jul 2021, 15:58

First of all I am glad that you need professional tools for your productions, because that means that crynsminiaturen works well !!

I also believe that your professional process goes beyond my needs, but I have a far better view of casting now.

I really googled a lot, the last 2 or 3 days to figure out the new techniques for me, but your really detailed answer helped me even more. Thank you. :-D
User avatar
Kostis Ornerakis  Greece

In memoriam
 
Posts: 1280
Member since:
14 Feb 2016, 18:16

Help keep the forum online!
or become a supporting member

Posted by Kekso on 14 Jul 2021, 12:57

I love it... thanks for sharing your experience with us.
User avatar
Kekso  Croatia

Moderator Moderator
Supporting Member (Bronze) Supporting Member (Bronze)
 
Posts: 6840
Member since:
19 Oct 2011, 18:32


Return to Tutorials