
Tutorials
Building Scale Trees from scratch
35 posts
• Page 2 of 2 • 1, 2
A very nice tutorial mr. Cryns! What I like very much too is that you use many unsophisticated and cheap materials like white glue, sponge, persil and natural twigs, instead of expensive prefab stuff from the hobbyshop. It's not only cheaper, it is also much more original, more fun and more rewarding this way.
-

huib
- Posts: 962
- Member since:
12 Dec 2015, 15:57
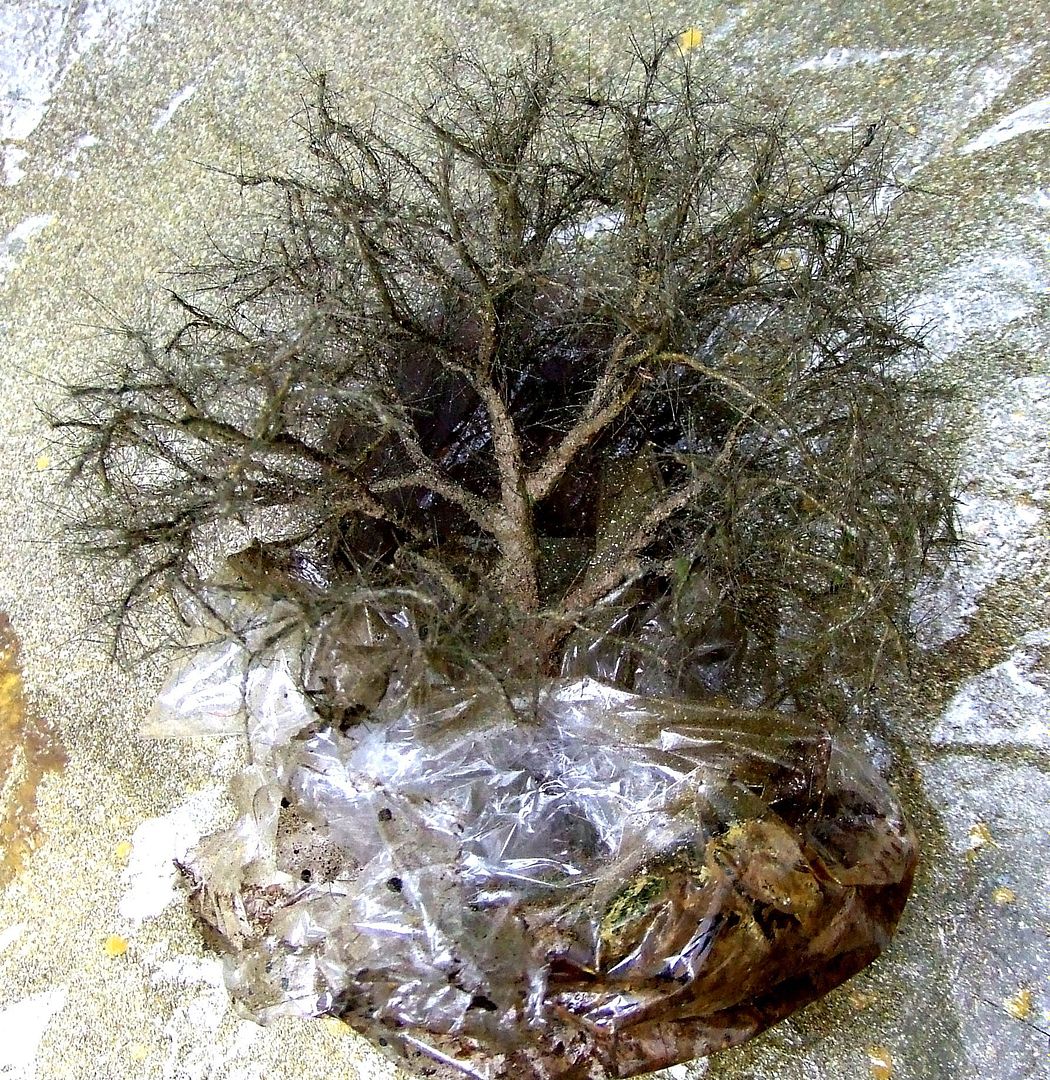
Mr. Cryns wrote:A blown down tree reveals a treasure of material.
There's no good material such as natural roots. Yup, a real treasure

-

Kekso
 Moderator
") Supporting Member (Bronze)
Supporting Member (Bronze) - Posts: 6840
- Member since:
19 Oct 2011, 18:32
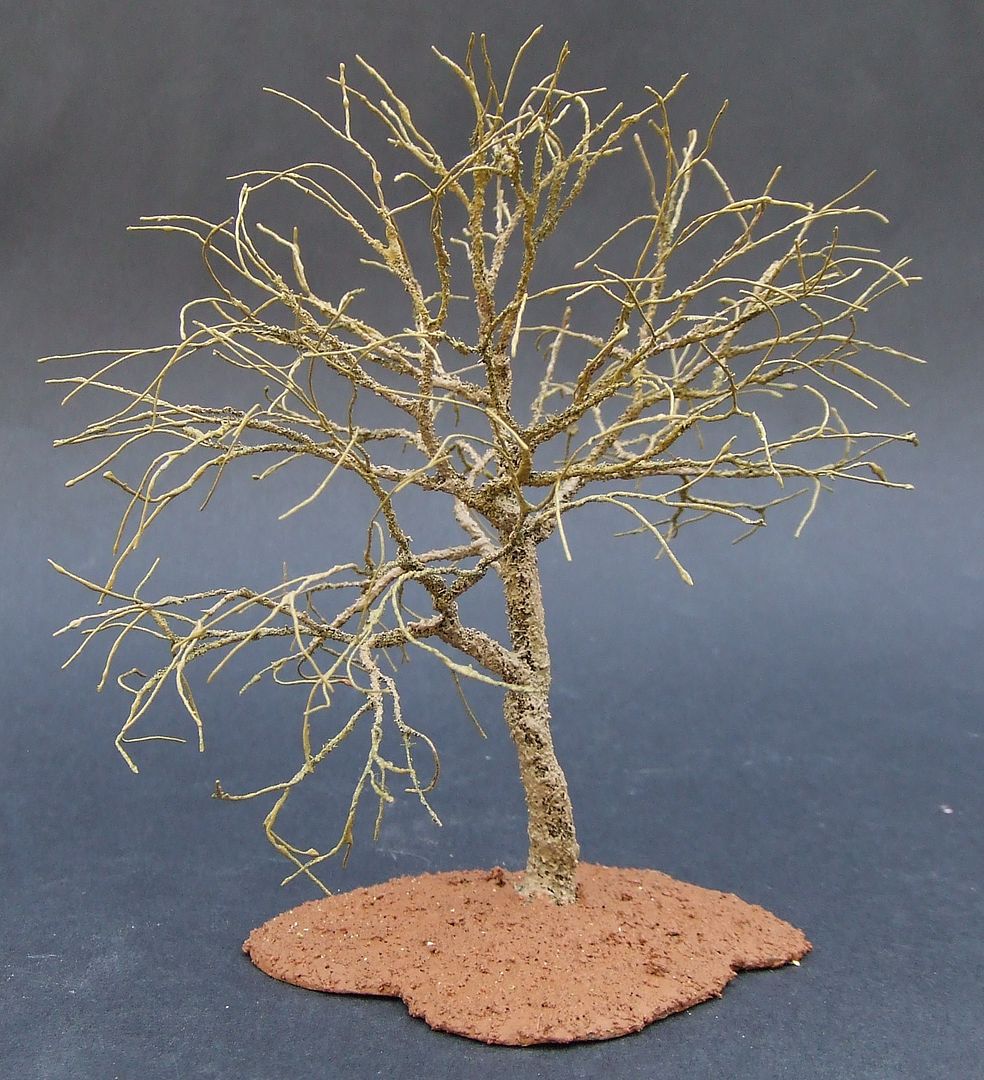
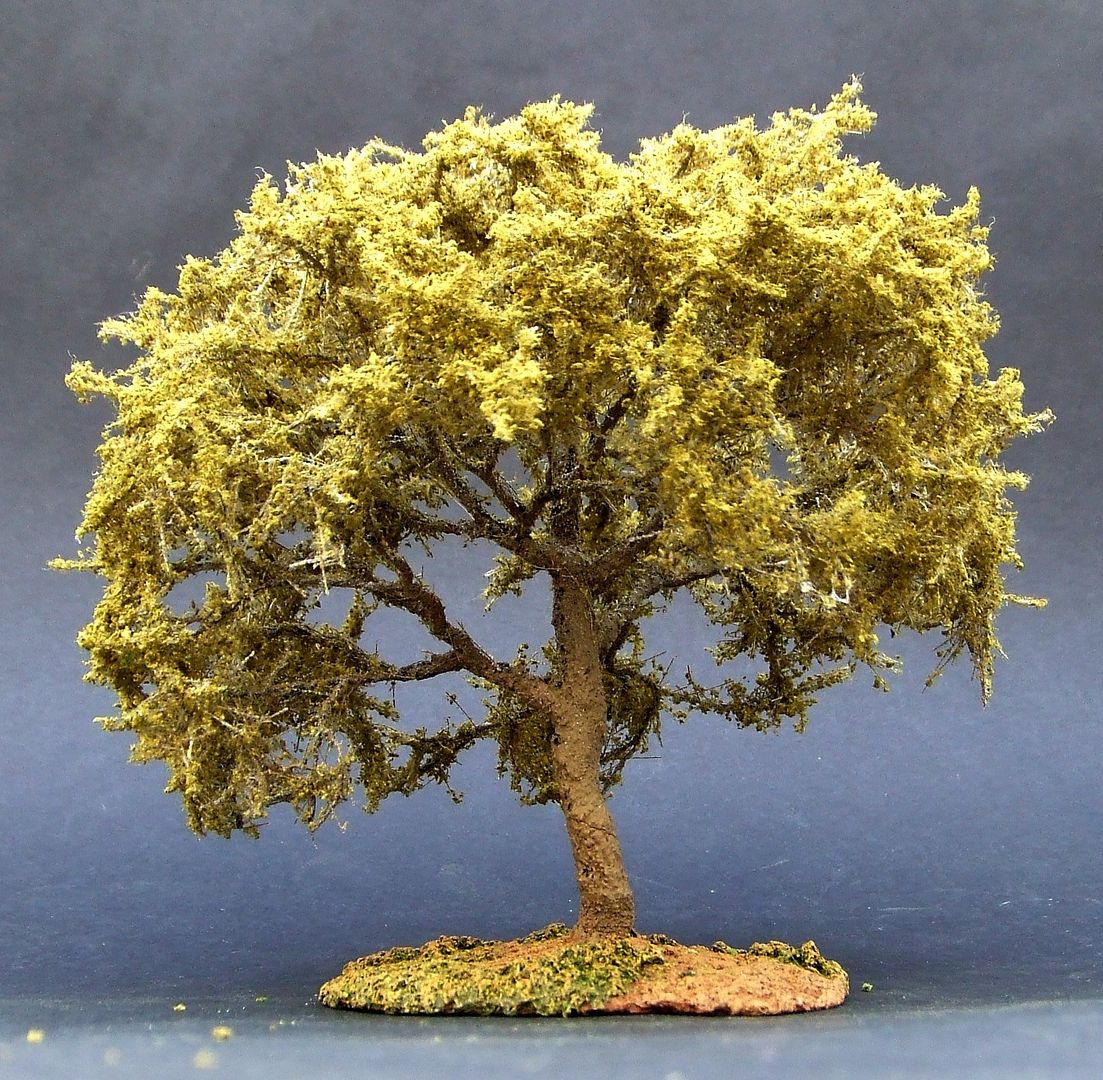
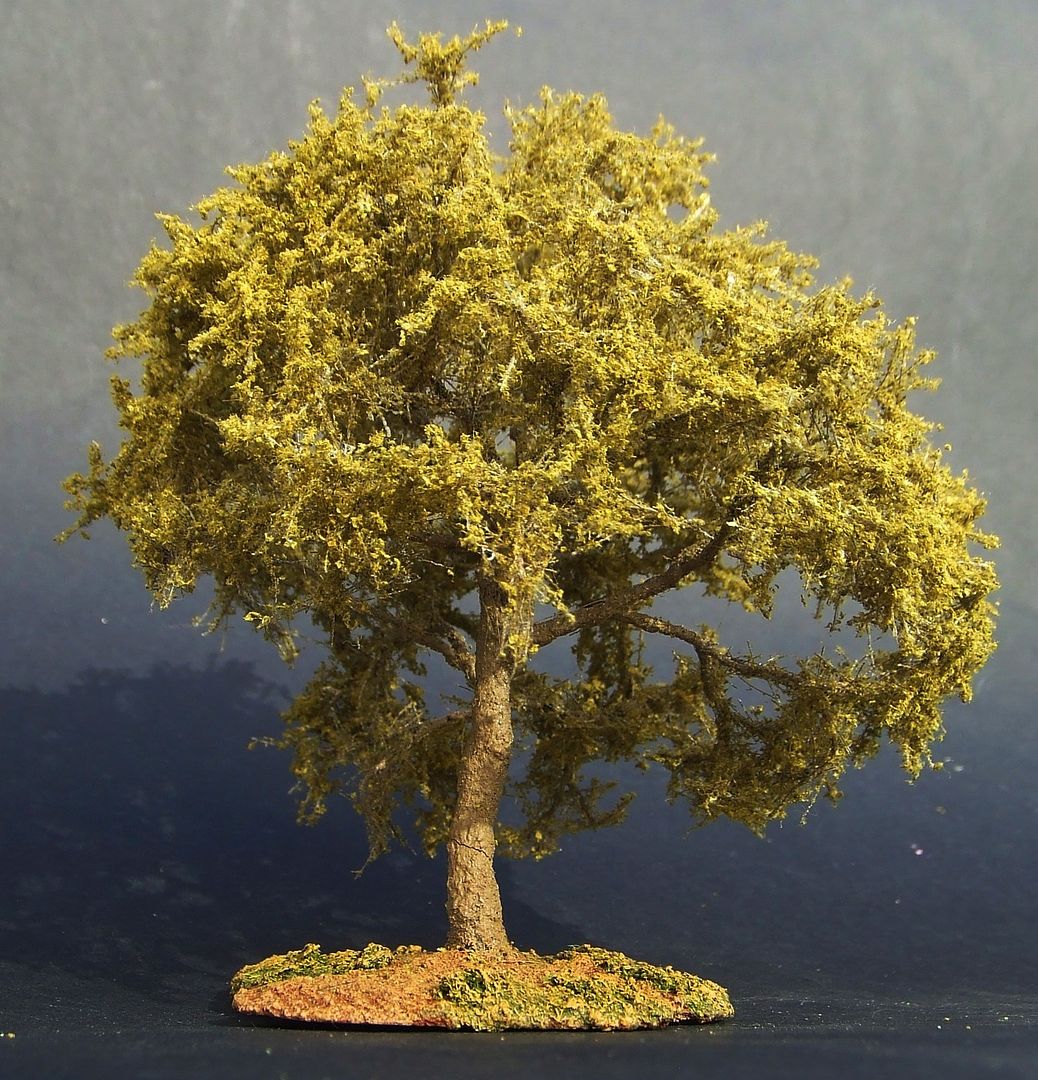
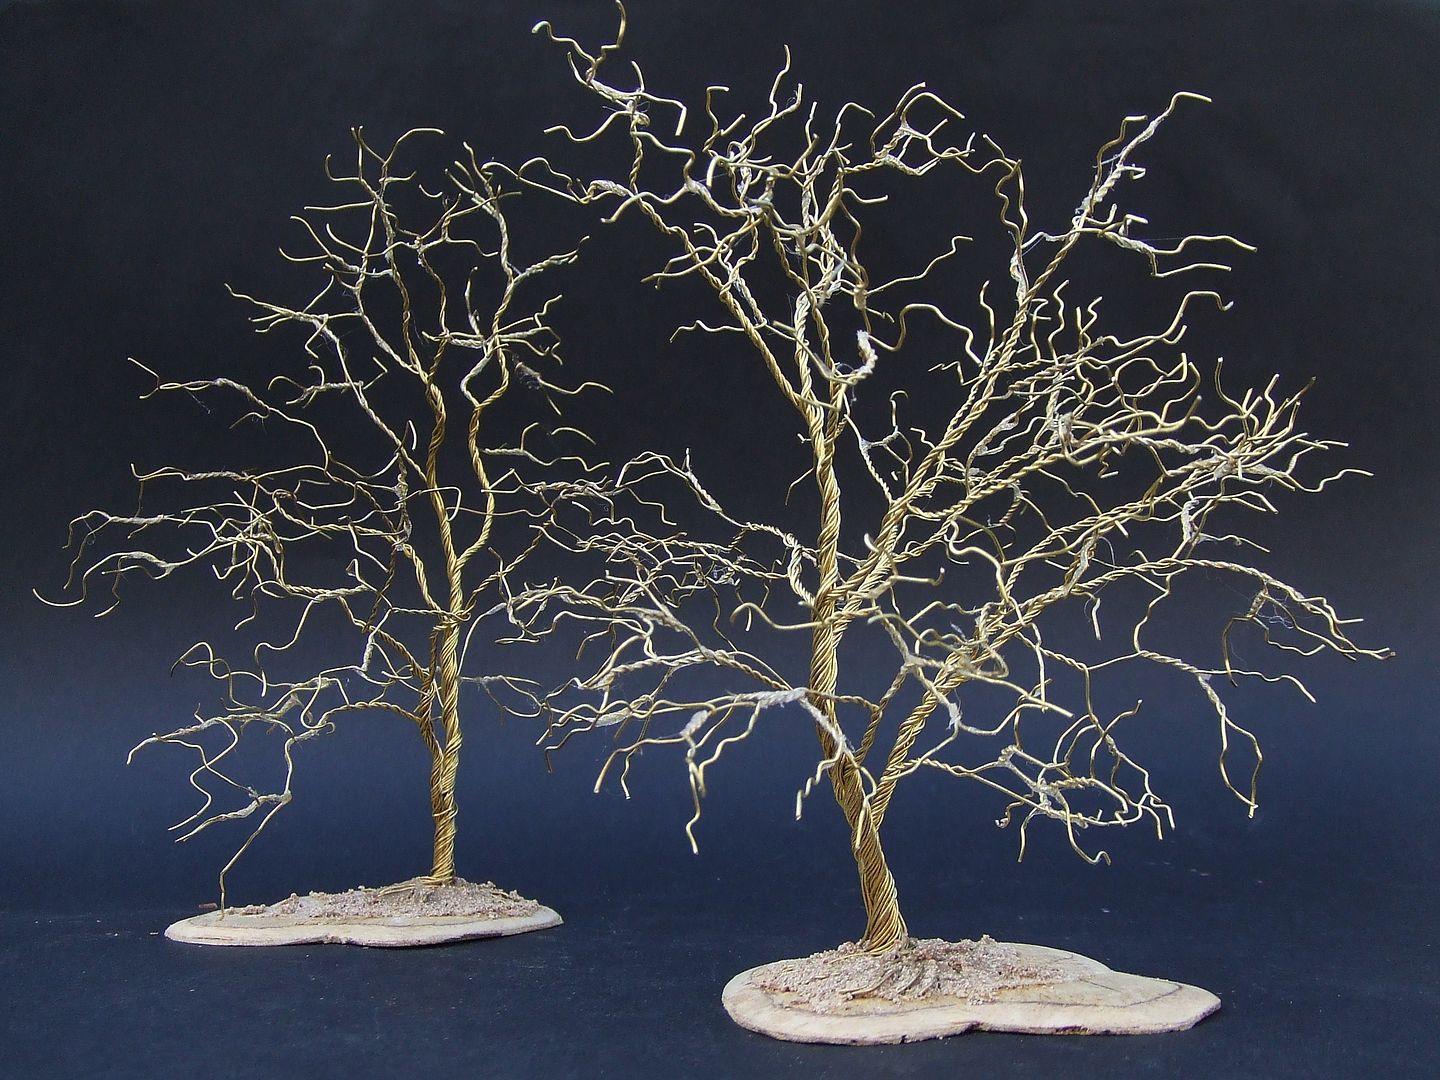
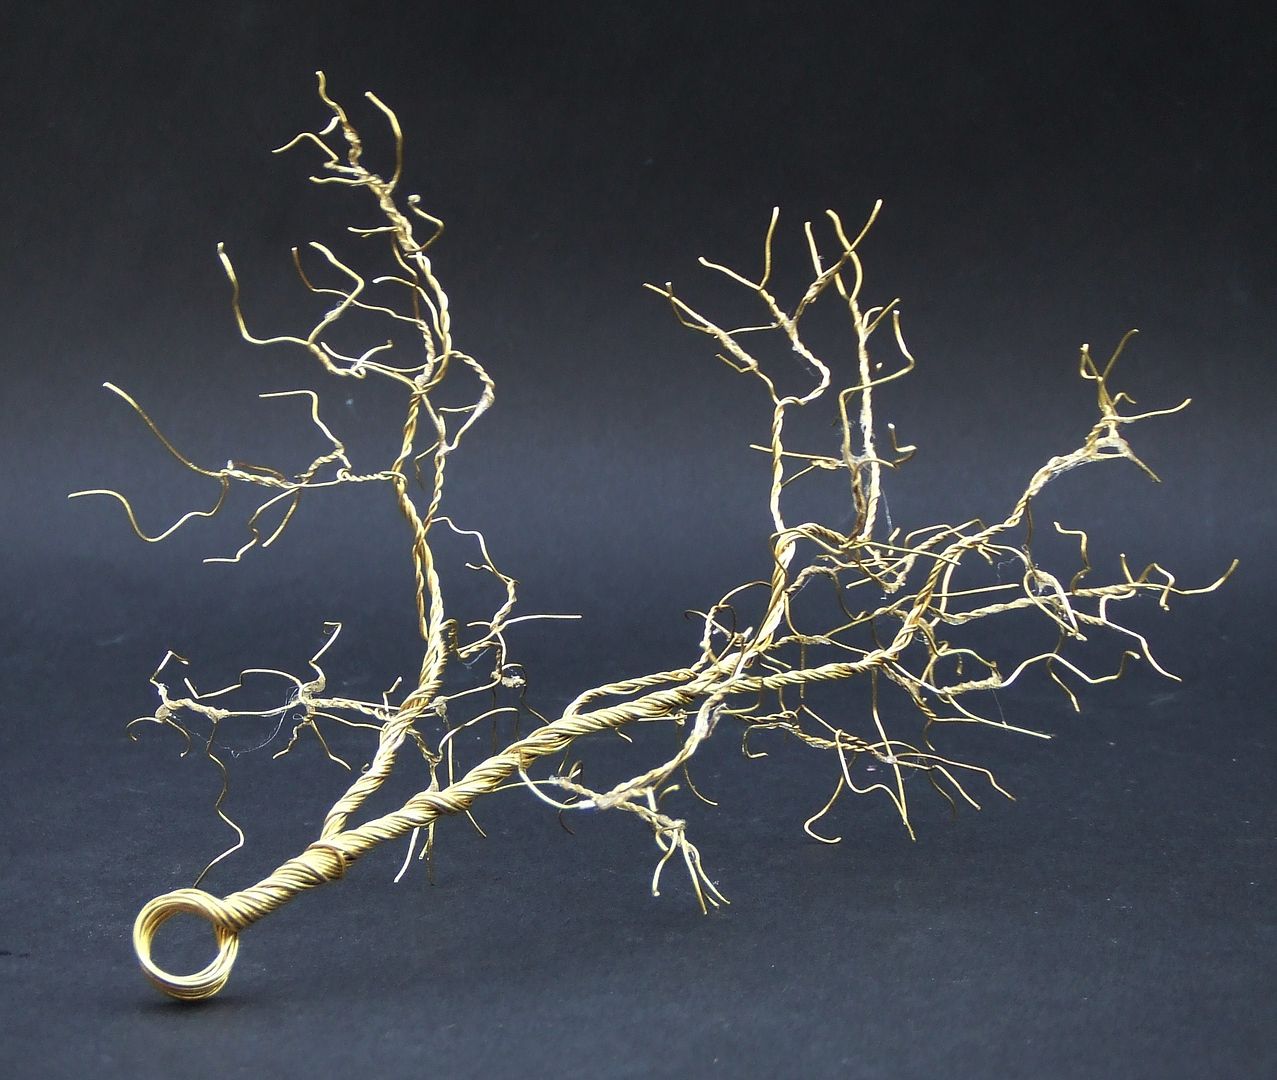
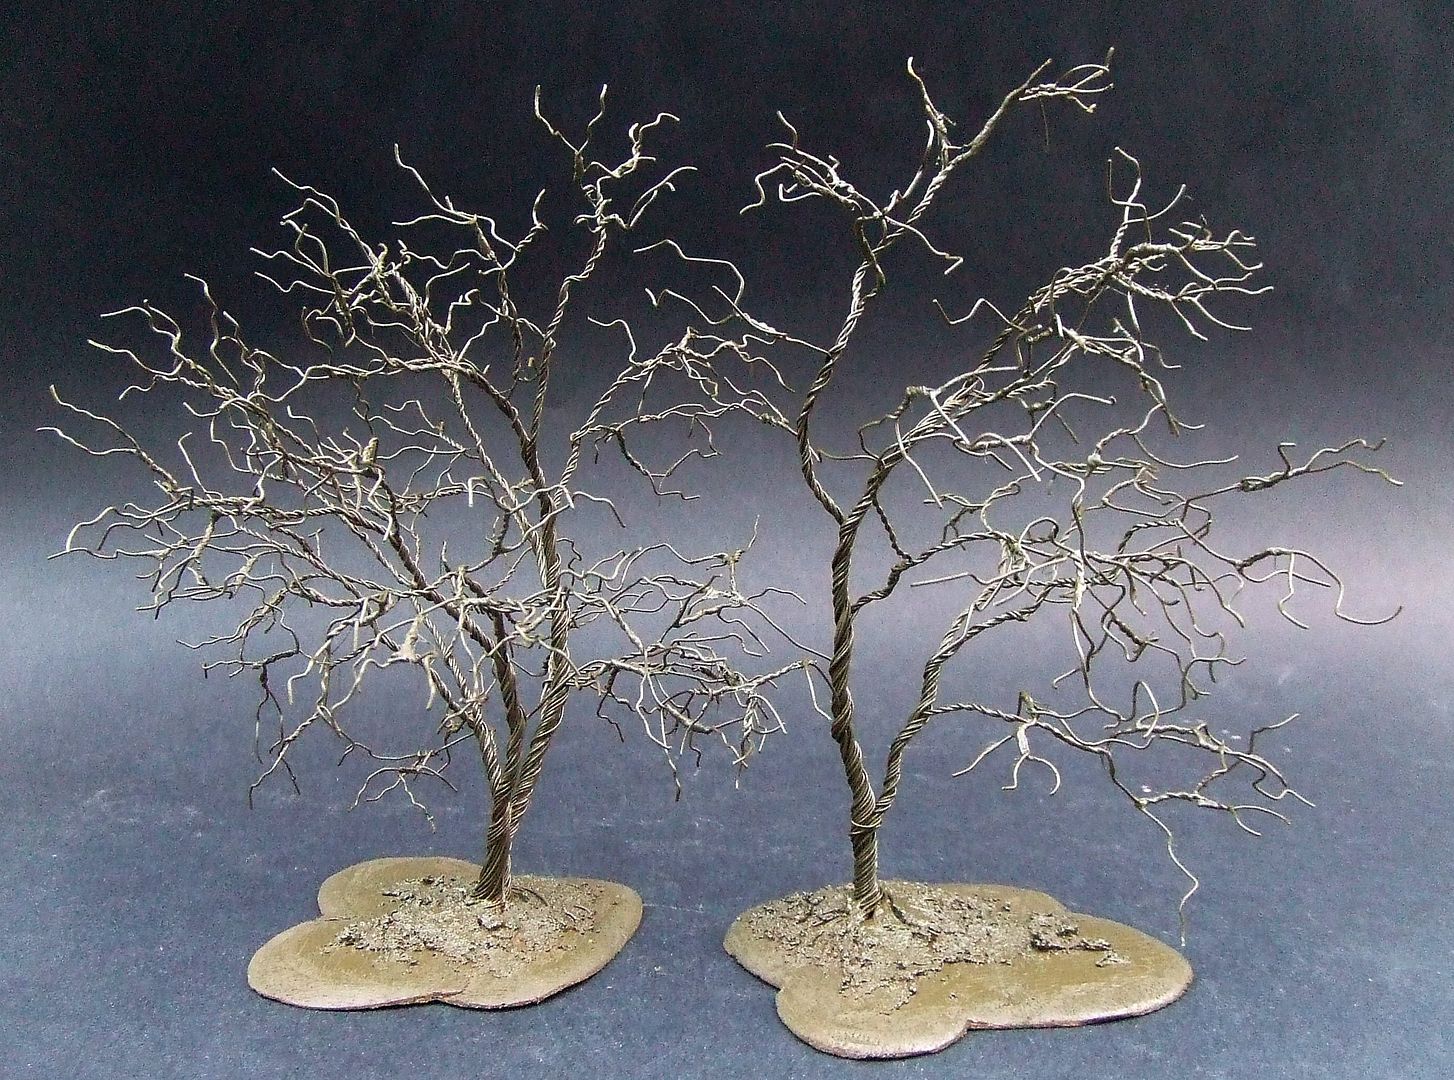
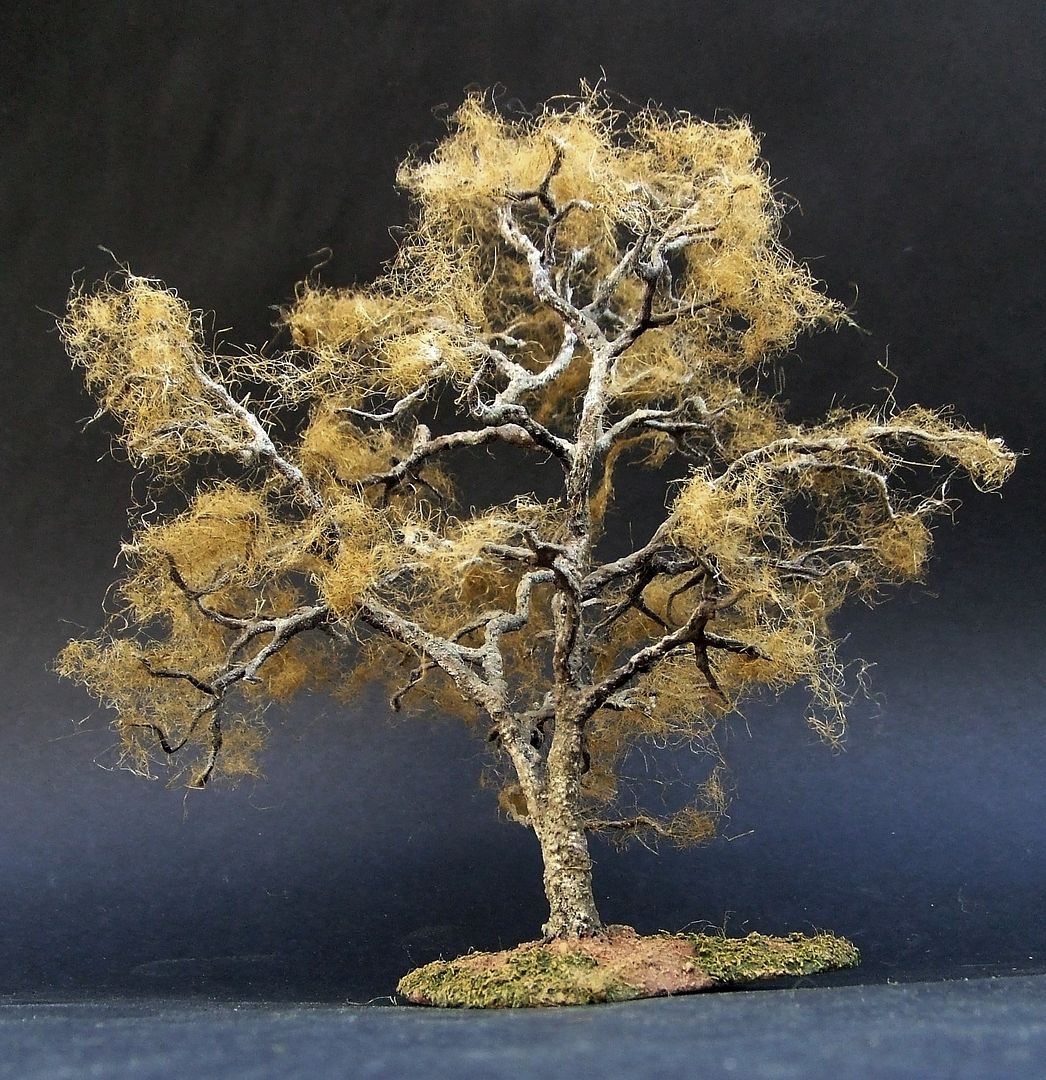
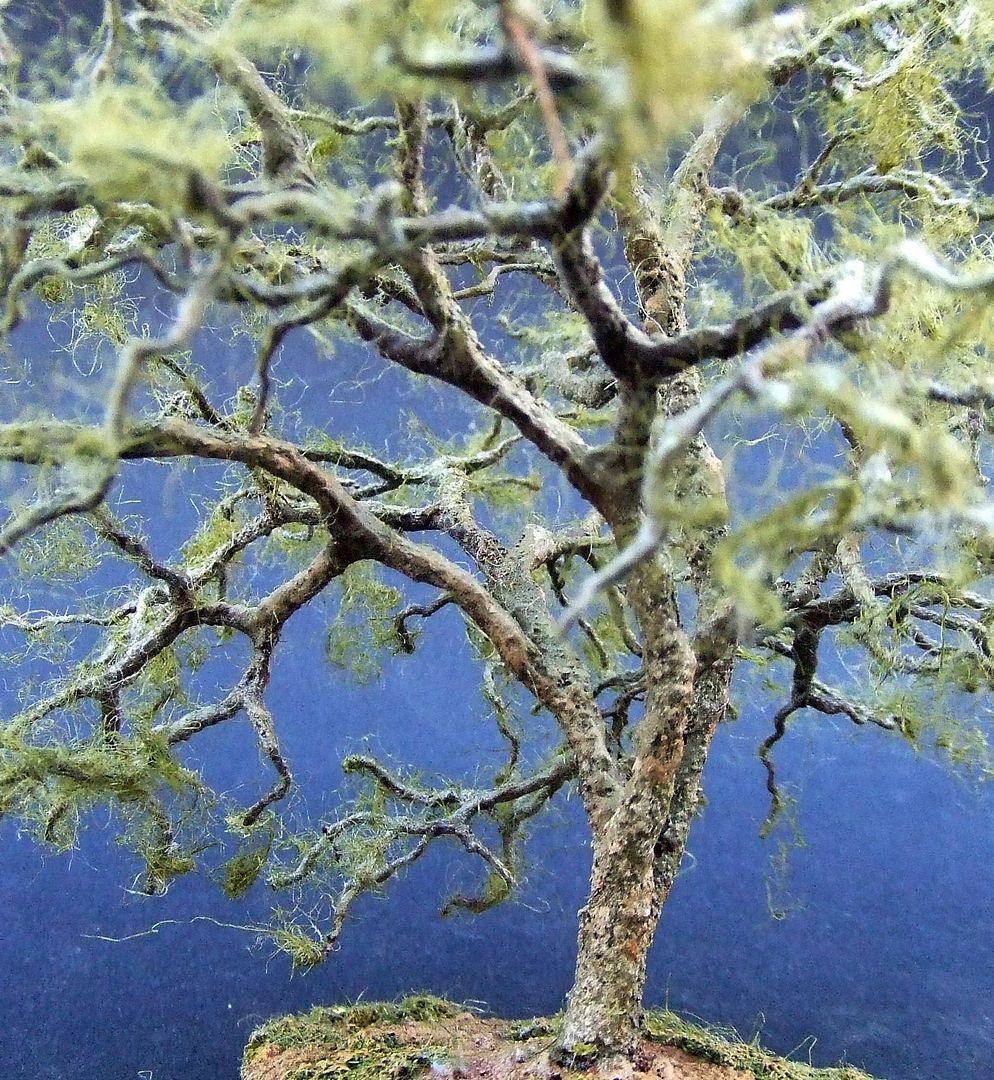
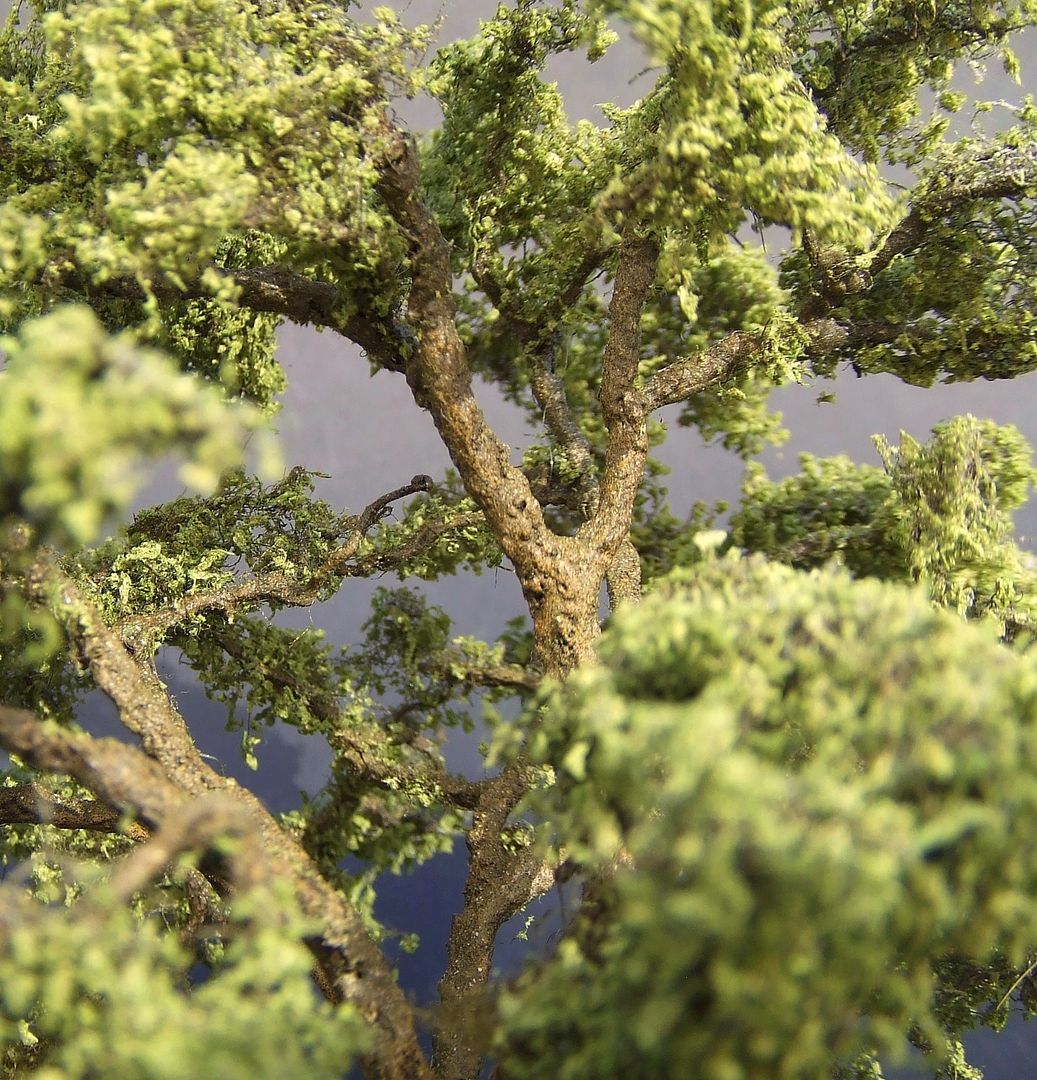
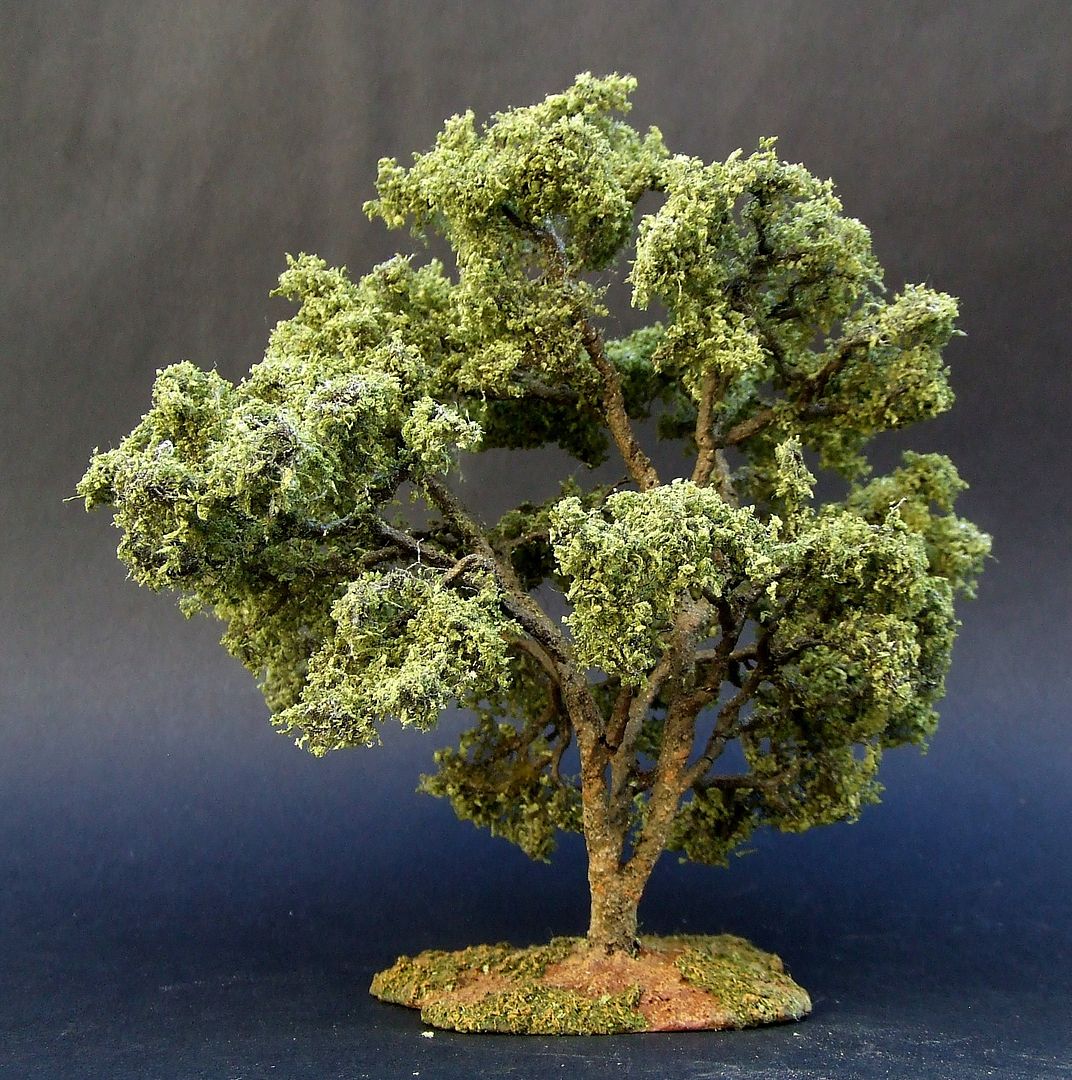
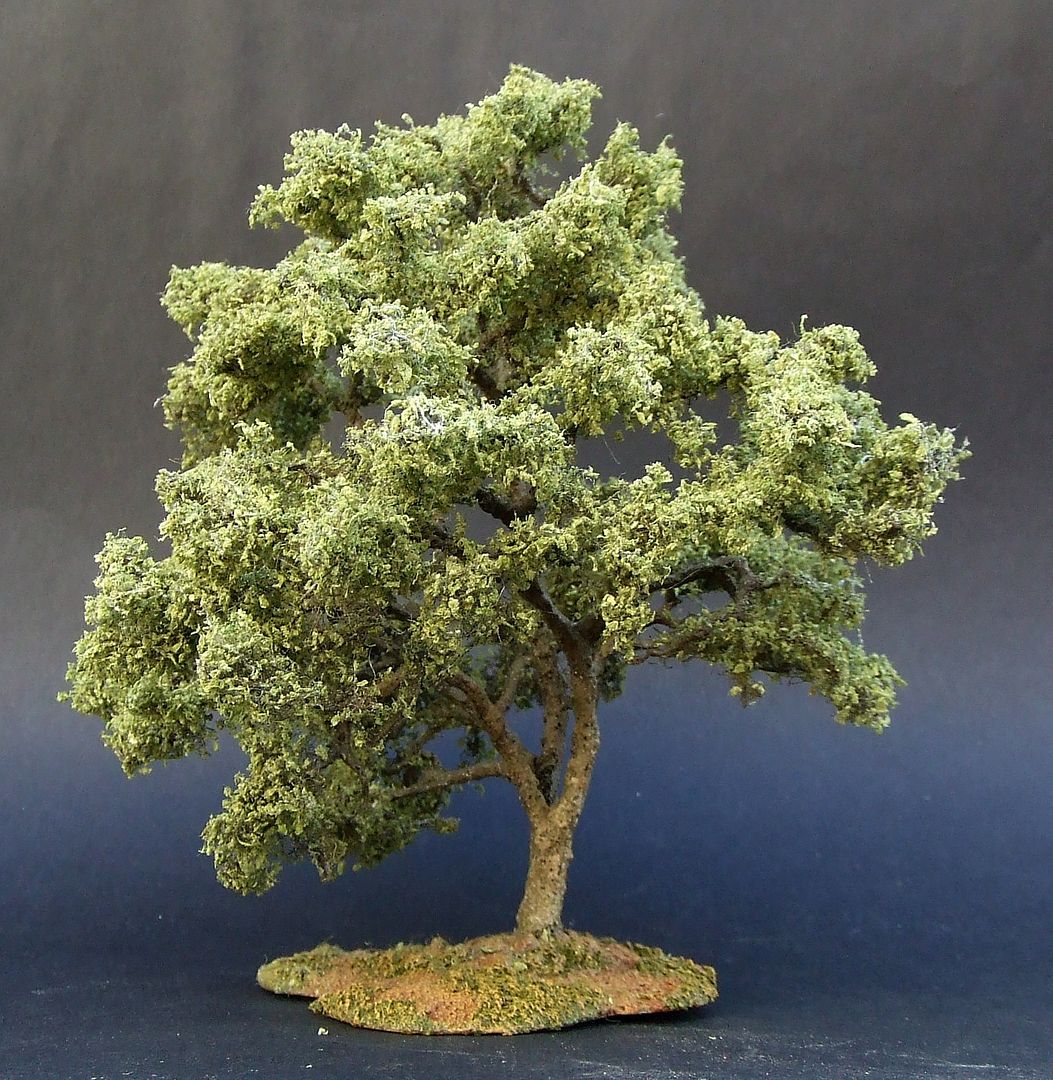
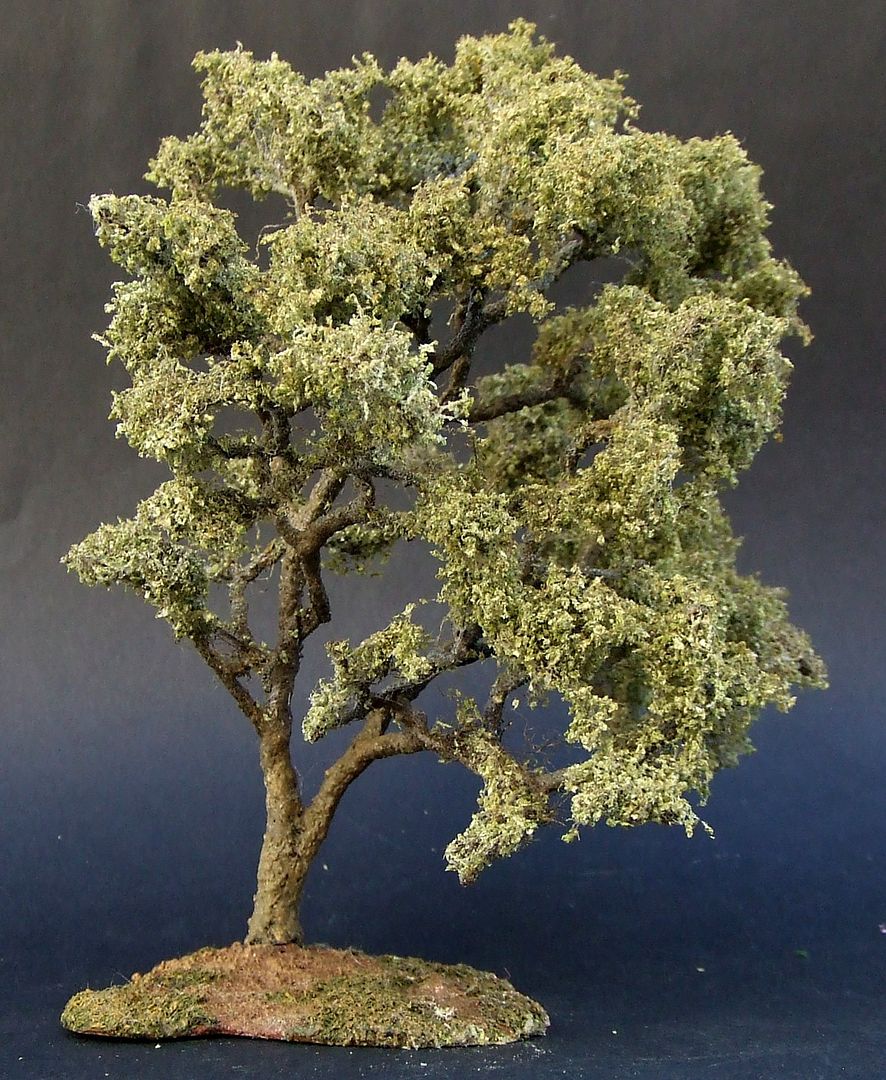
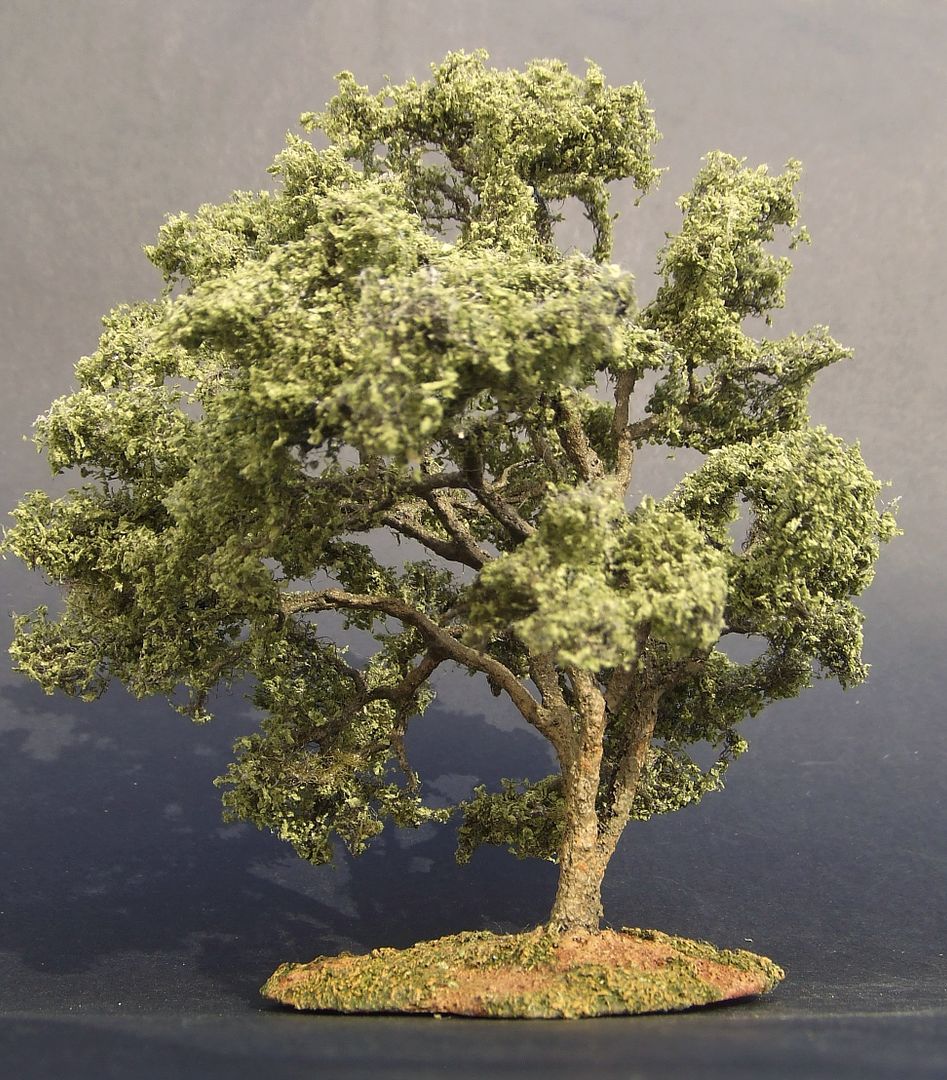
BUILDING A PERSIAN WALNUT TREE …
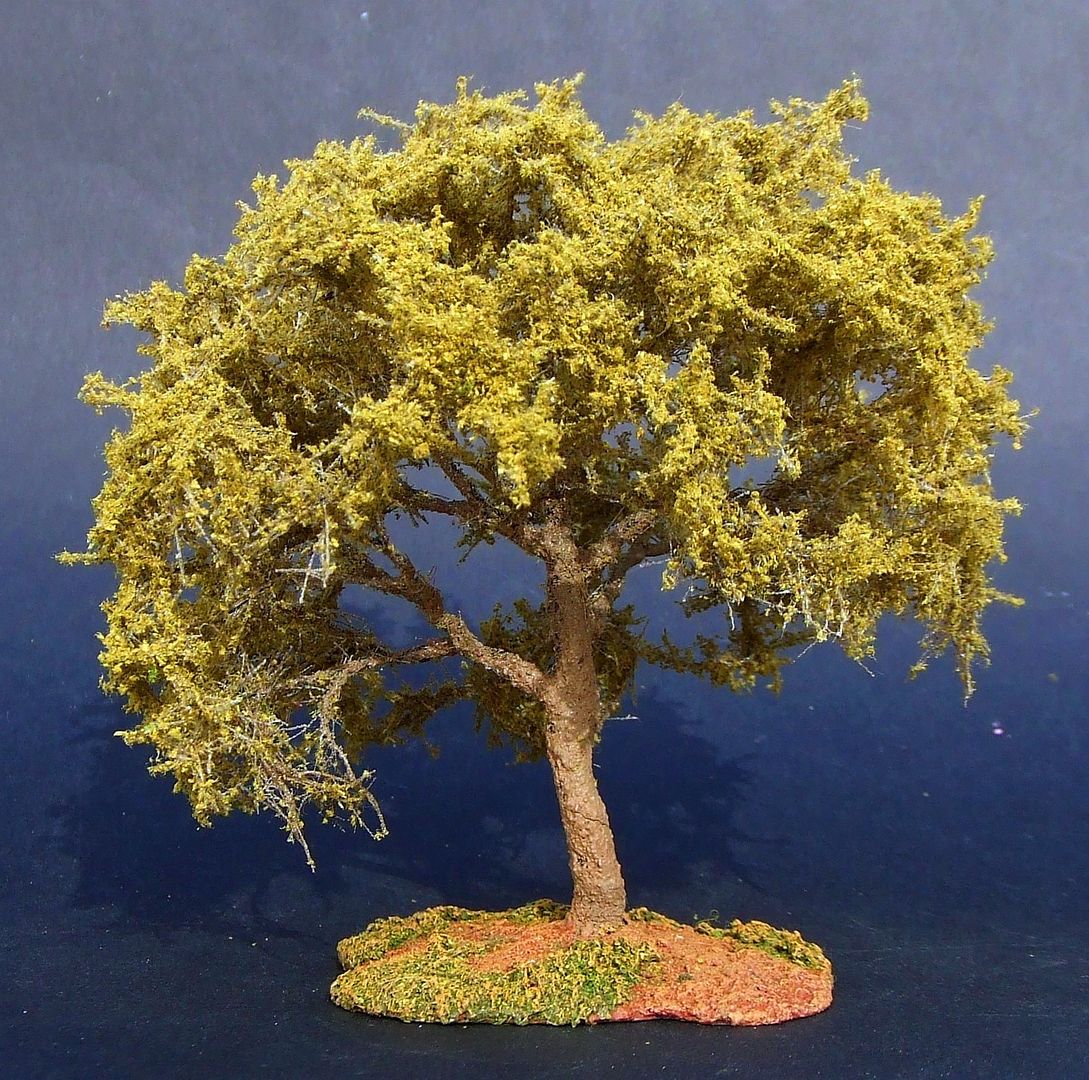
…using electricity cable…
…and viscose sponge.
Latin name: Juglans regia

The Persian Walnut, also known as English Walnut or Common Walnut, origins to the region stretching from the Balkans to the Himalayas and China and was brought to Europe by the Romans.
The worlds largest walnut forests can be found in Kyrgyzstan at 1000-2000m altitude.

After the weeping willow and lime tree tutorials it is time for treating some finer and more delicate materials and techniques.
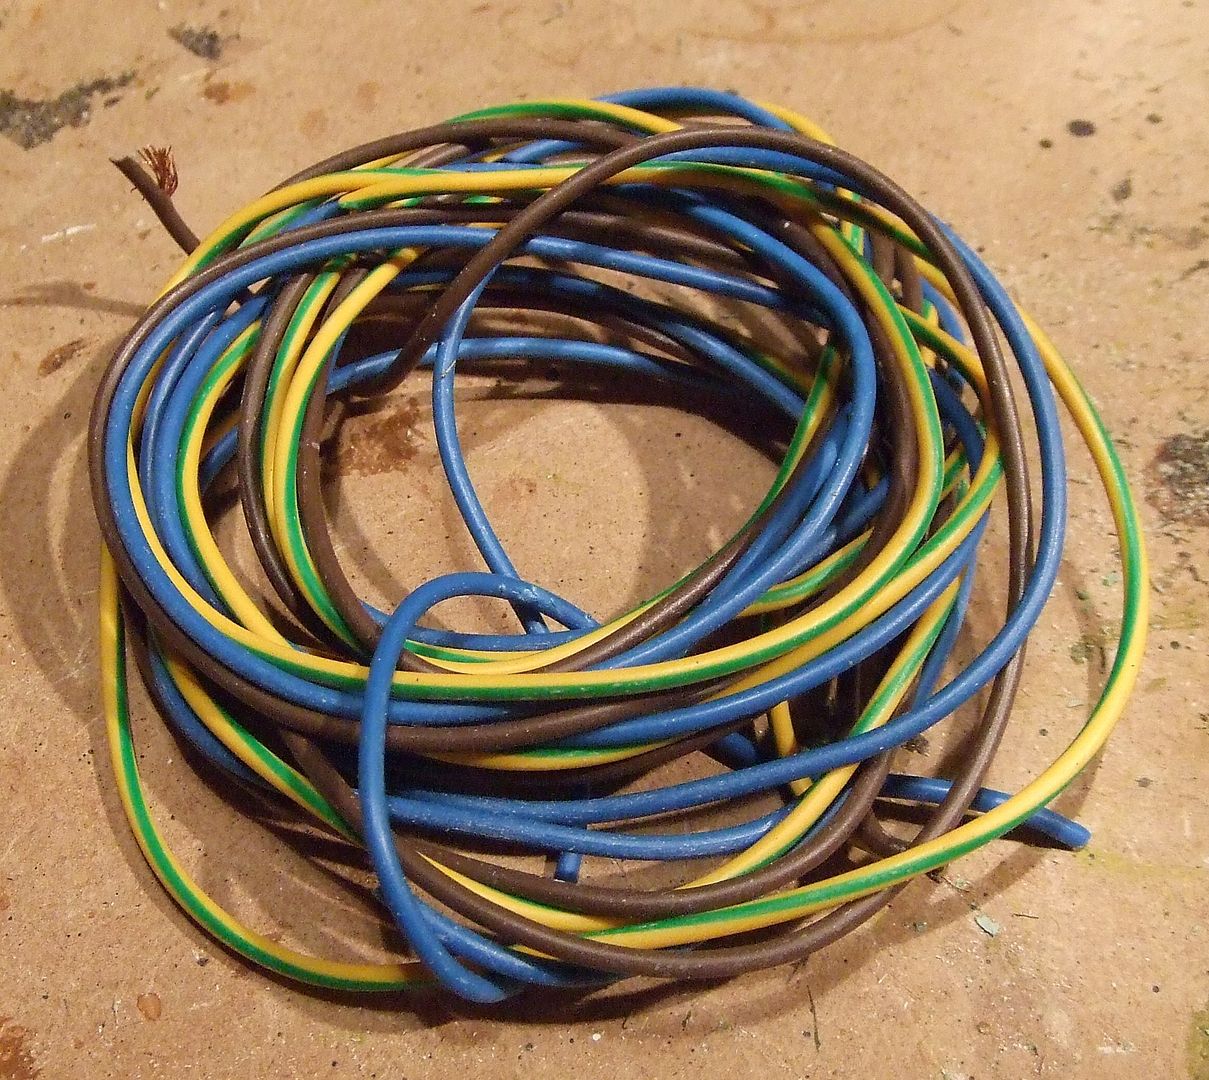
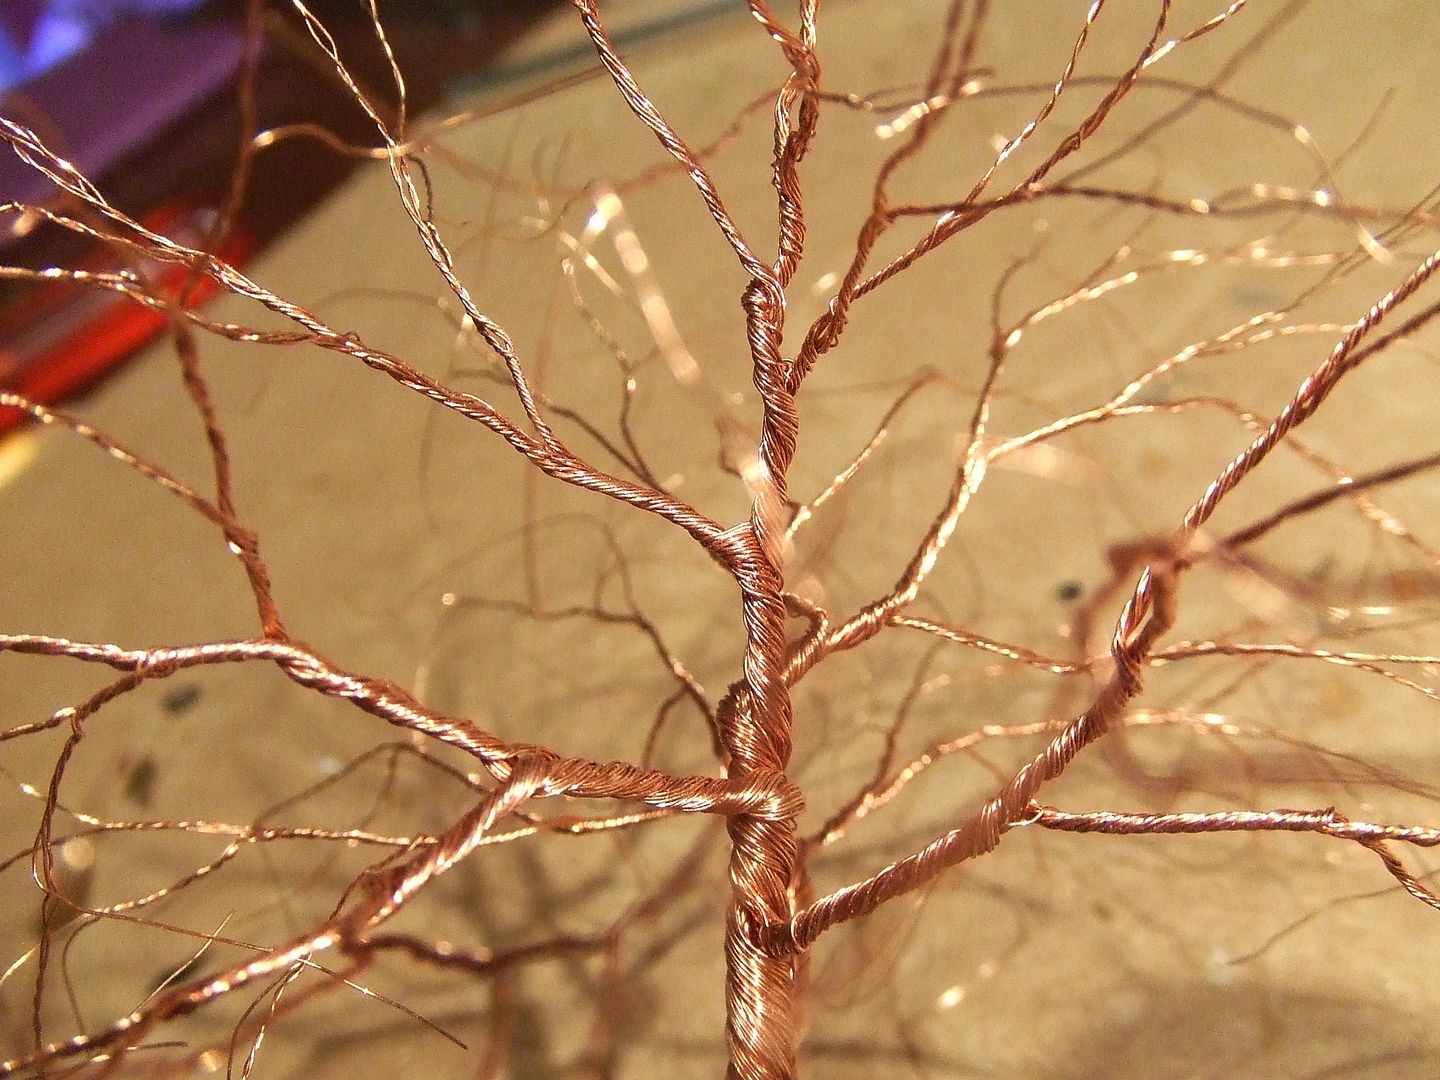
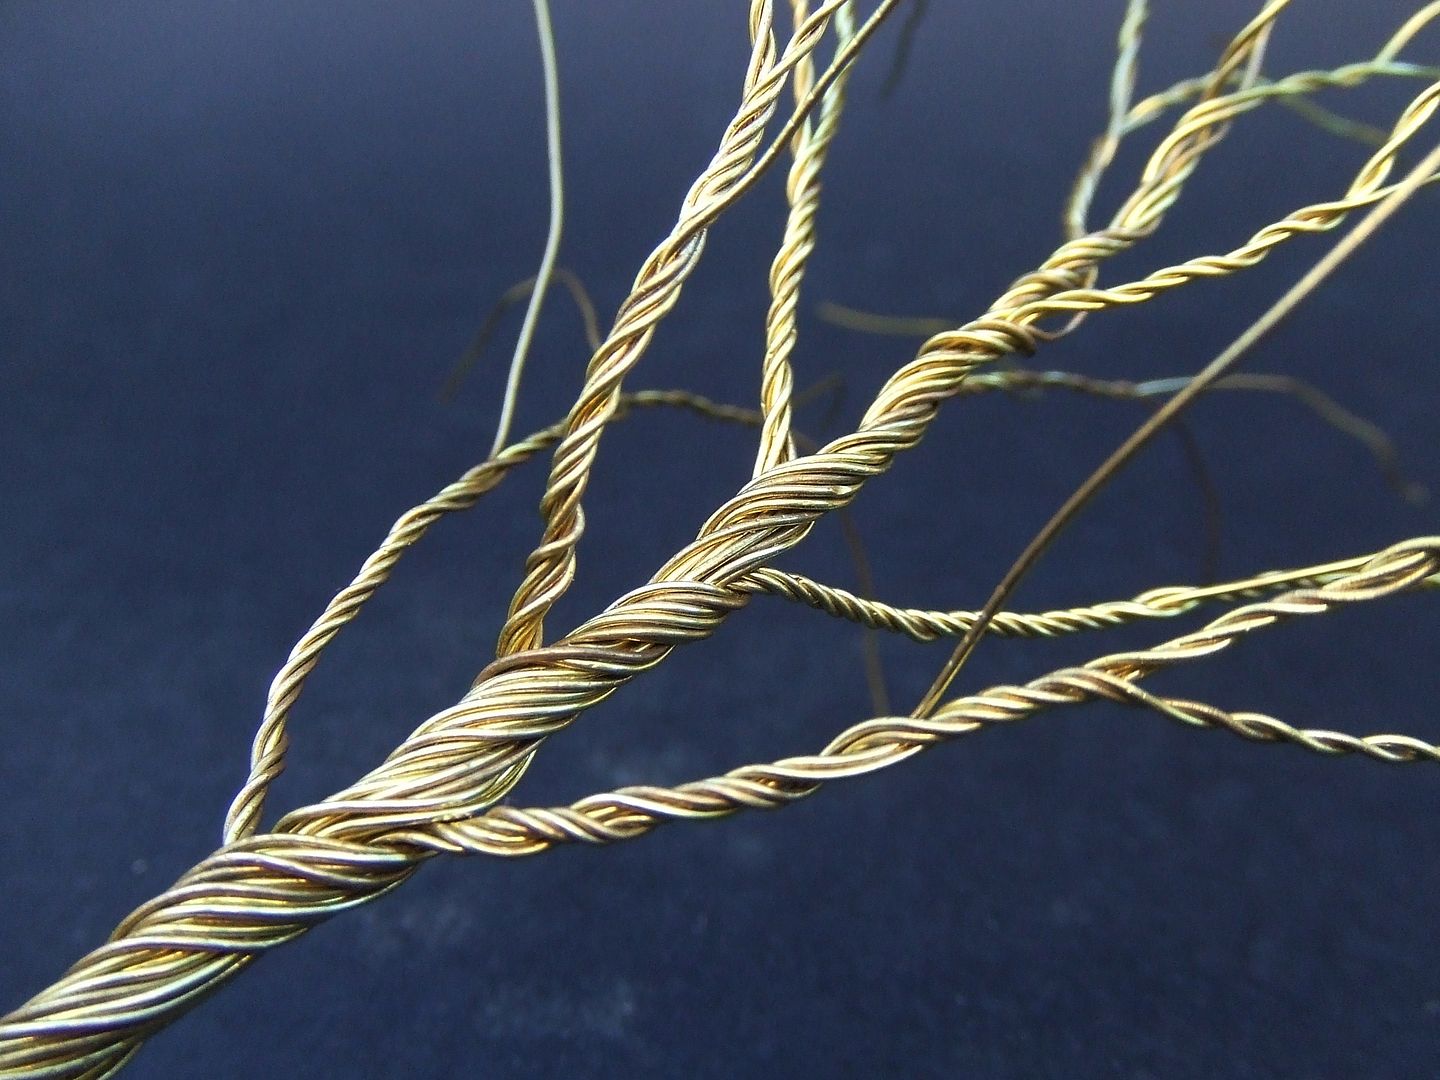
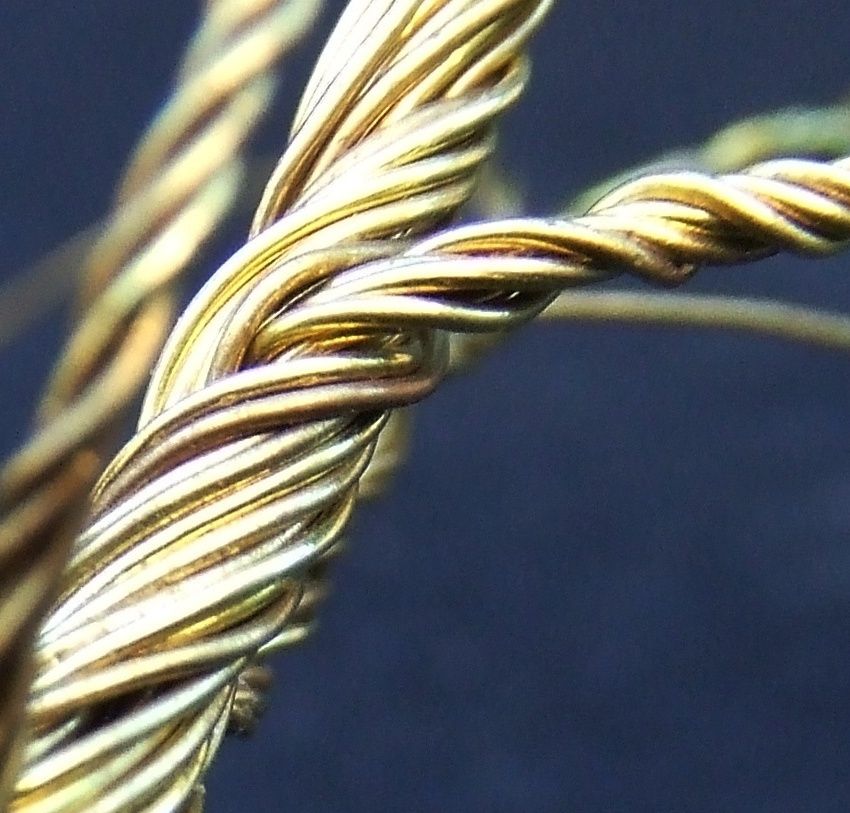
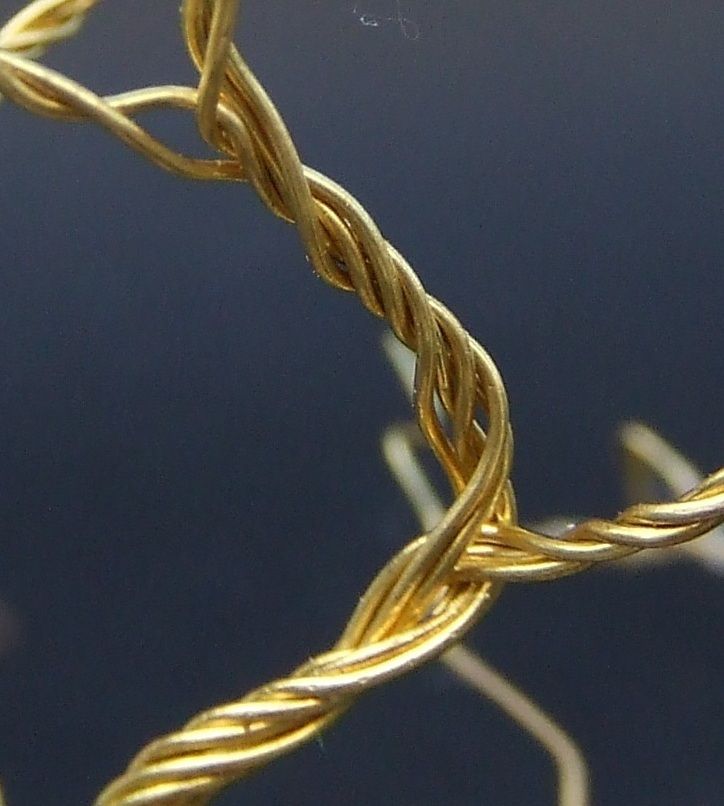
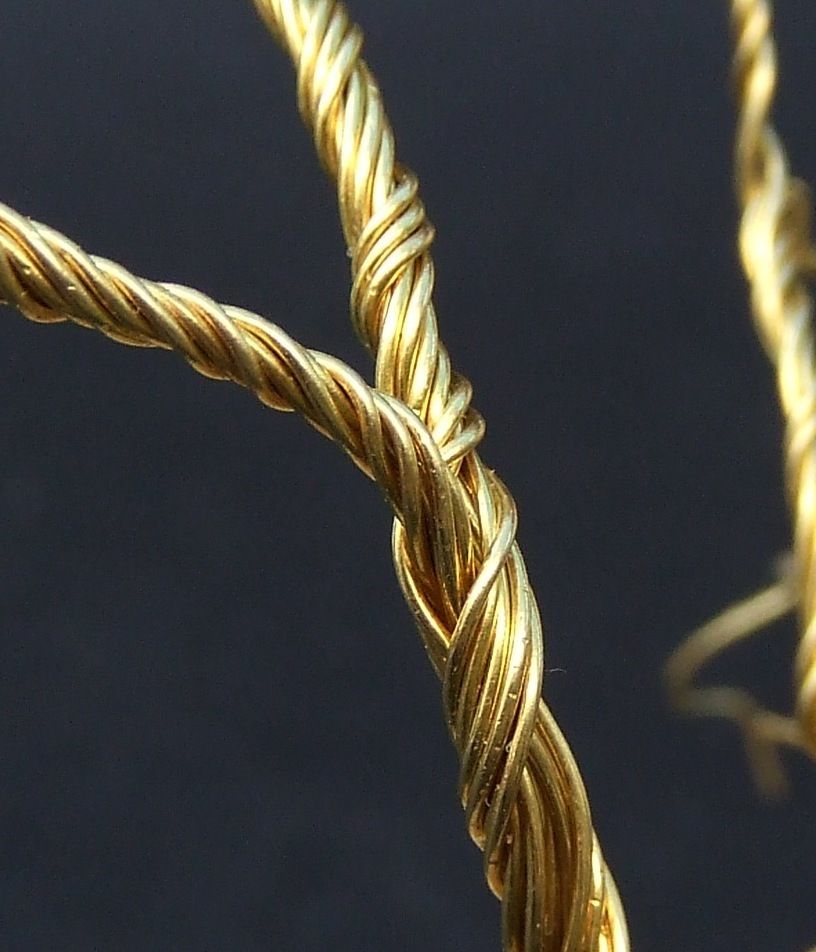
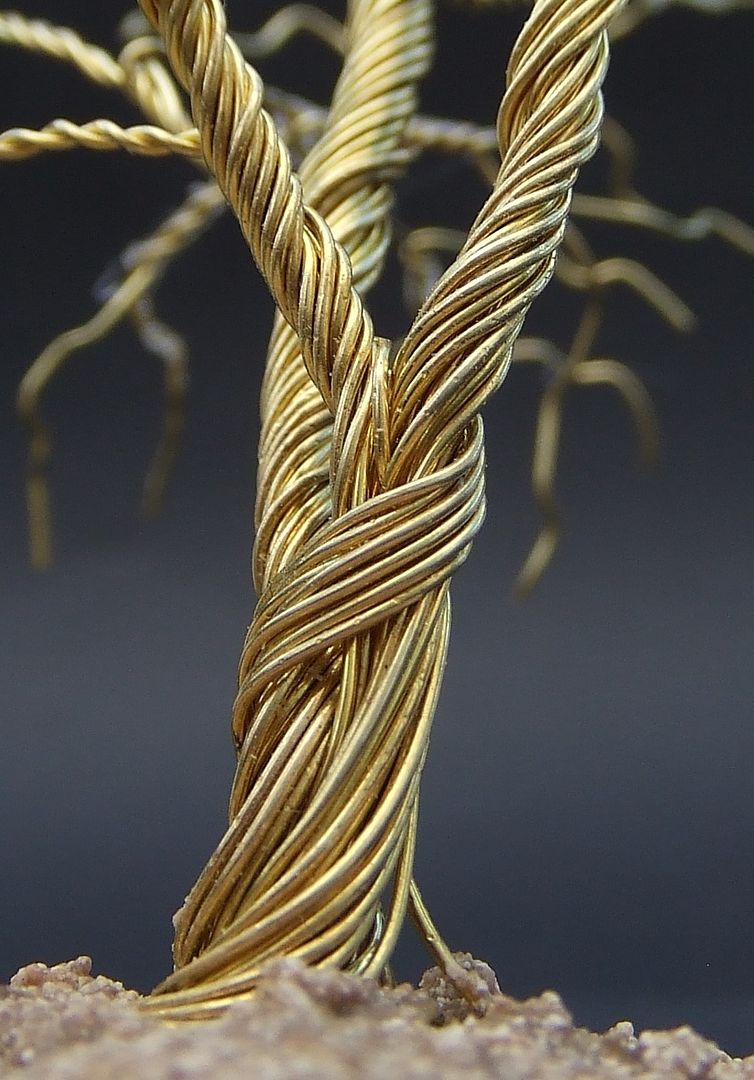
COPPER WIRE FRAME
Copper wire from electricity cable is extremely thin so perfect for twisting fine branches and twigs.
Disadvantage is its weakness.
The final shape of the tree can be easily distorted since copper is soft and not flexibel.
For this reason building electricity cable copper wire trees is perfect for dioramabuilding (static based situation) but not for gaming (touching and transporting).
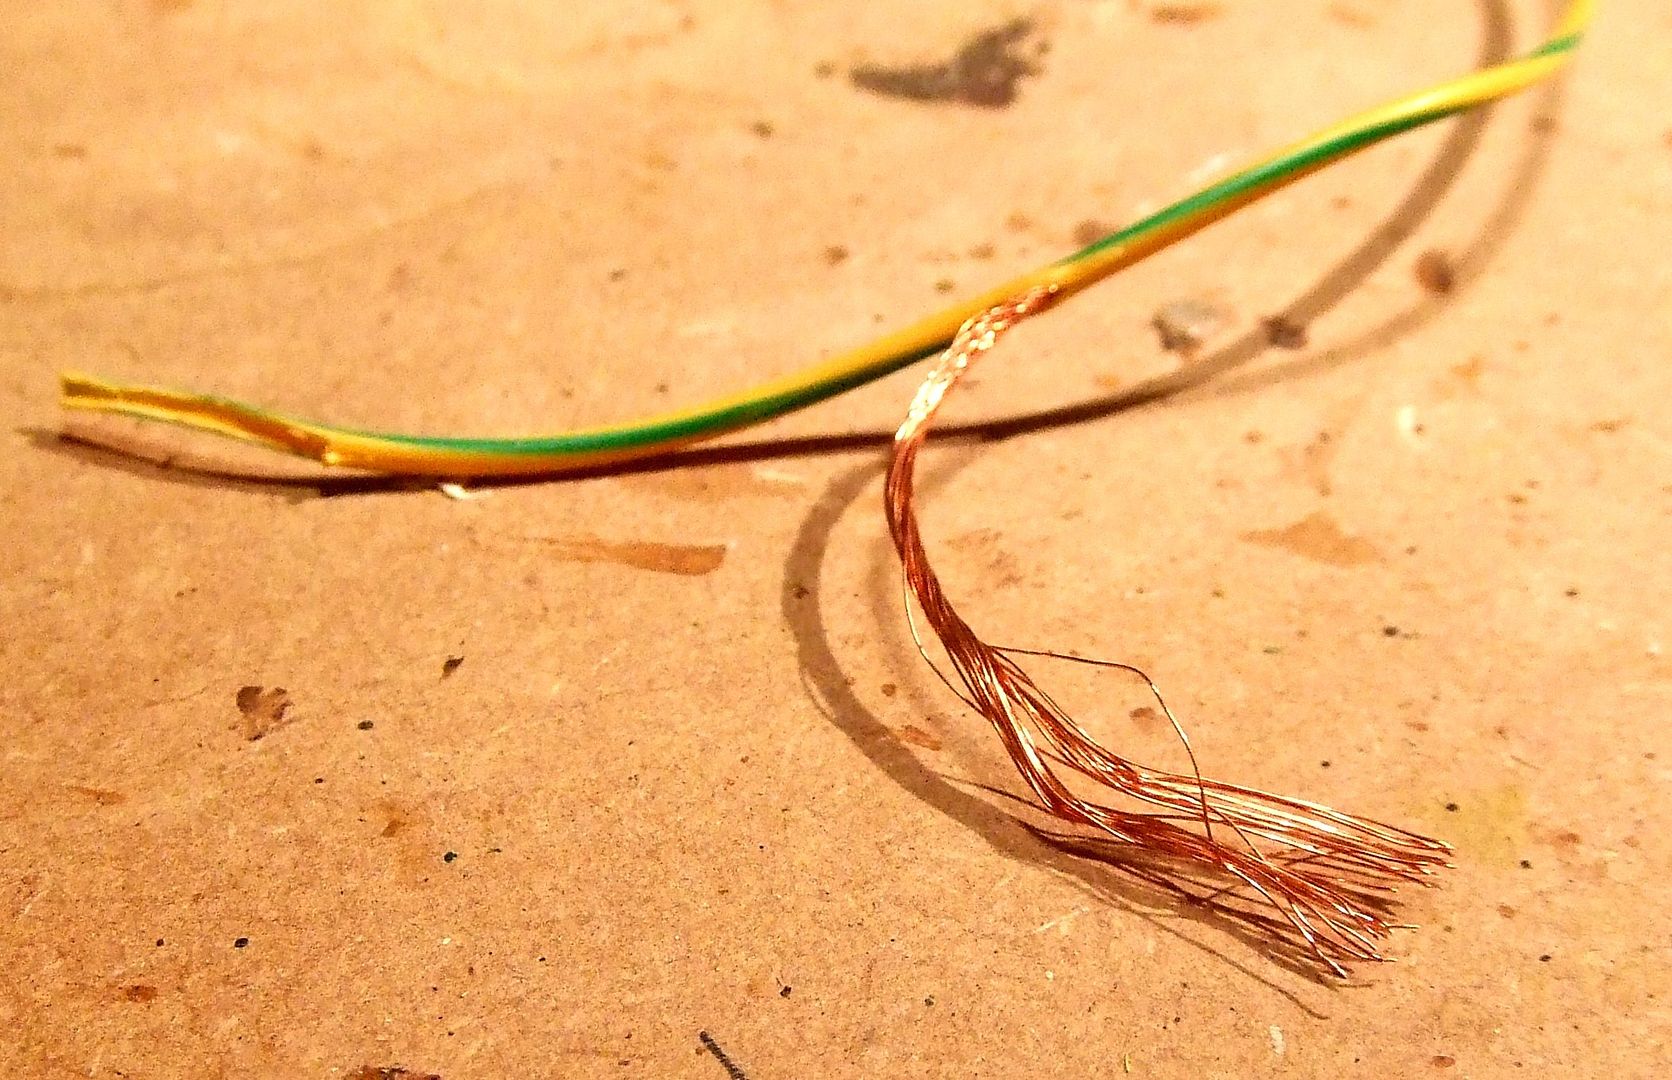
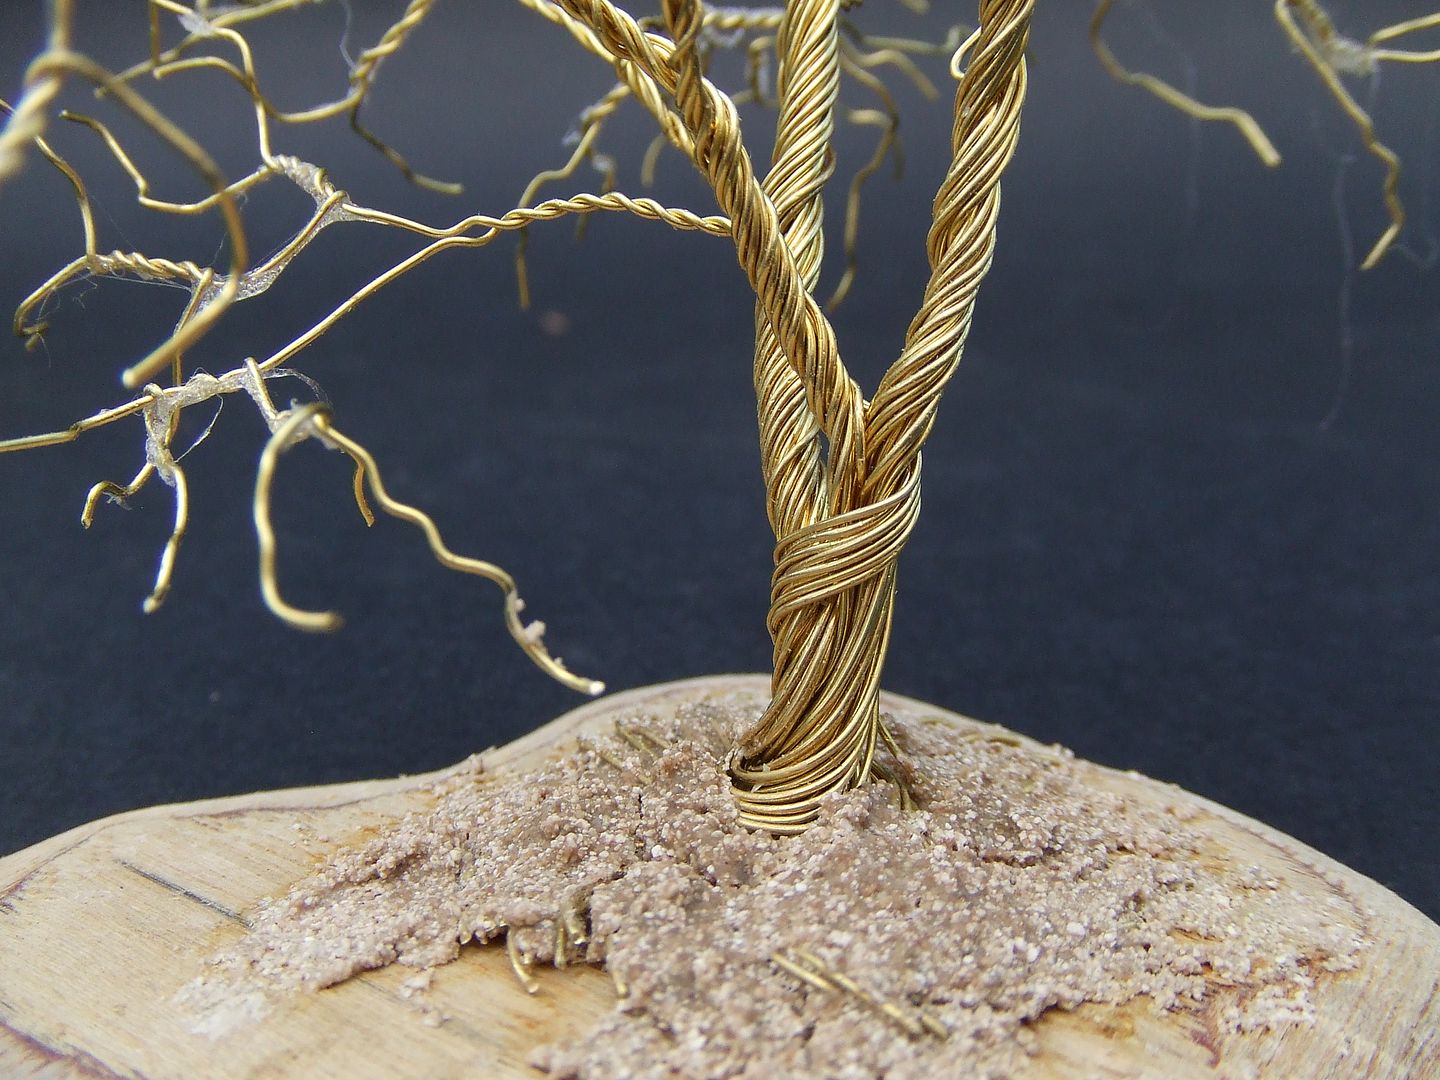
Collect some meters of waiste electricity cable.
Remove plastic coating.
Each cable has about 25 copper wires inside.
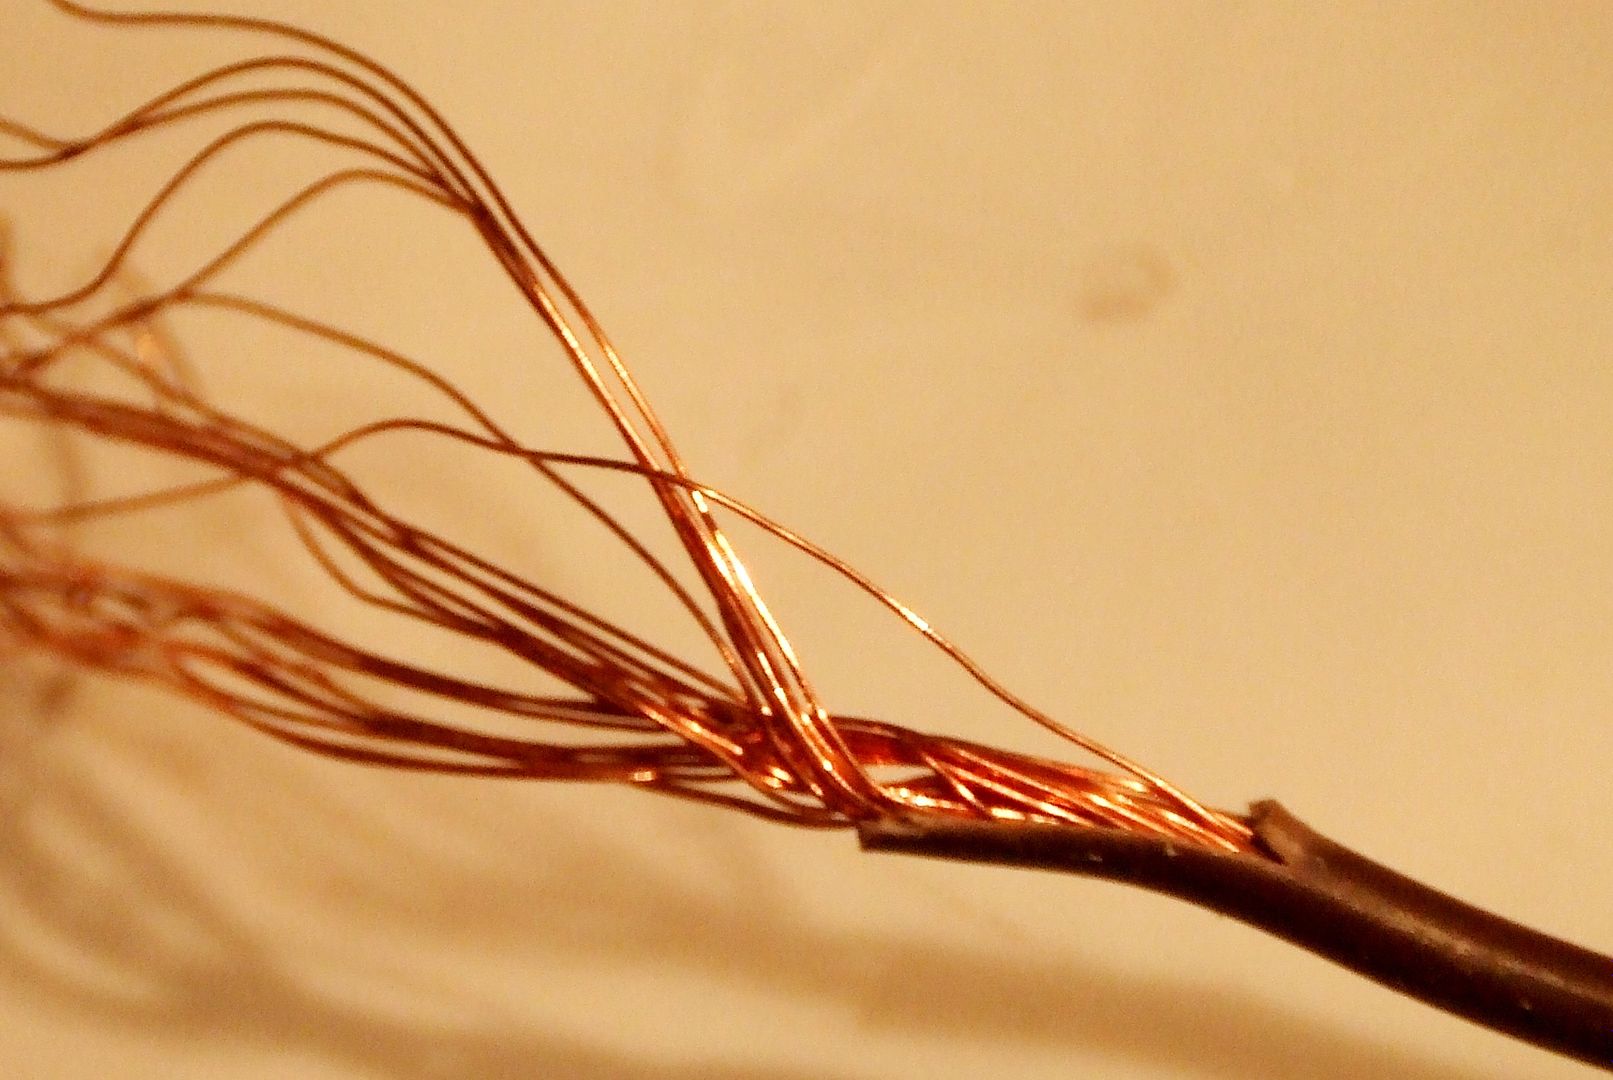
Four such cables make one hundred wires of 40cm each.
Make one bundle.
Twist around brush handle.
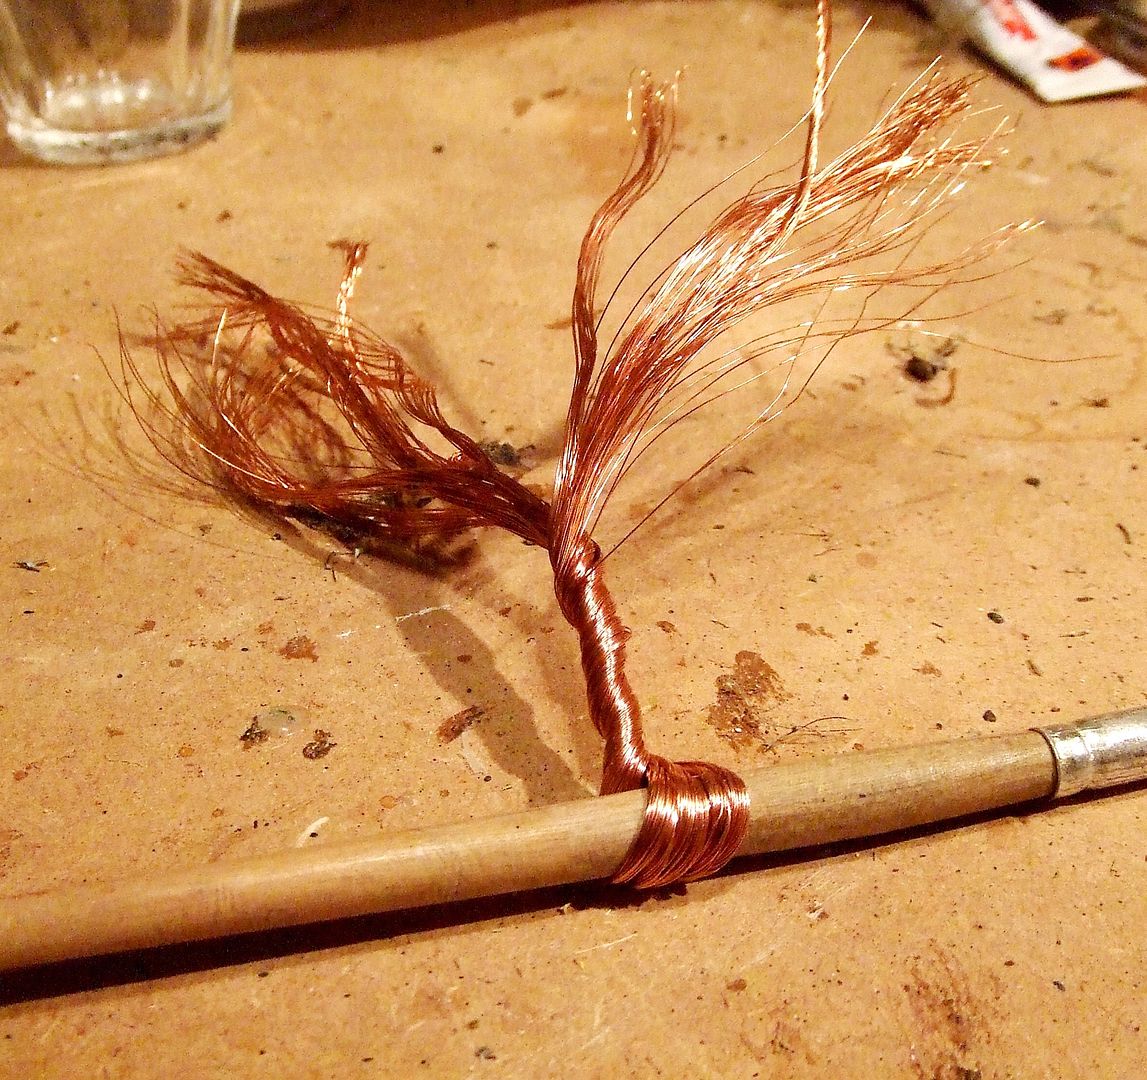
Twisting will stay in shape without glue or soldering.
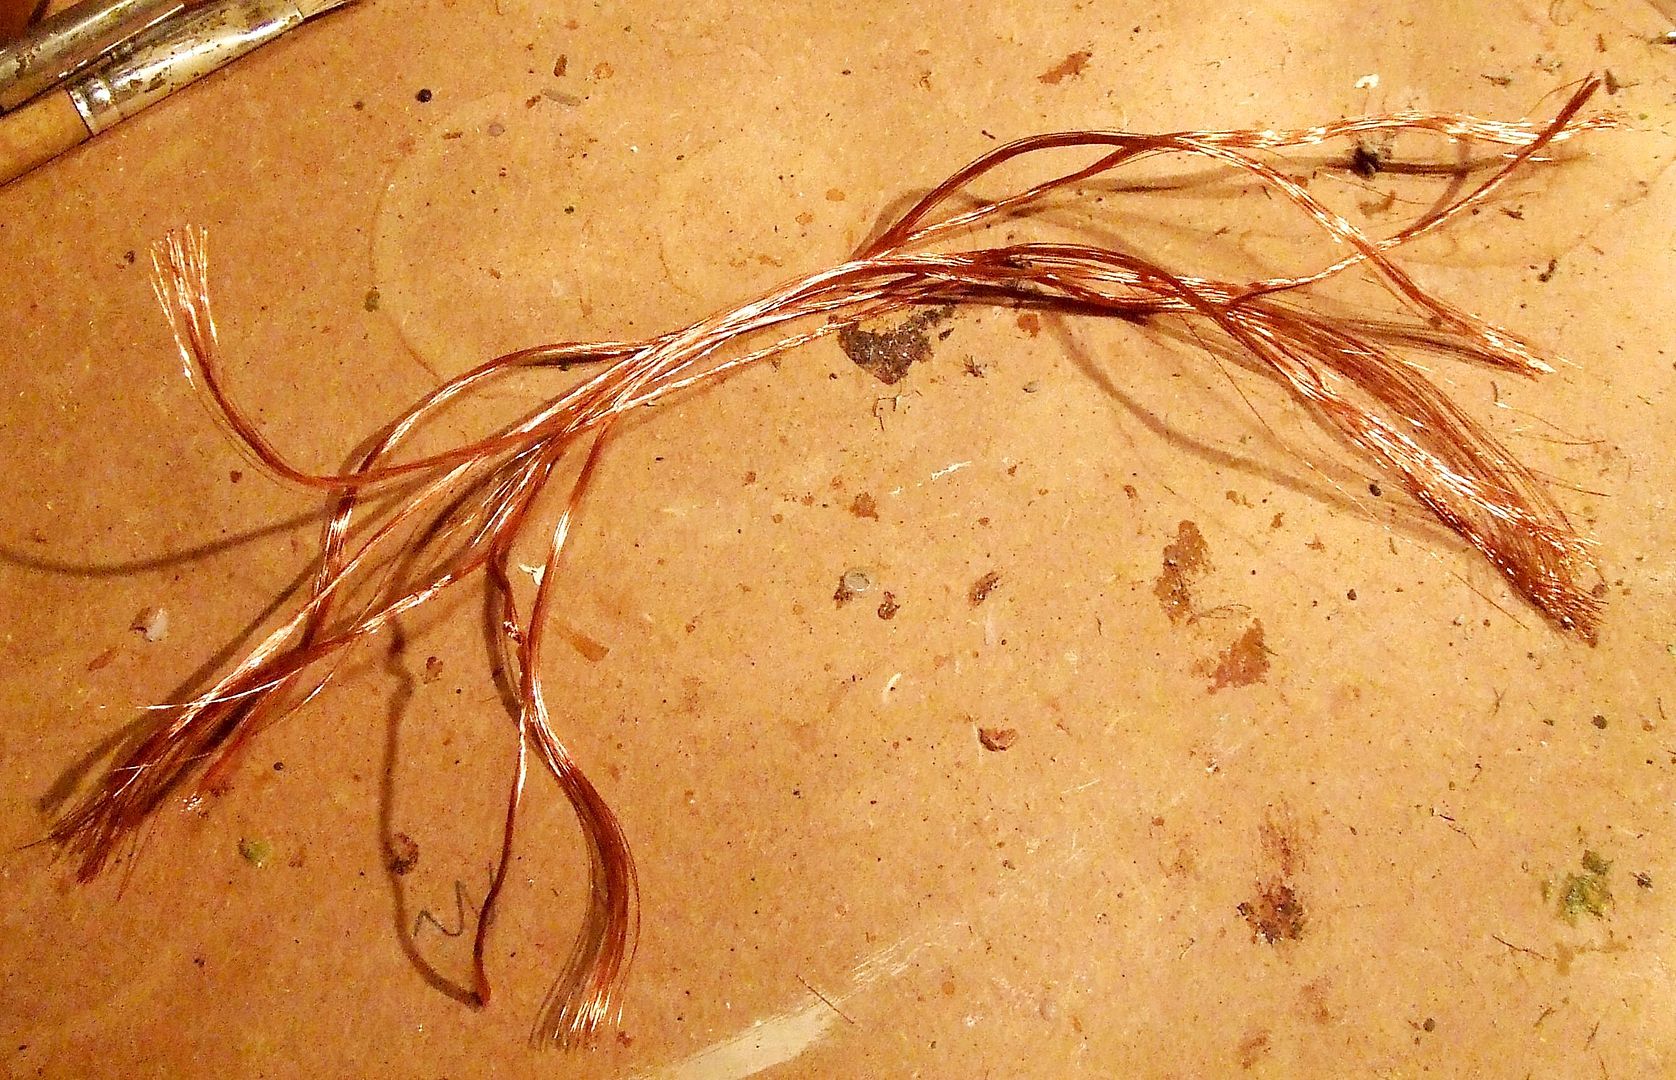
Branches and twigs in winter.

Create branches in temporary horizontal direction to enable construction.
Split up branches in half and twist both halves.
Split halves in half and again into one hundred single twigs.
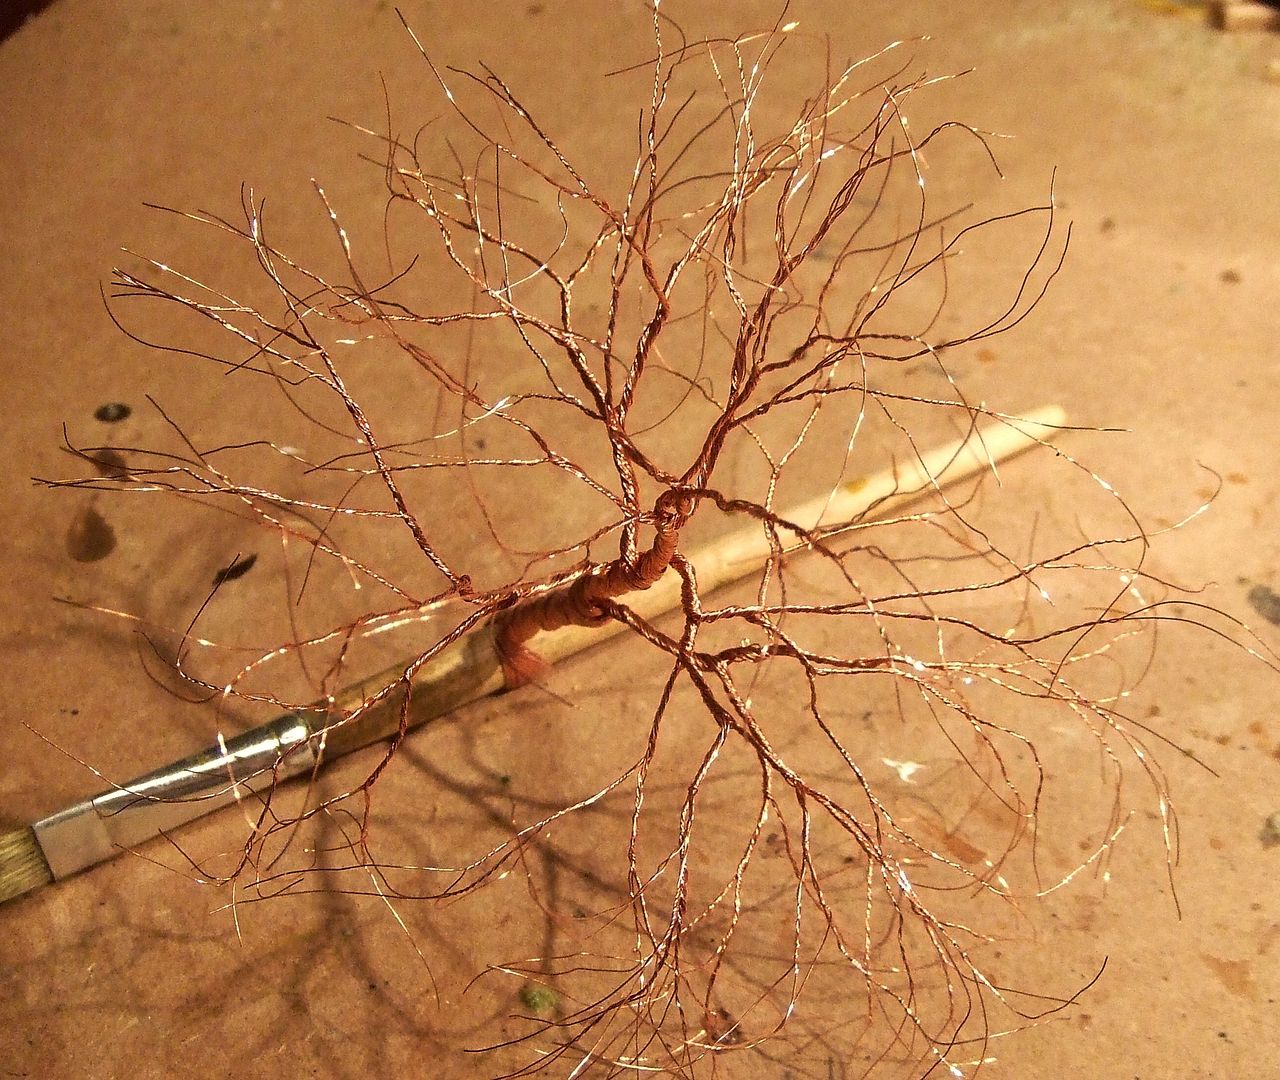
Use real trees for proportions.

Fasten on base and bend horizontal branches upwards.
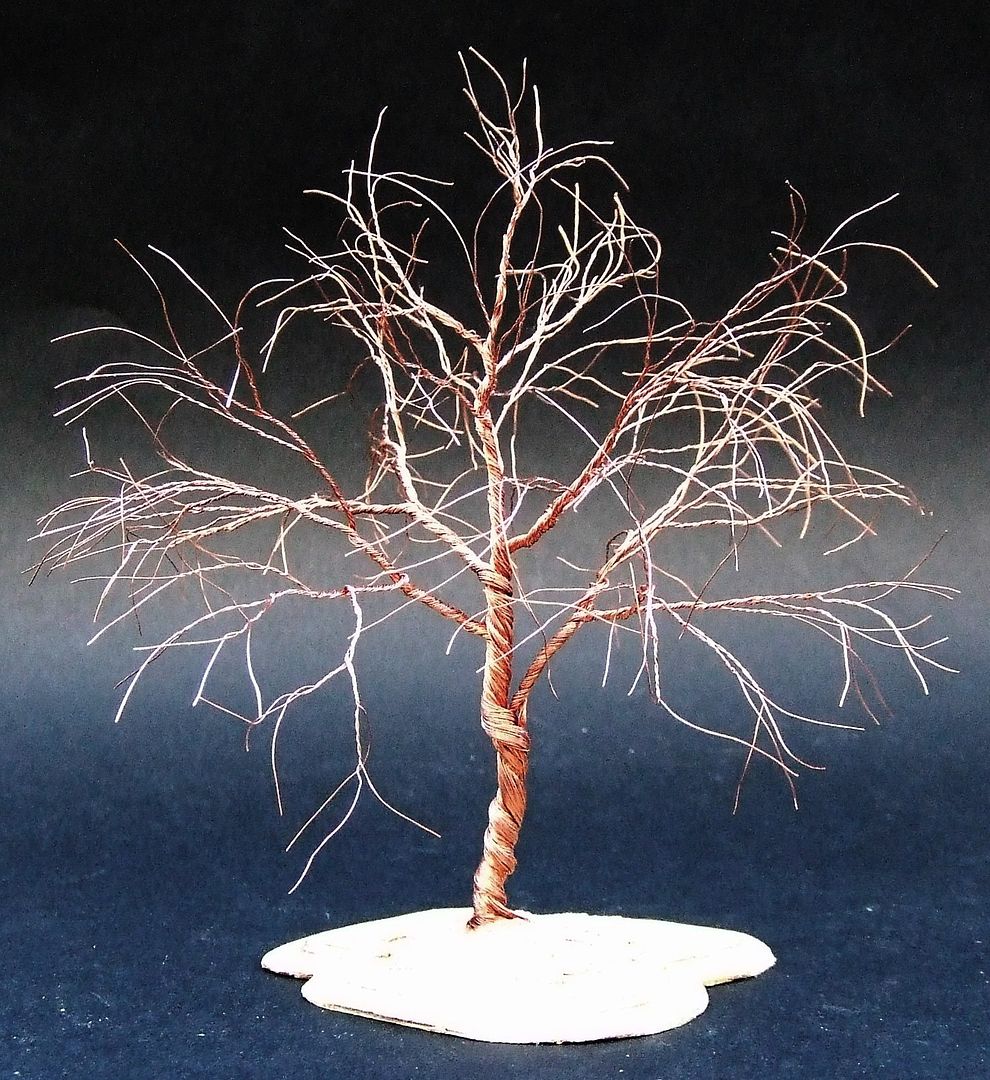
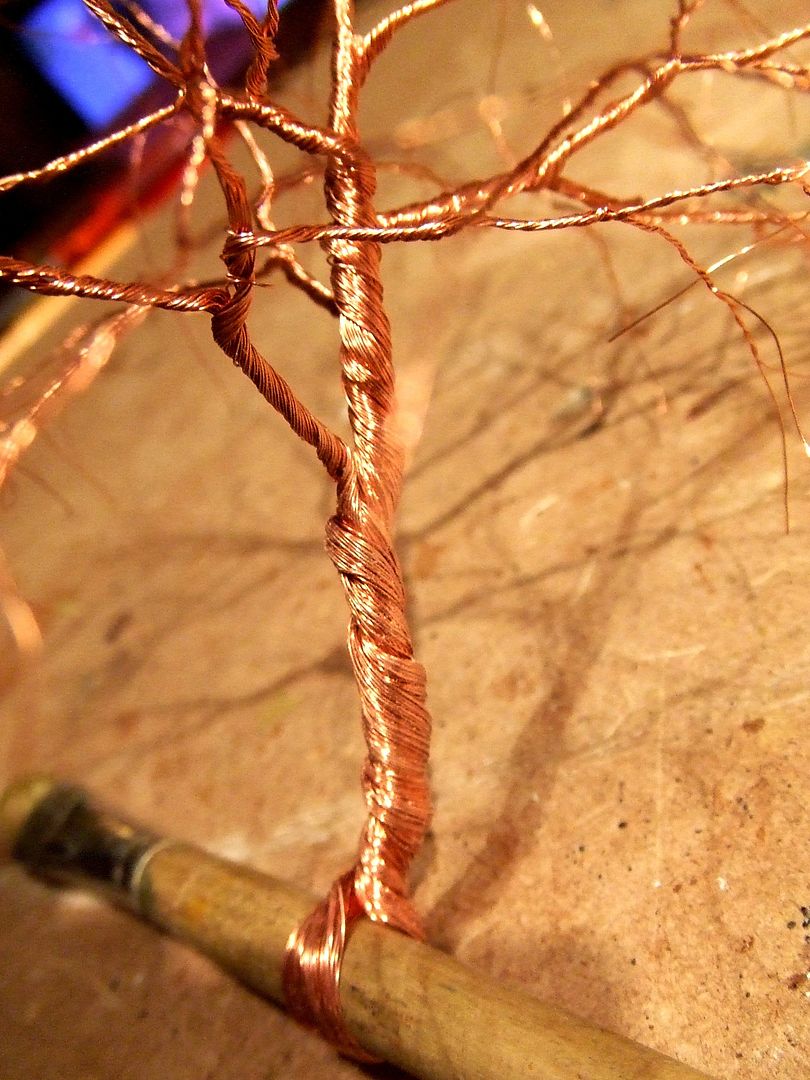
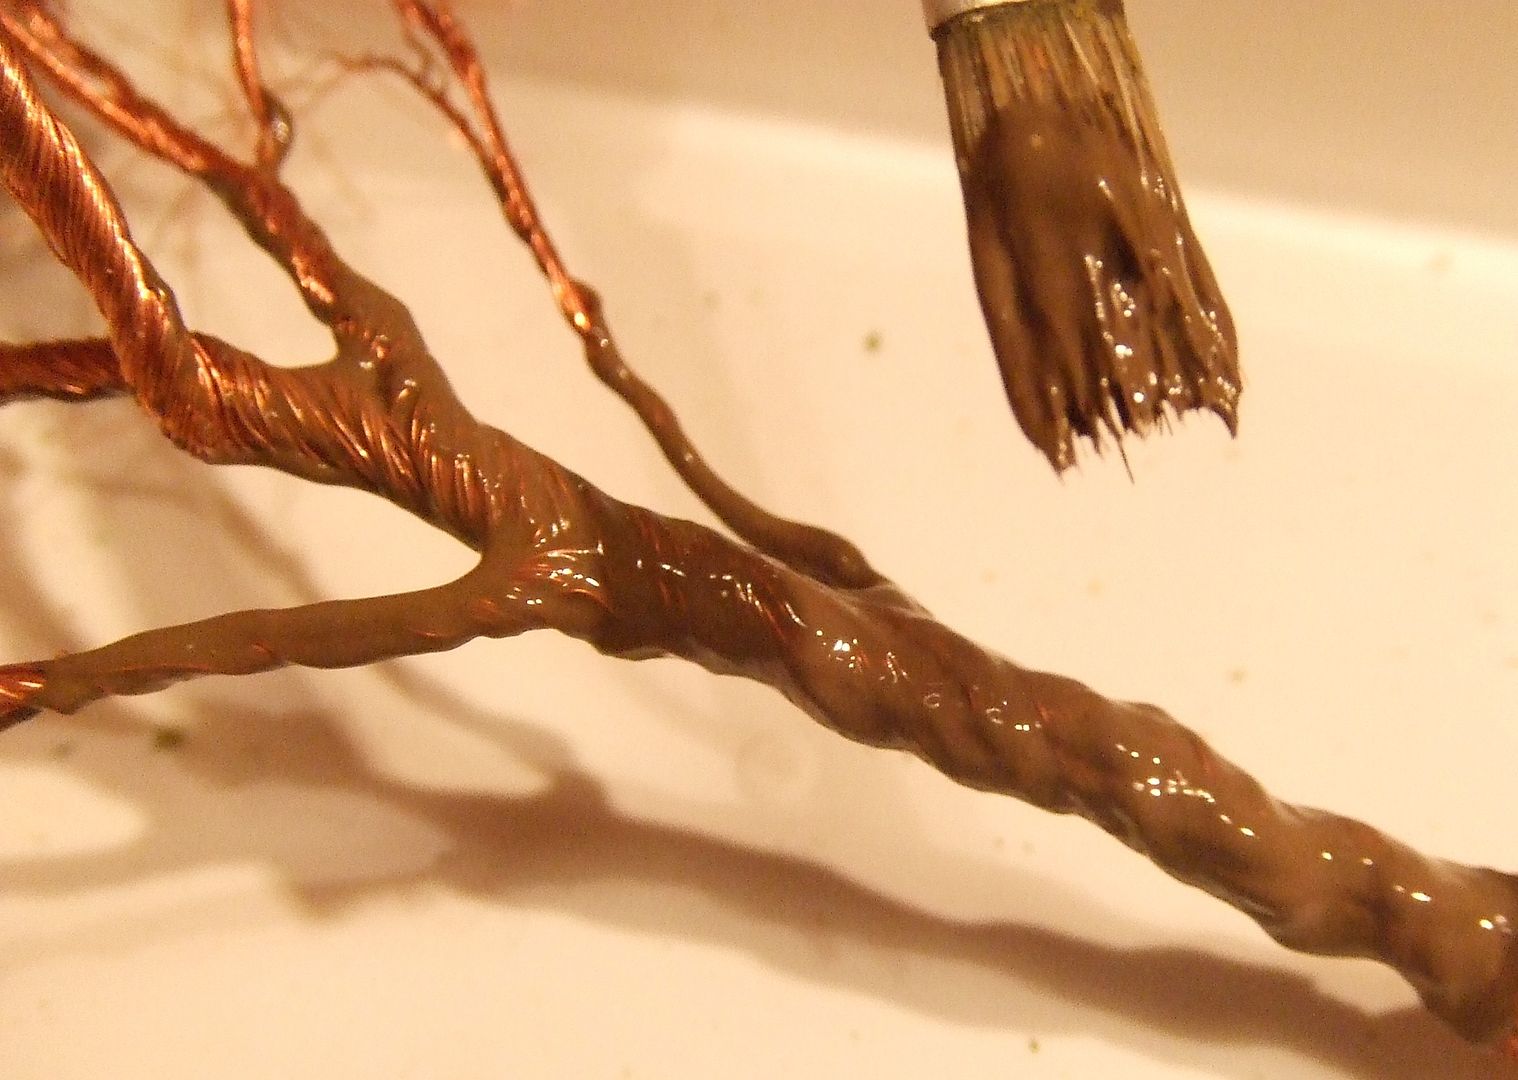
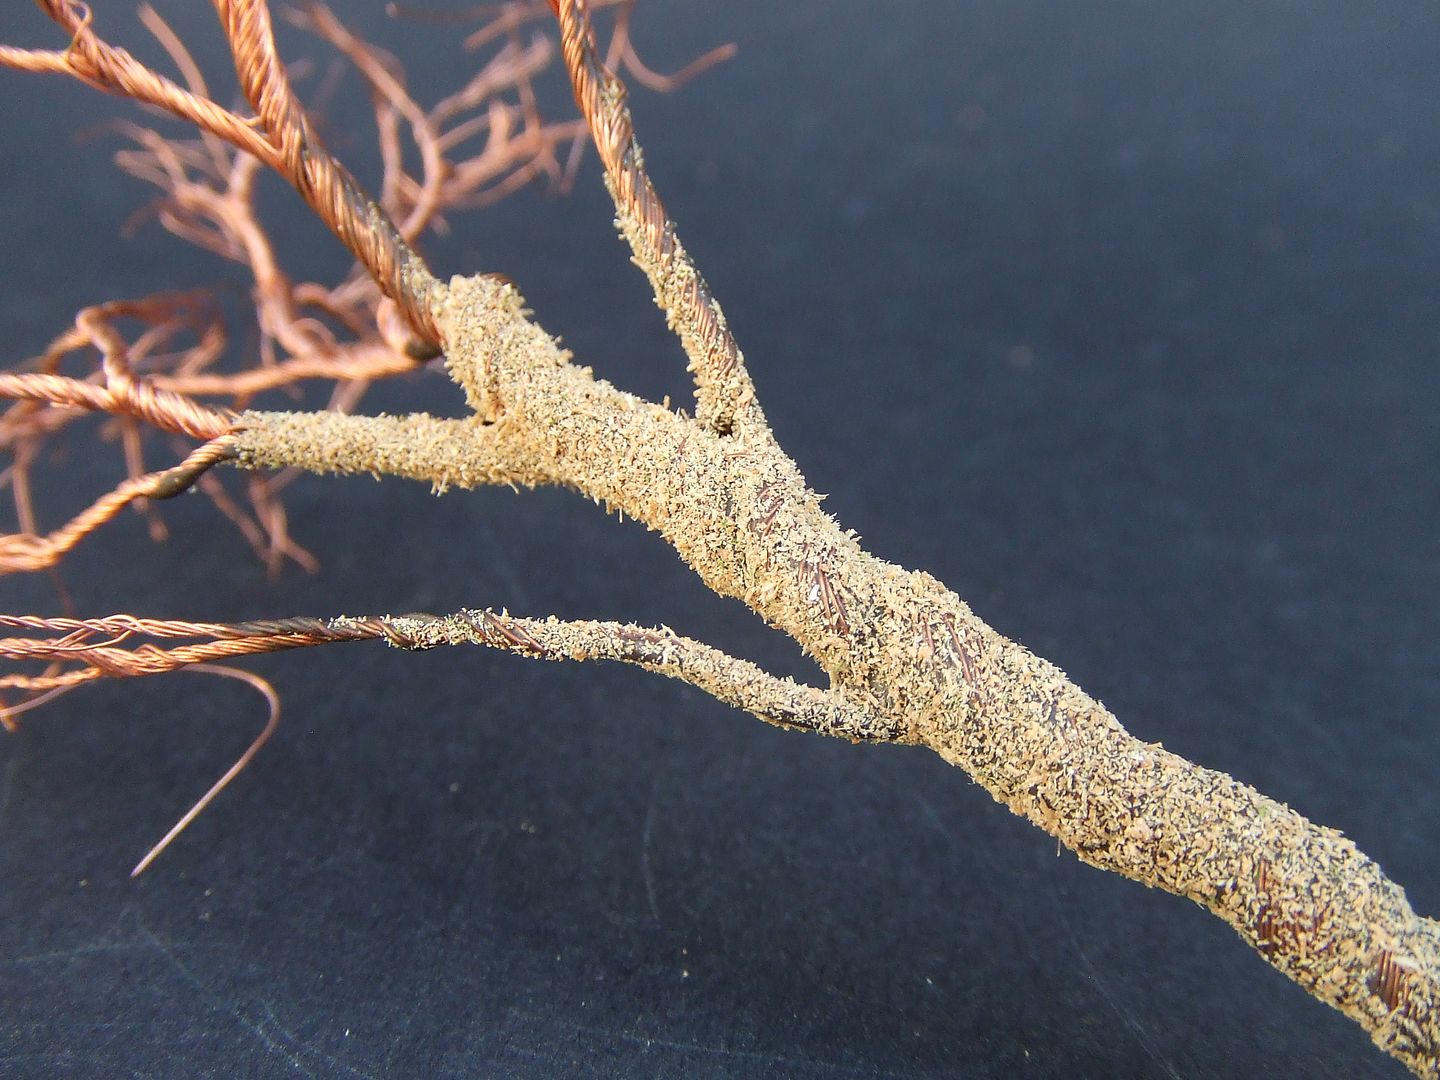
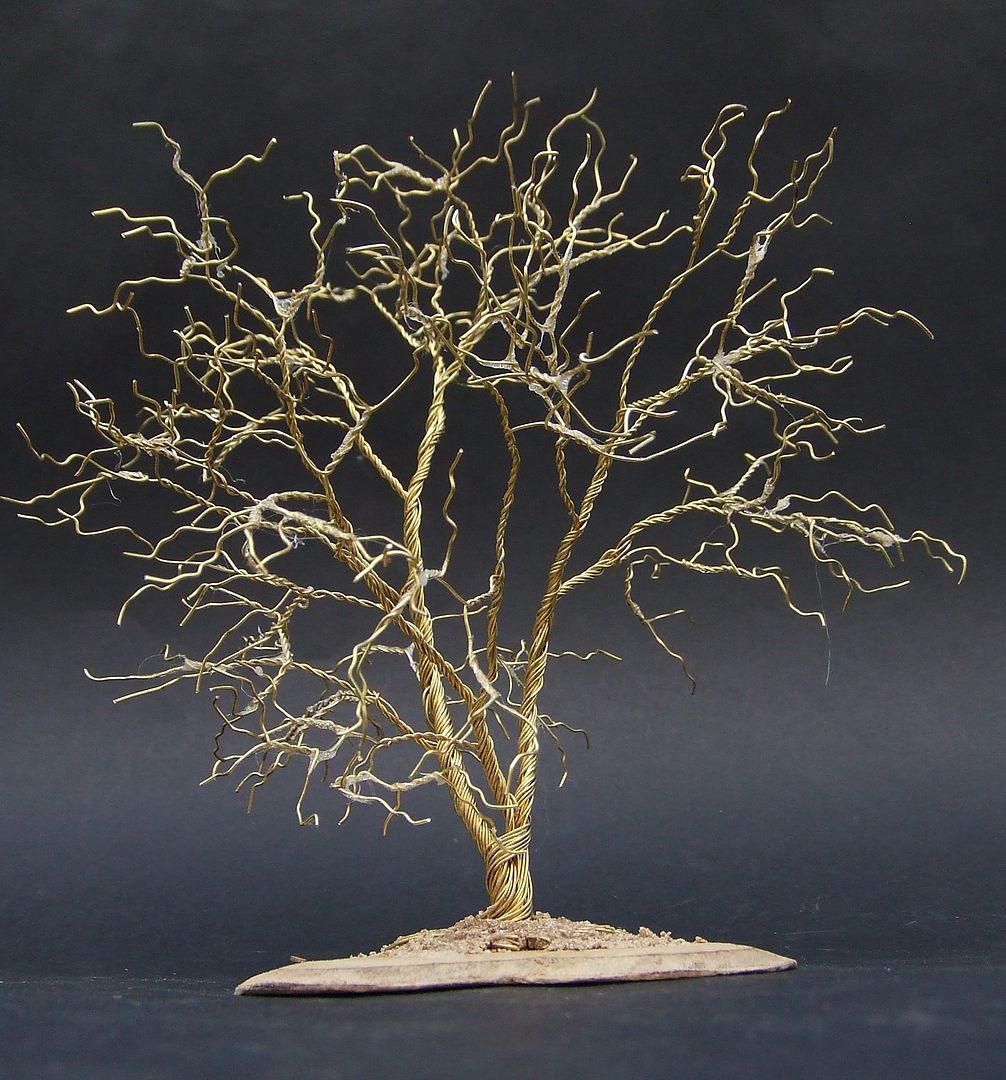
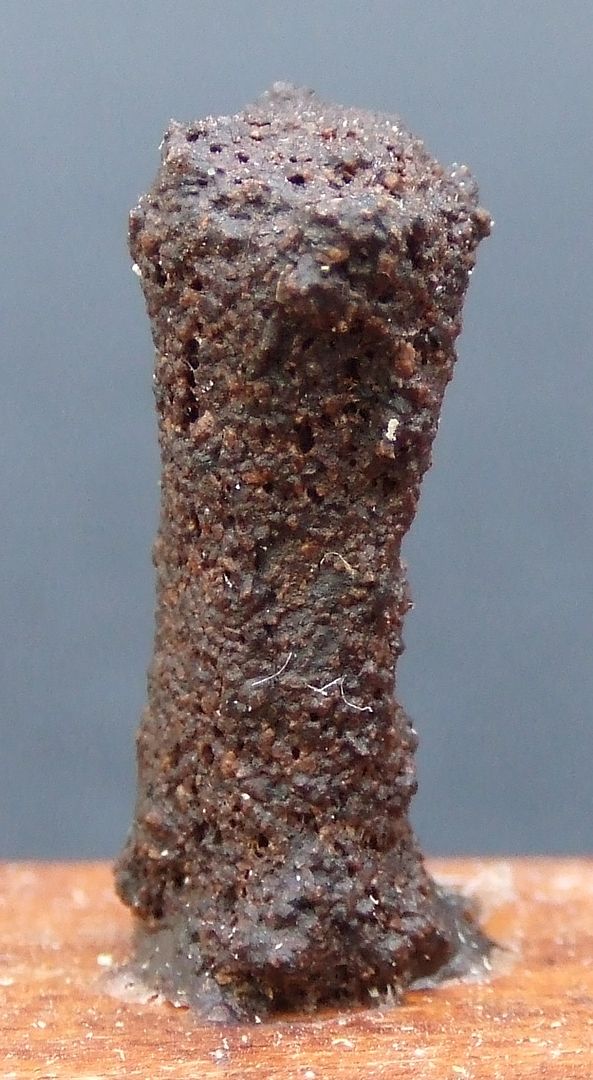
SAWDUST BARK
Collect or make fine sawdust.
Apply mix of white glue, acrylic paint, water and a drop of dishwashing liquid detergent on trunk and bigger branches.
Drop of detergent serves to enable glue mix to infiltrate into sawdust
Scatter sawdust throug strainer on tree.
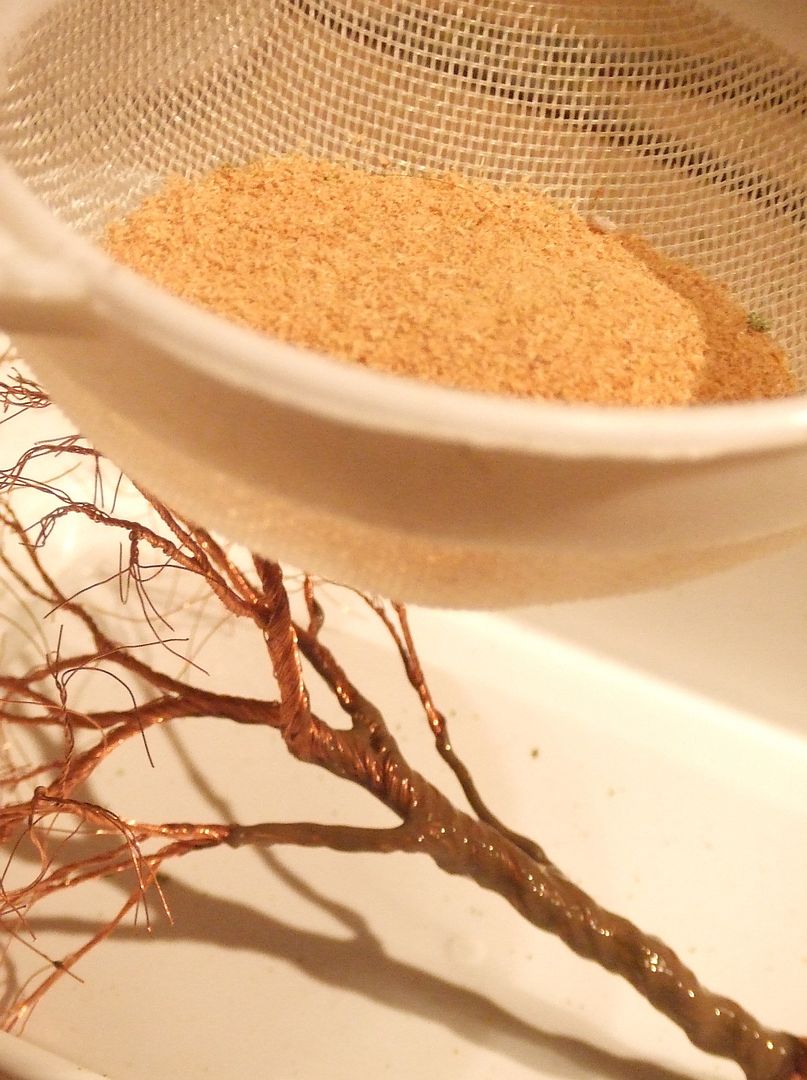
Cover all sides this way.
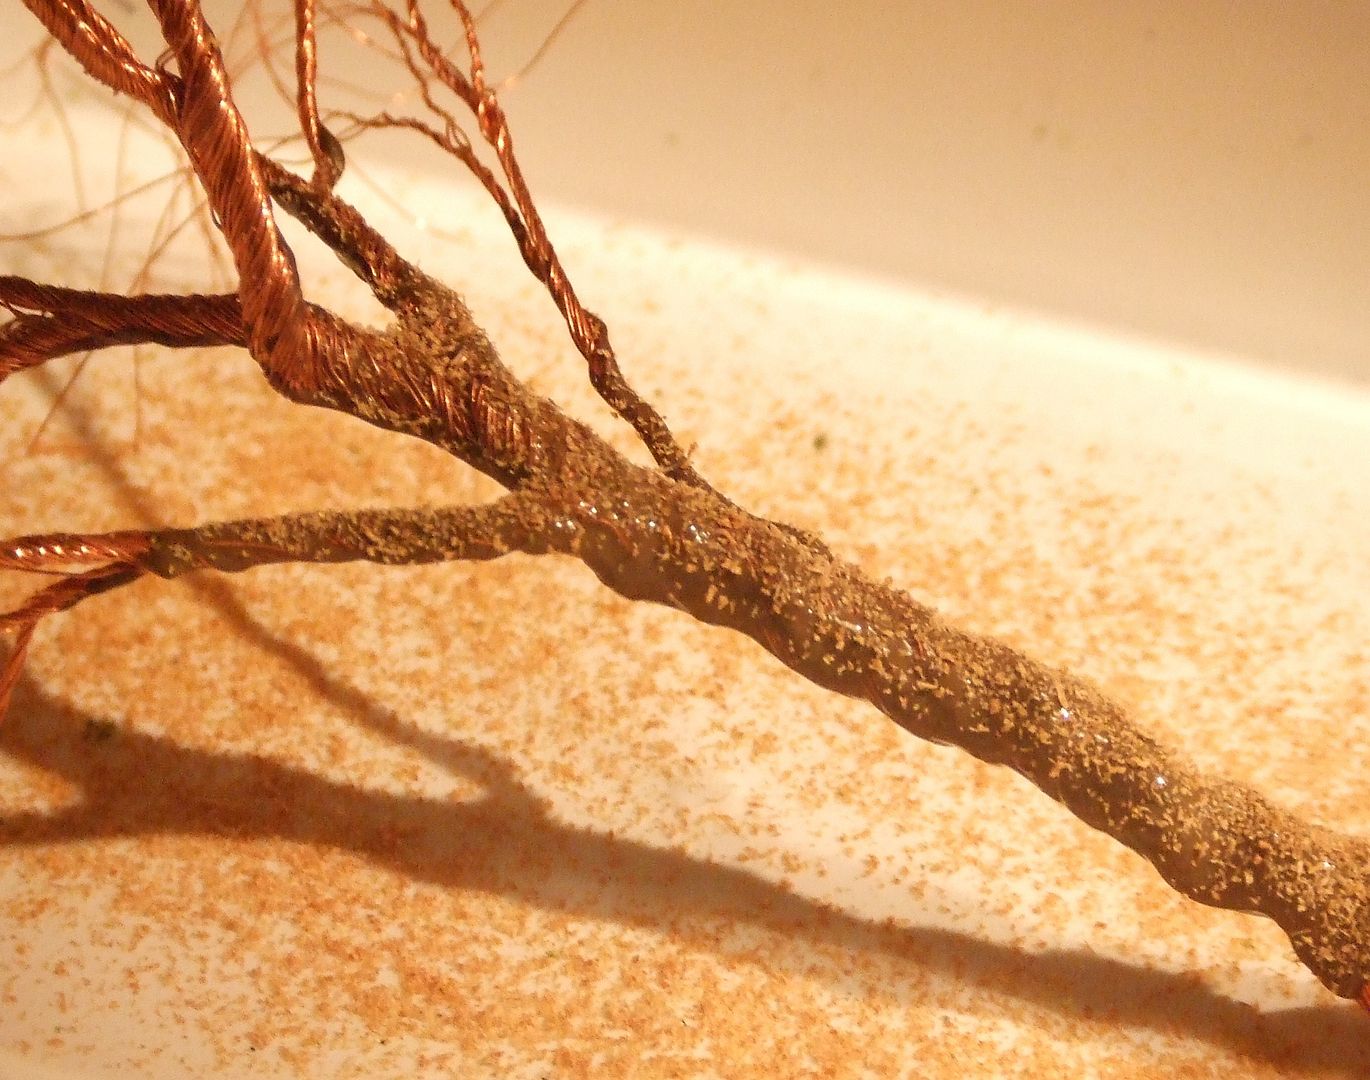
Repeat adding glue mix and sawdust until trunk and branches are round and little twisted wire is visible.
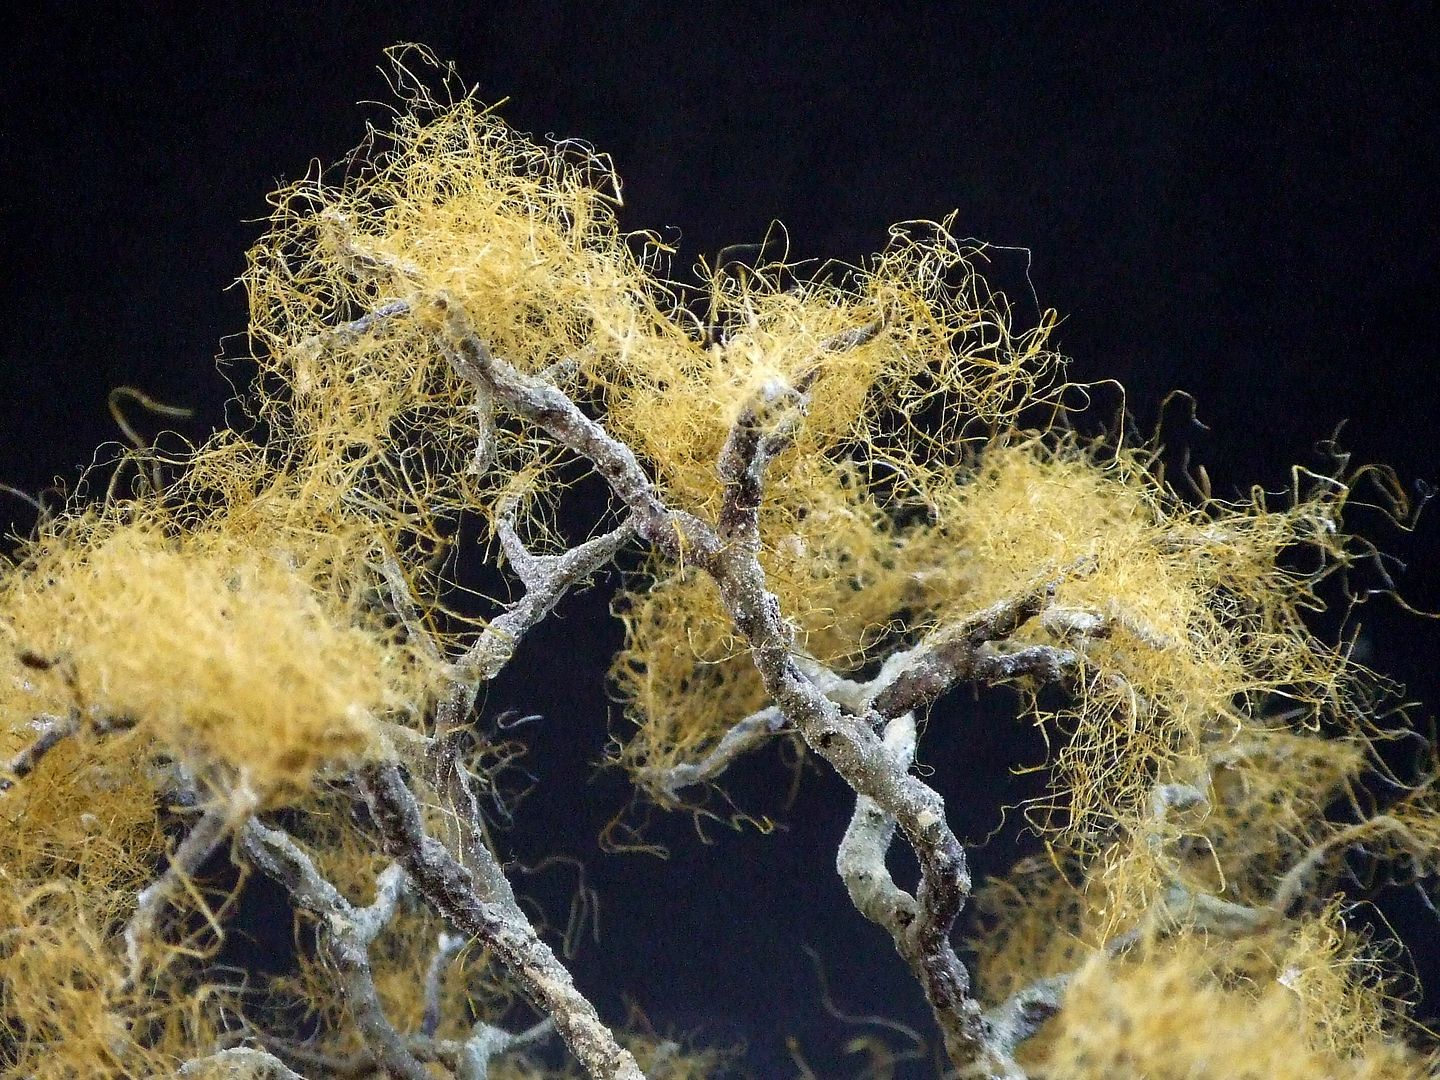
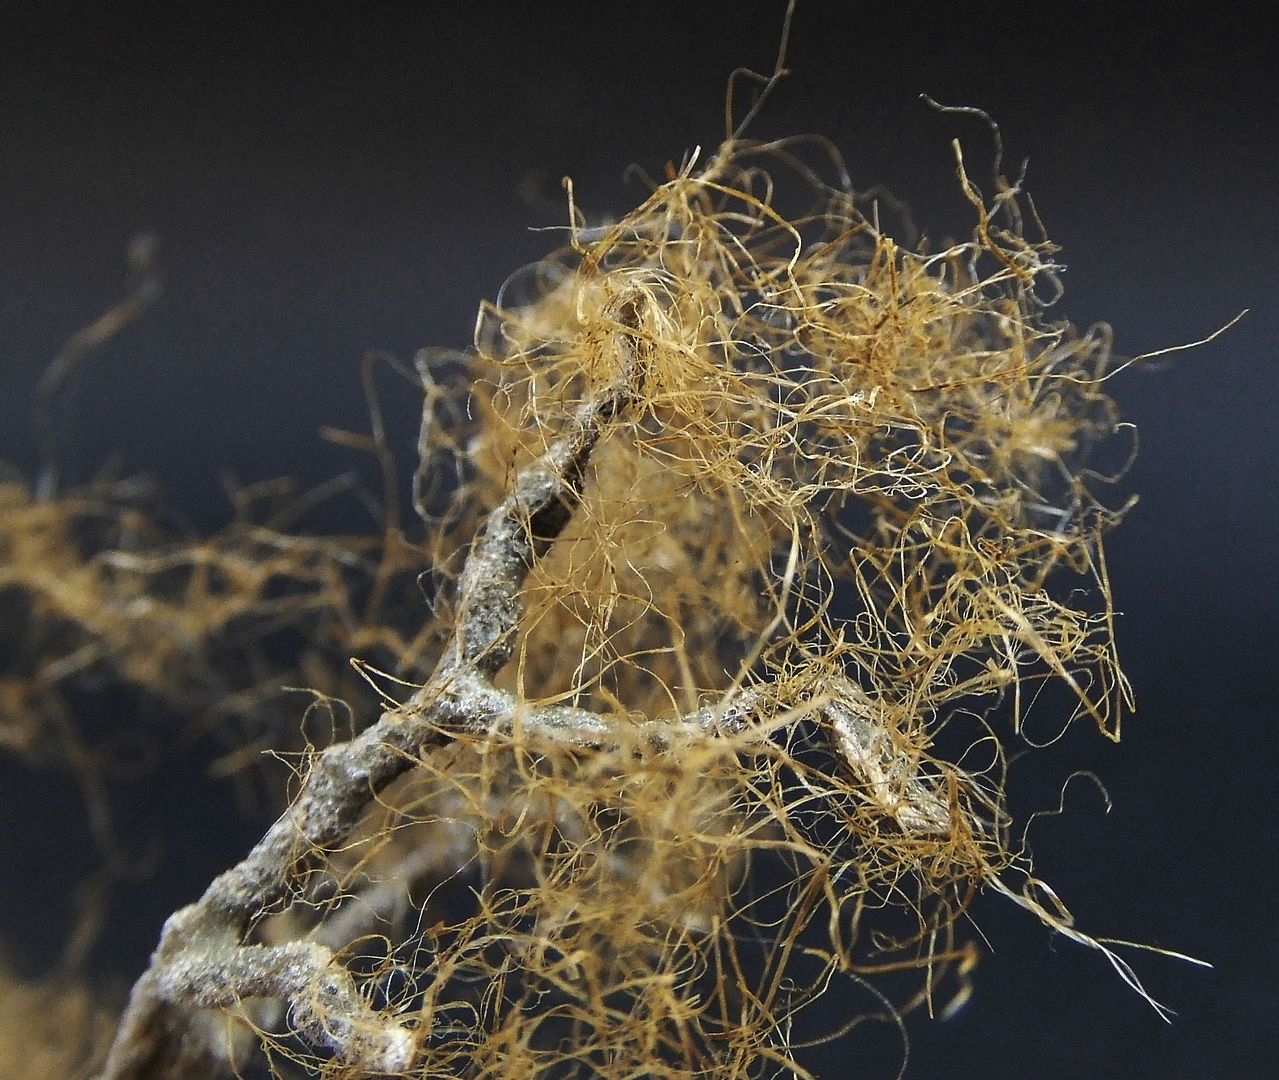
MICRO FIBRE TWIGS
Decide if copper wire twigs are fine and numerous enough, or if smaller twigs are preferred.
Larger twigs need larger foliage.
Smaller twigs need finer foliage.
Noch long dry grass micro fibre can be used as fine additional twigs
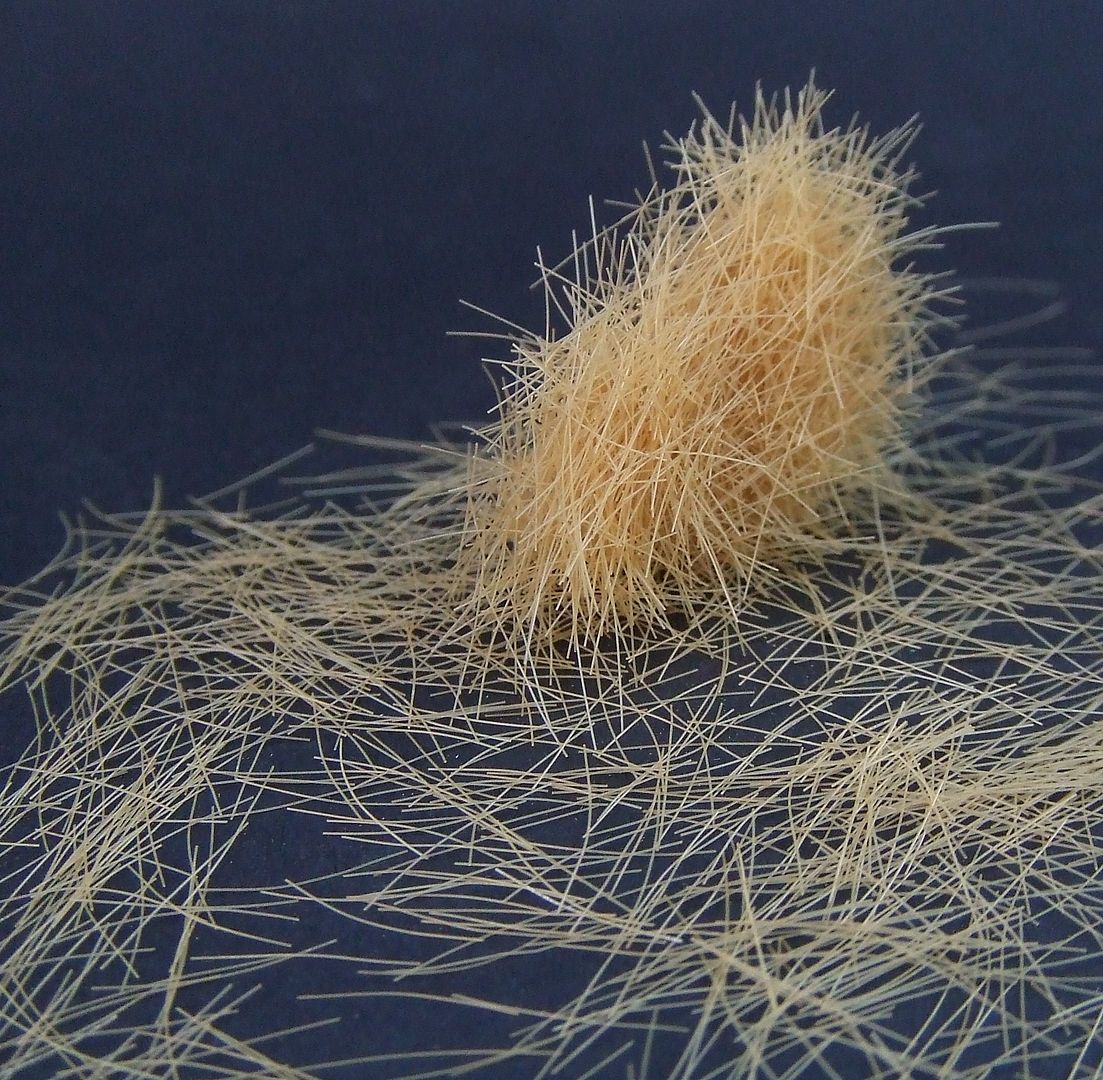
Spray branches with glue and scatter micro fibre over it from all sides.
Cover base and main trunk with plastic foil.
Use dark olive spraypaint for darkening micro fibre
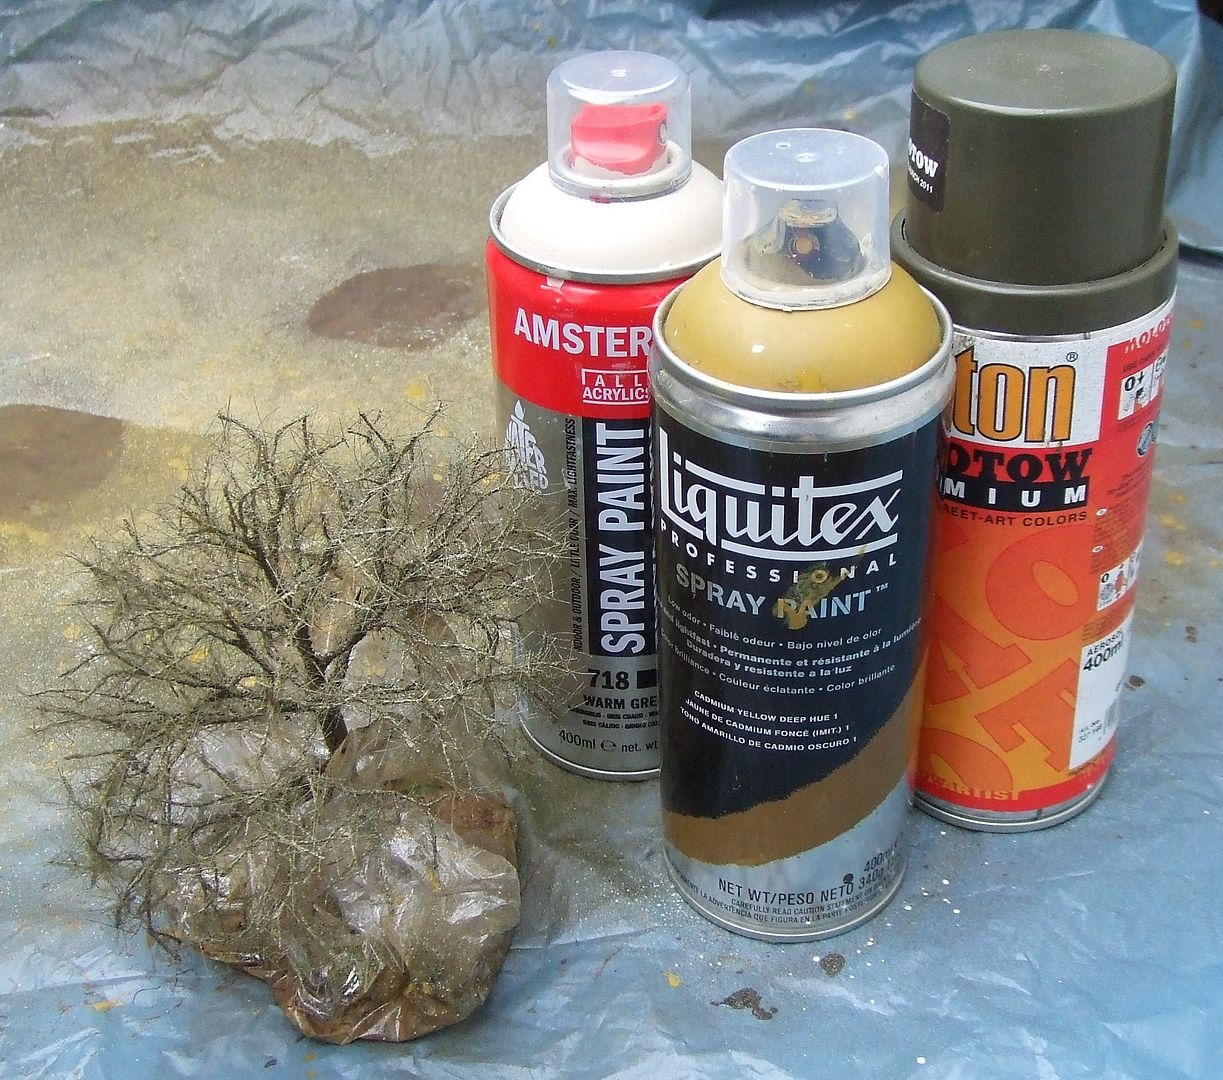
Use shades of olive yellow and beige spraypaint to make trunk, branches and twigs look more lively.

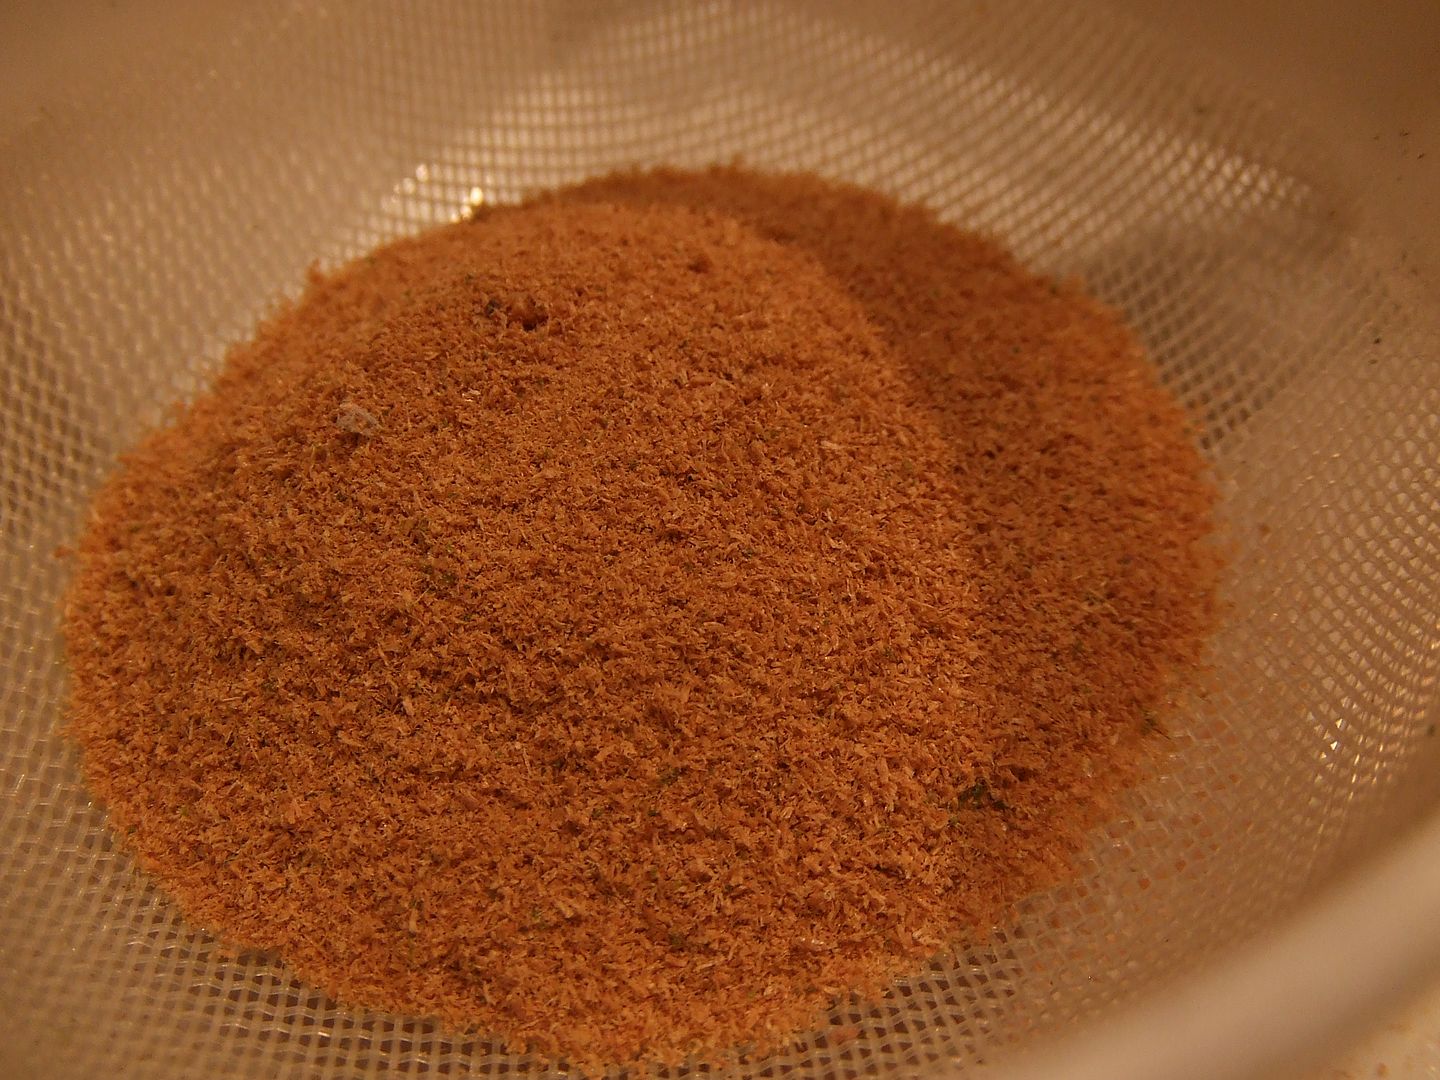
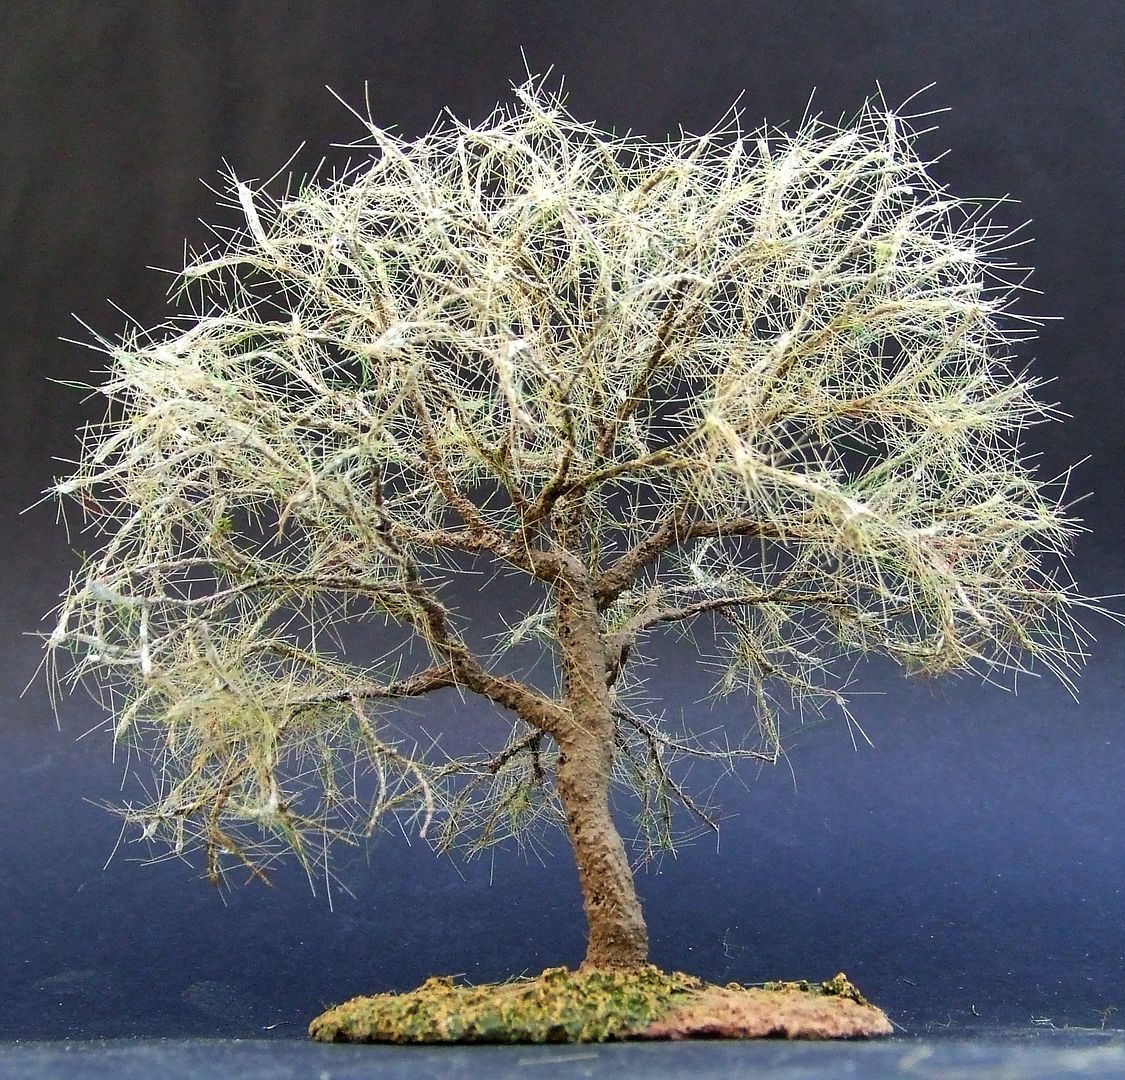
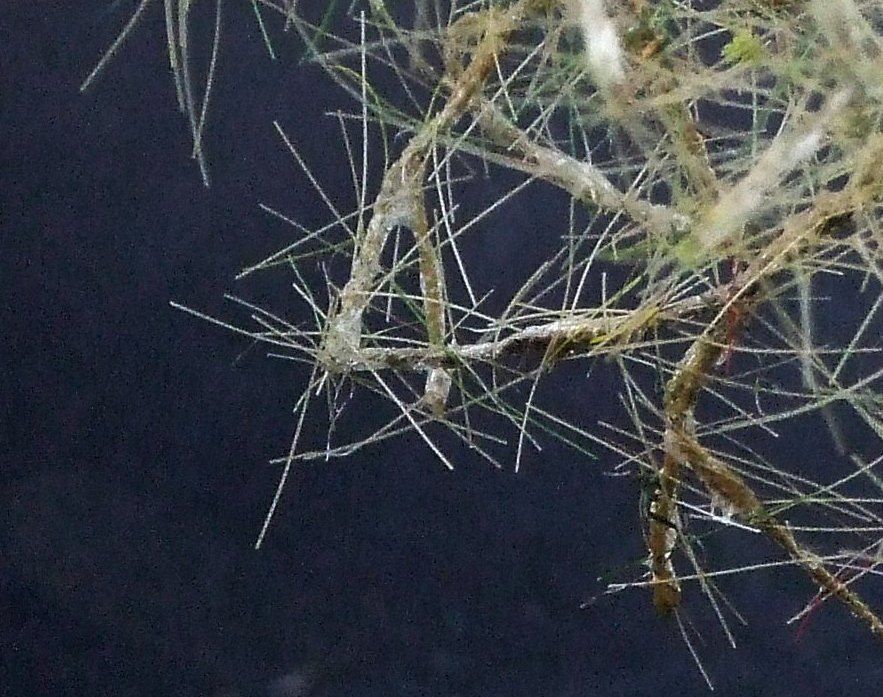
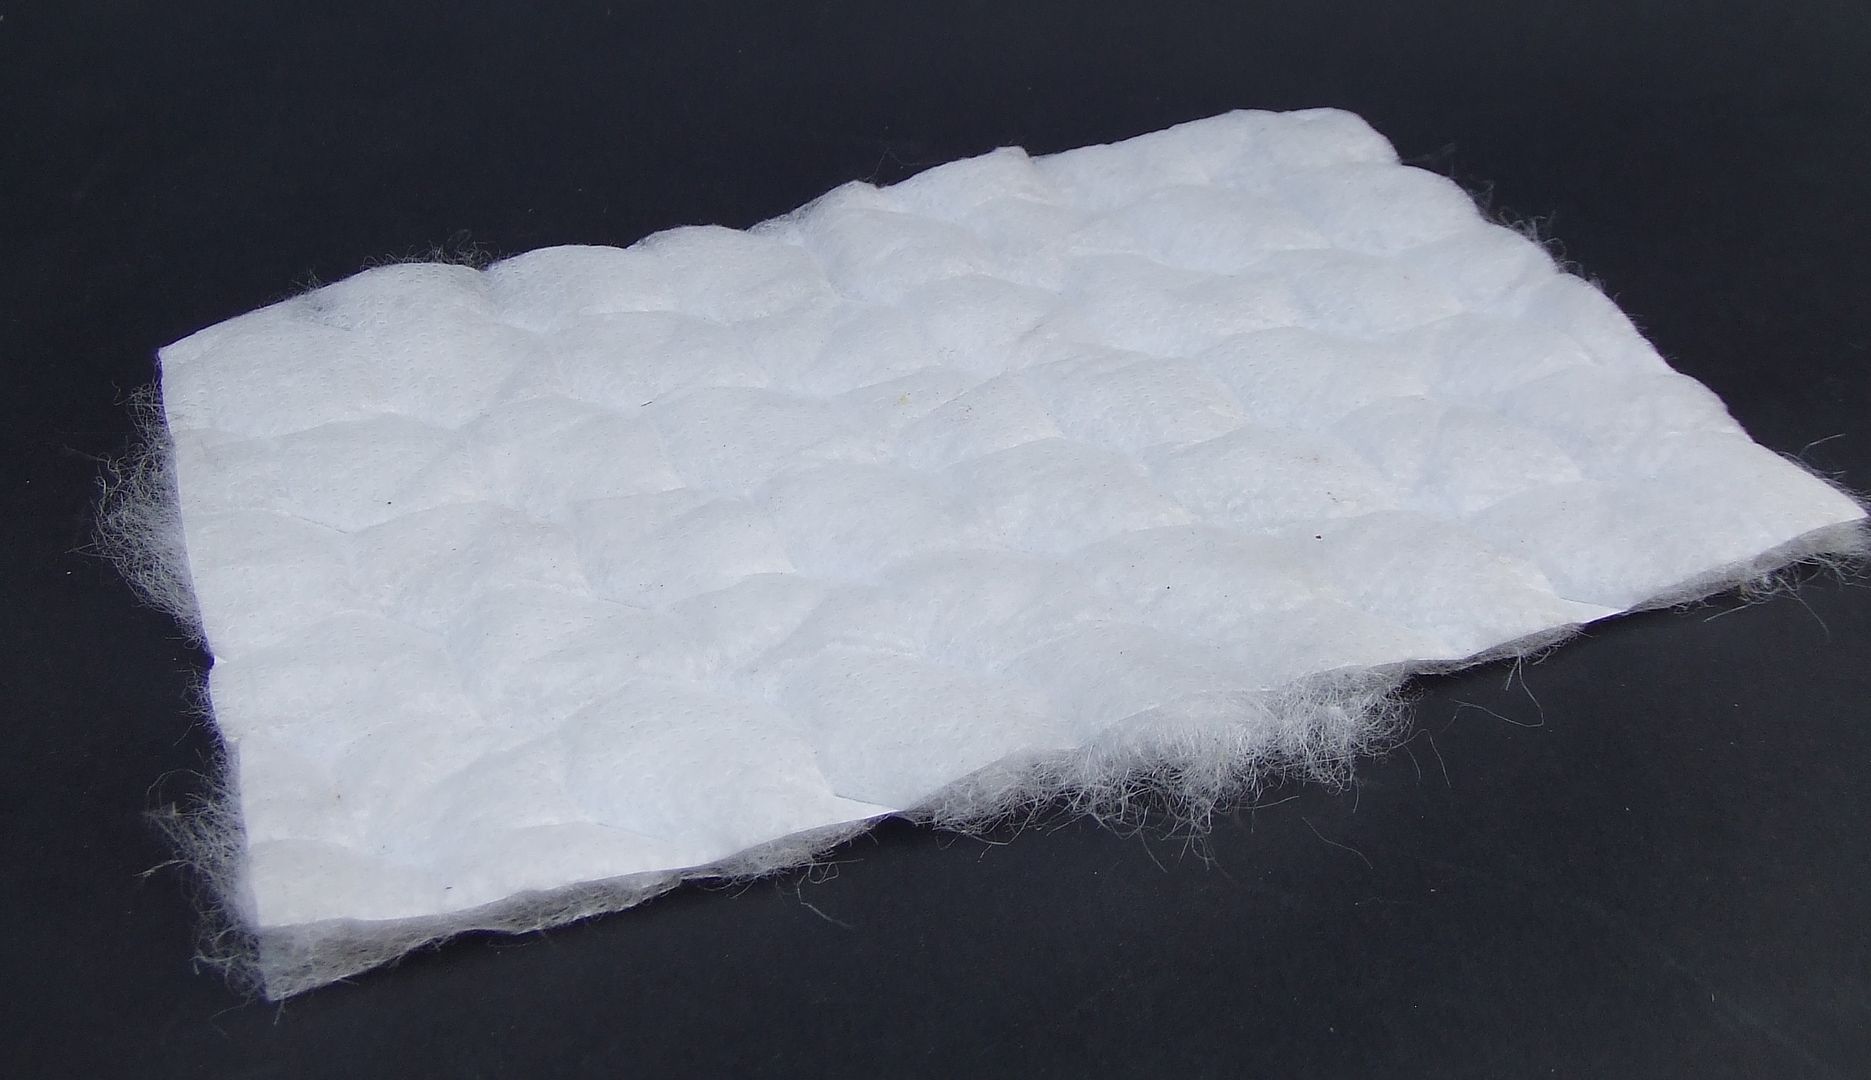
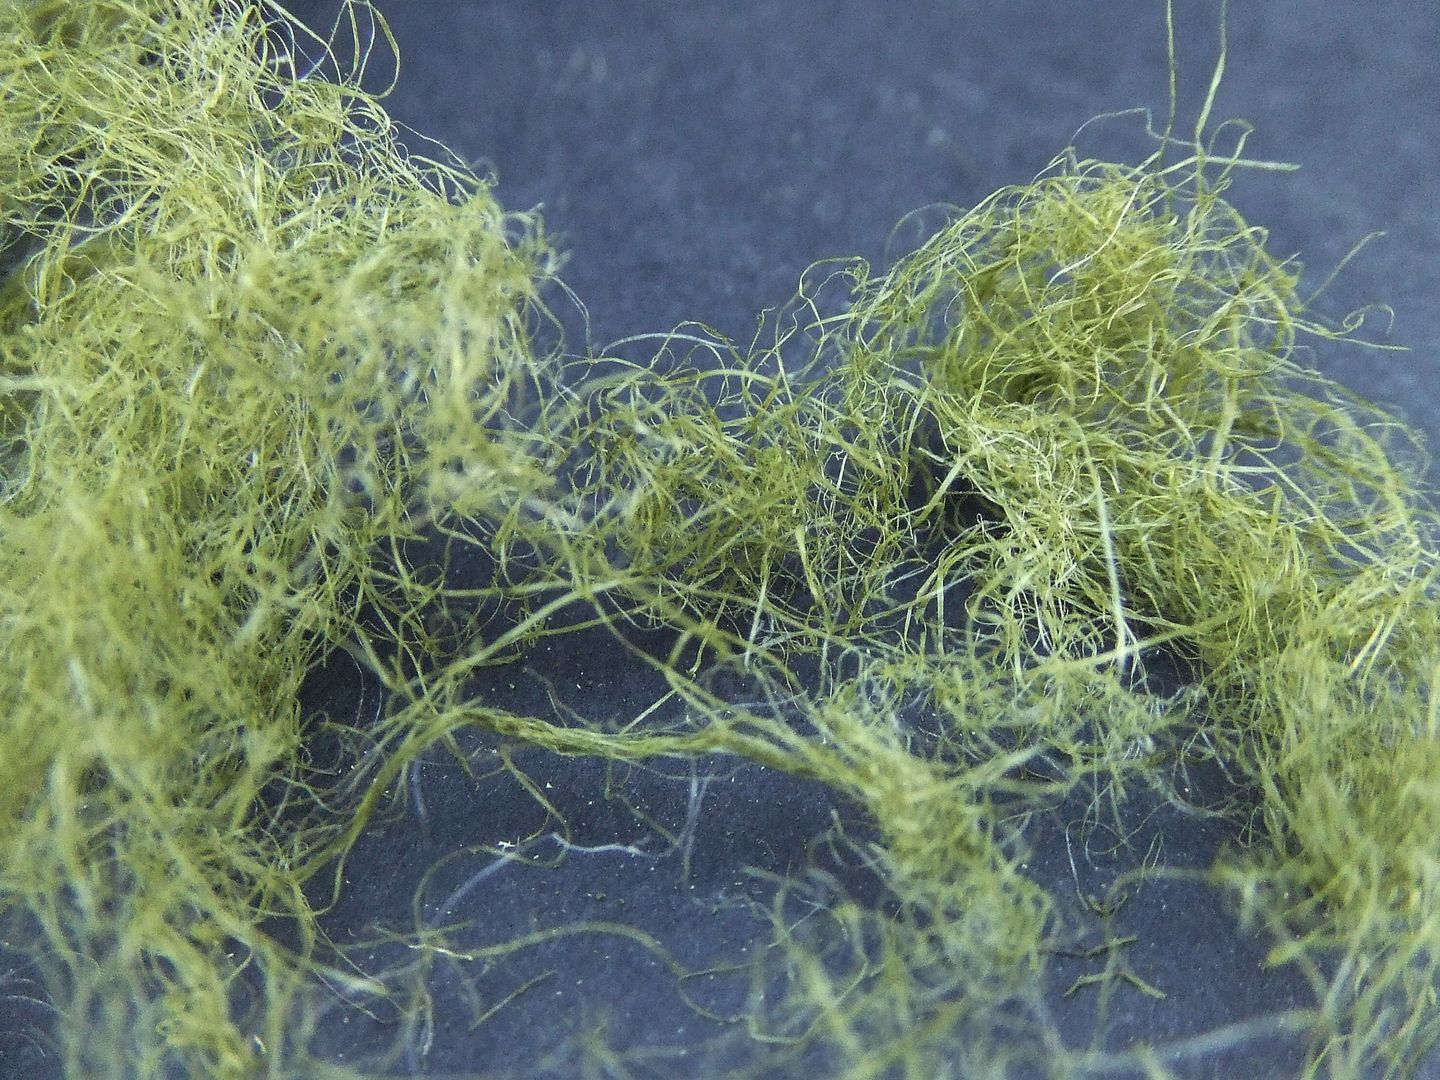
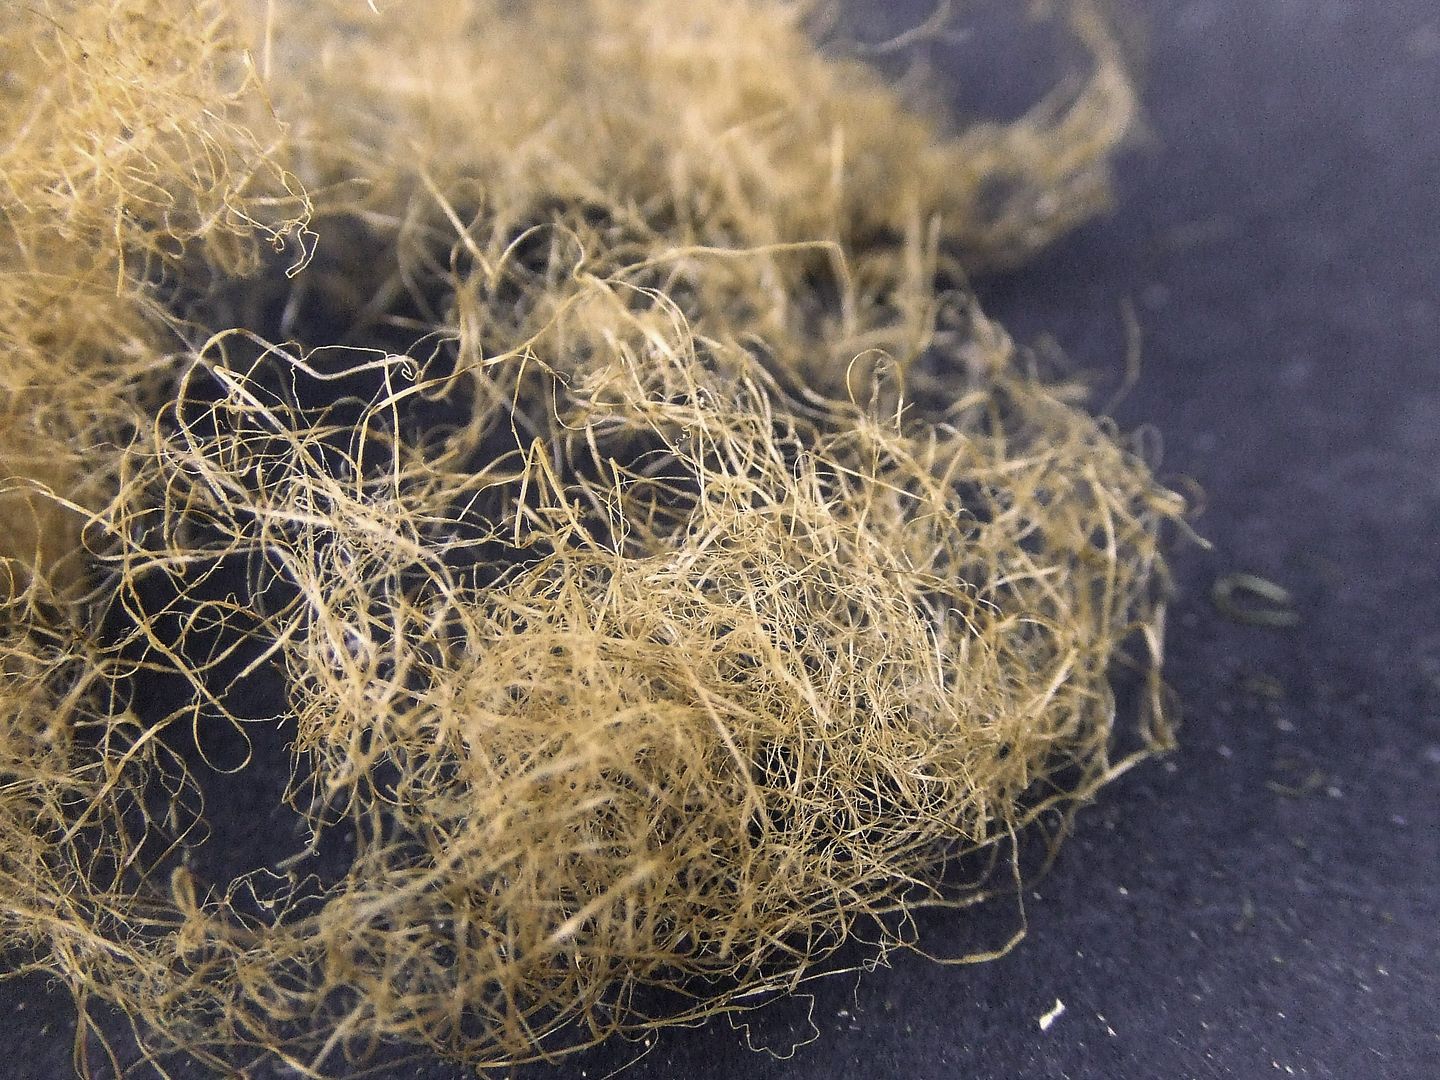
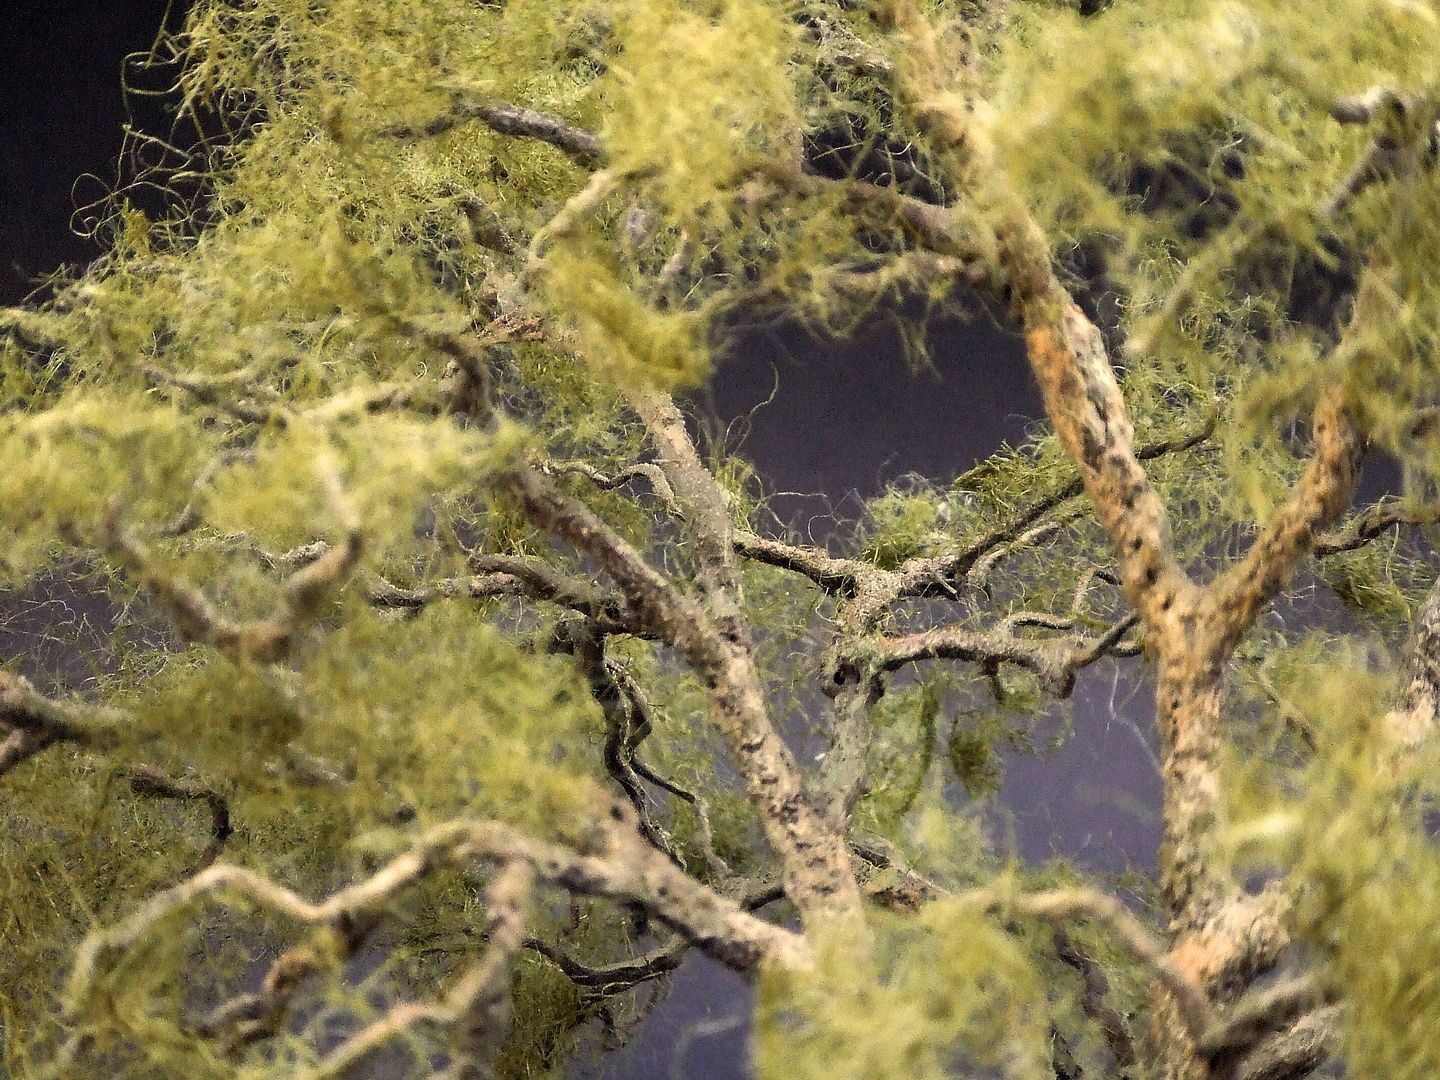
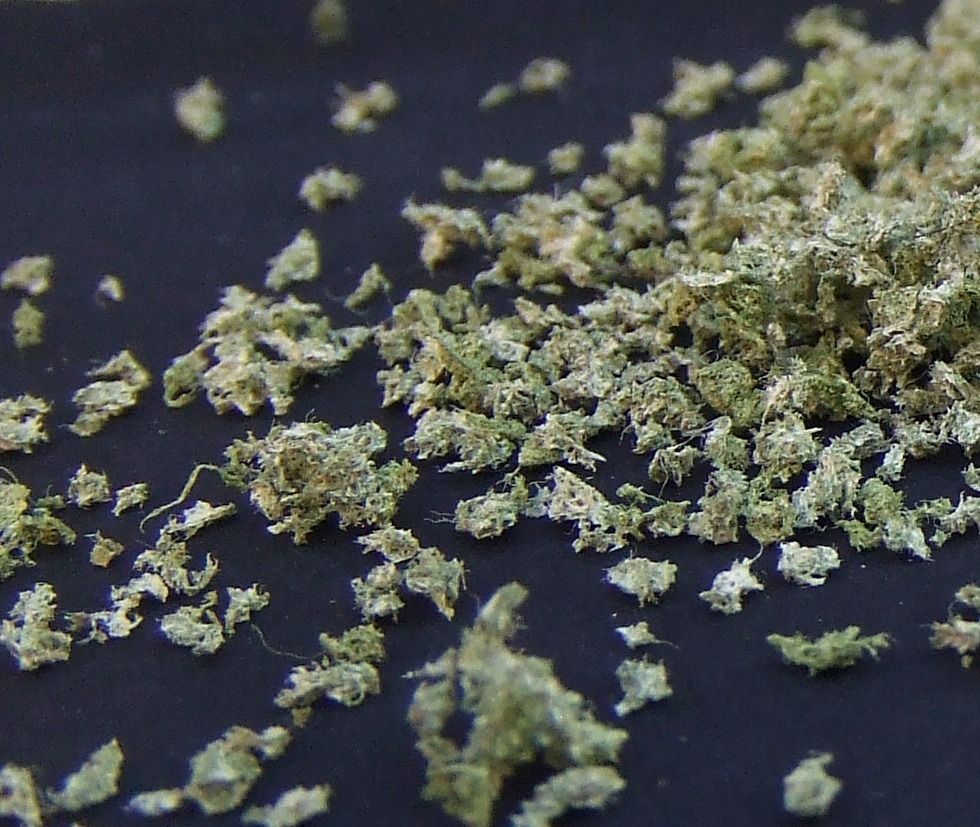
VISCOSE SPONGE FOLIAGE
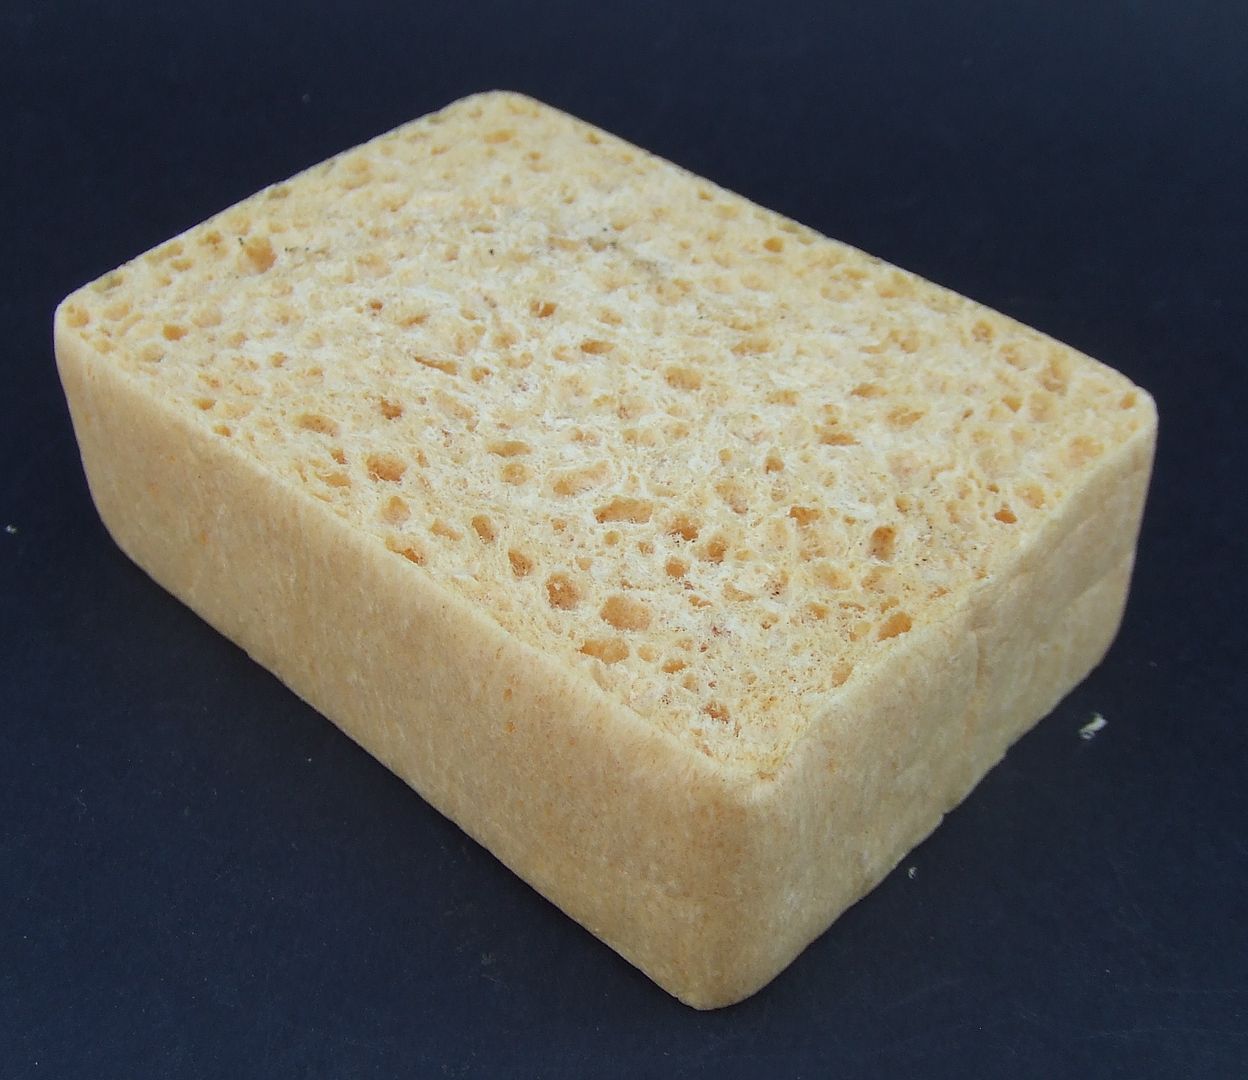
Advantage of viscose sponge: it gives finer grind compared to plastic sponge.
Disadvantage: only 50% of viscose sponge can be turned into foliage.
The rest of it (pulp) is waisted.
Viscose is both a semi synthetic fabric and a solution of cellulose xanthate.
It can be recognised for its bread-like natural appearance.
It looks just like the typical British food called crumpet (not the ladies but the cakes).
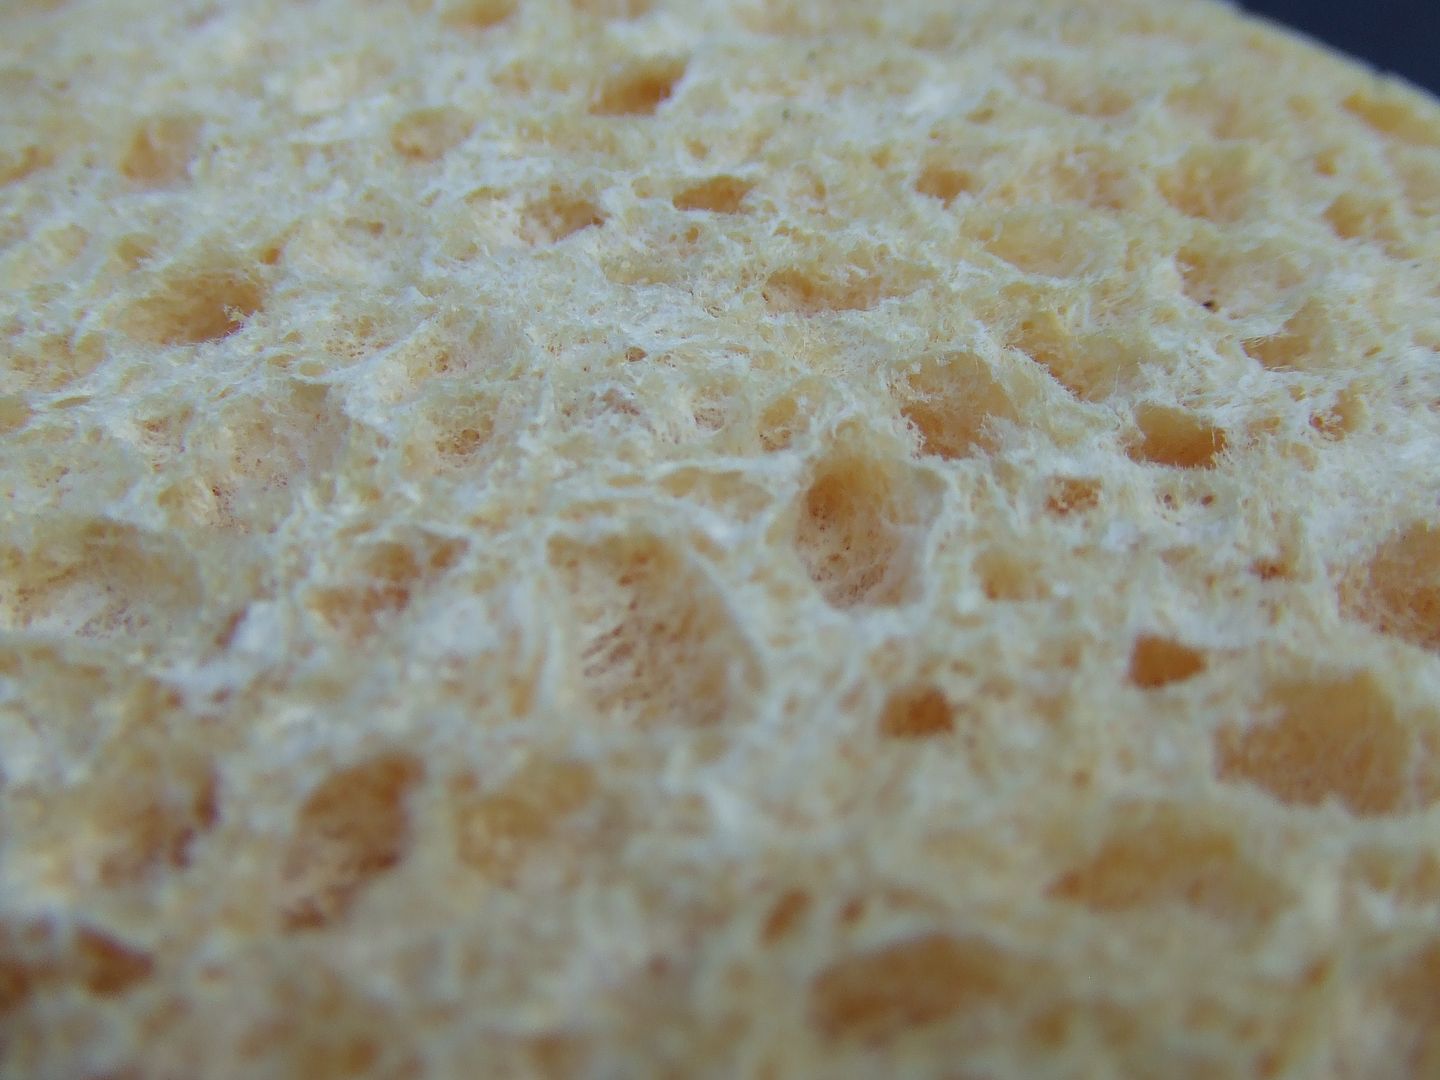
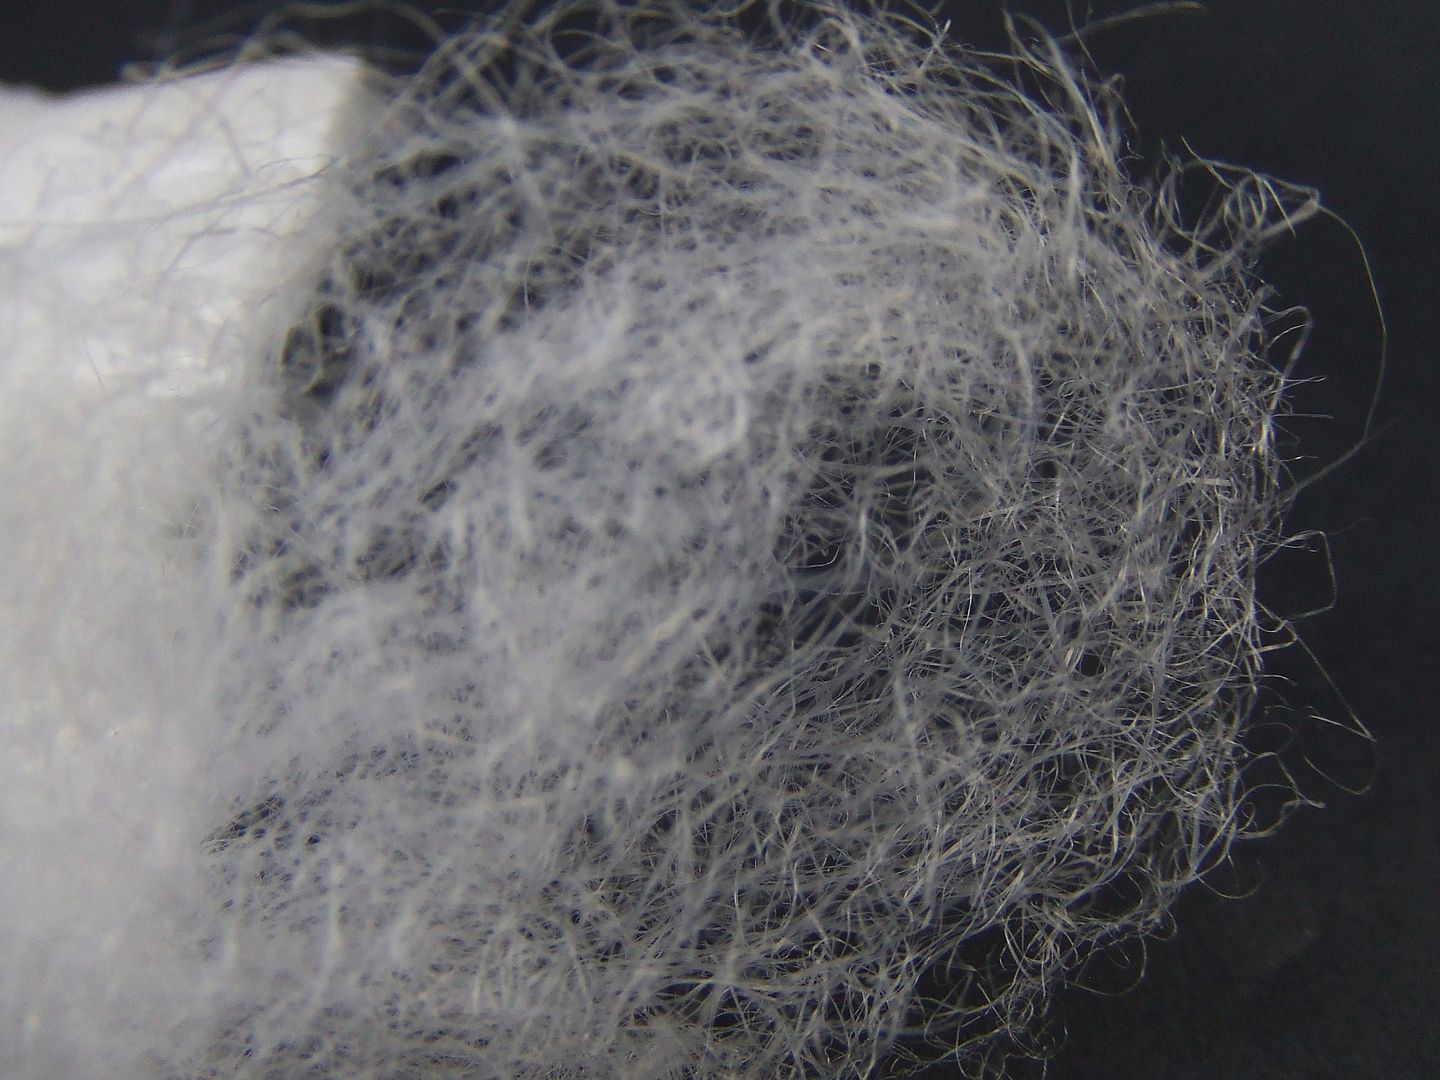
After grinding it turnes into two components: pulp and flakes.
Separate flakes from pulp by straining, cutting or tearing.
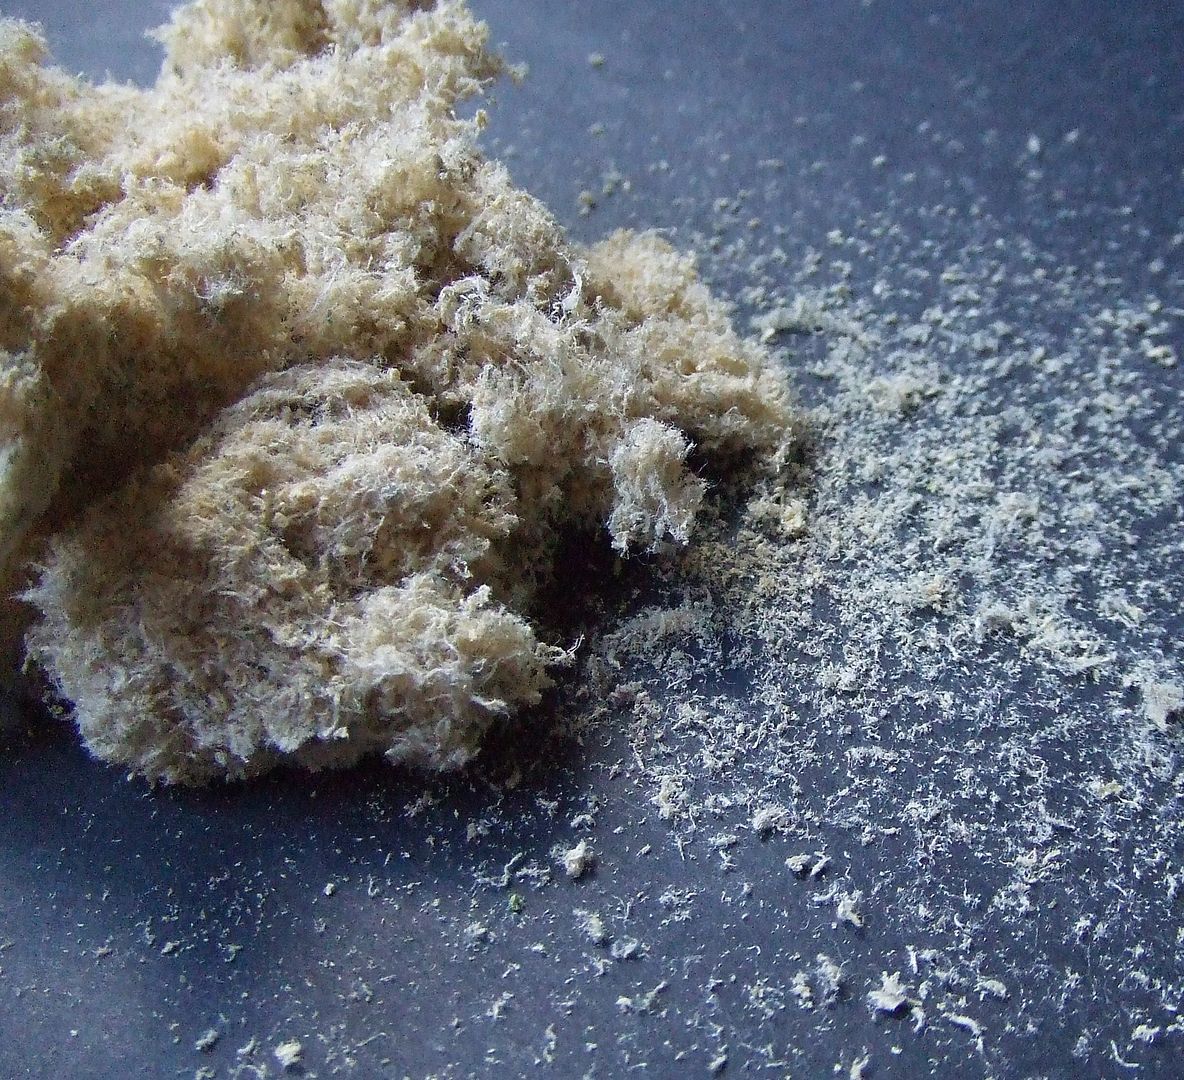
Color these flakes with acrylic paint.
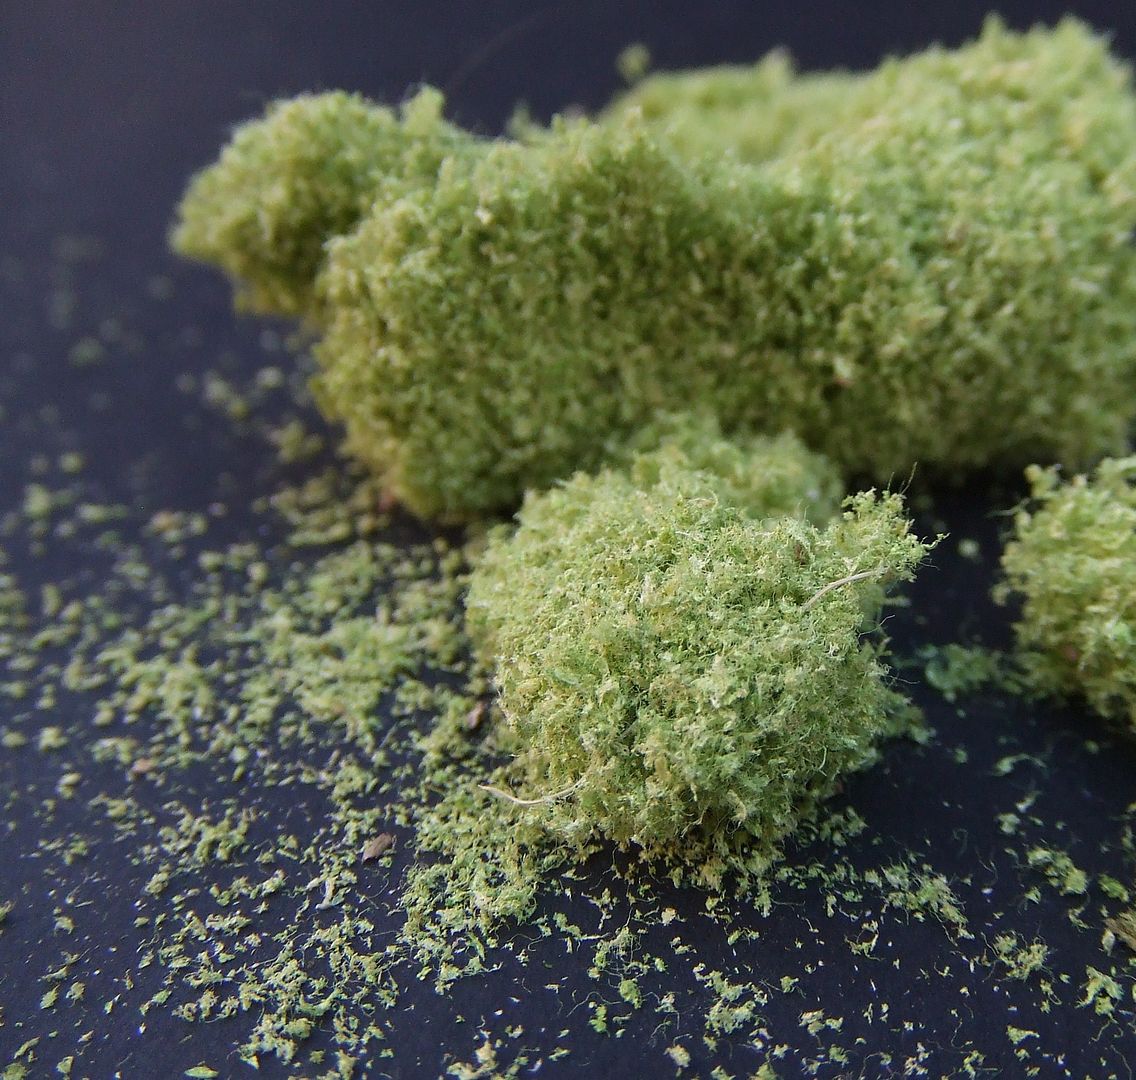
It cloths together so strain again.
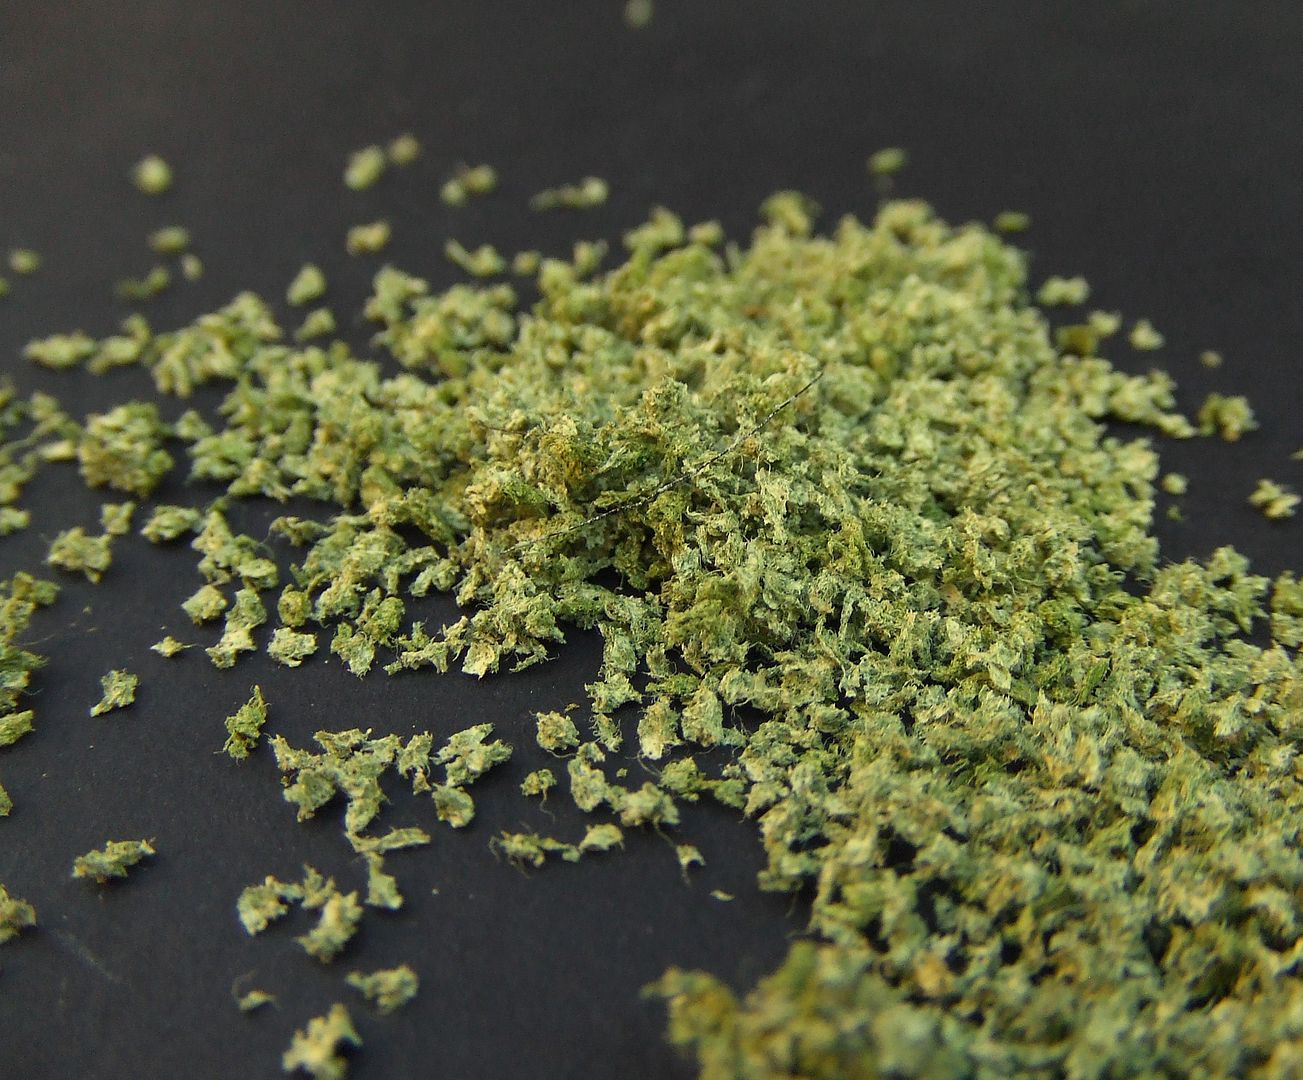
Spray glue on twigs and scatter flakes through strainer from all sides on twigs.
Remove foliage from trunk and branches by hard brush or fine file.
Be carefull with touching foliage and twigs.
The copper wire will distort easily and stay distorted.
Distorted wireheads can be bended back into place with a fine iron tool.
But that’s a lot of work.
…using electricity cable…
…and viscose sponge.
Latin name: Juglans regia
The Persian Walnut, also known as English Walnut or Common Walnut, origins to the region stretching from the Balkans to the Himalayas and China and was brought to Europe by the Romans.
The worlds largest walnut forests can be found in Kyrgyzstan at 1000-2000m altitude.
After the weeping willow and lime tree tutorials it is time for treating some finer and more delicate materials and techniques.
COPPER WIRE FRAME
Copper wire from electricity cable is extremely thin so perfect for twisting fine branches and twigs.
Disadvantage is its weakness.
The final shape of the tree can be easily distorted since copper is soft and not flexibel.
For this reason building electricity cable copper wire trees is perfect for dioramabuilding (static based situation) but not for gaming (touching and transporting).
Collect some meters of waiste electricity cable.
Remove plastic coating.
Each cable has about 25 copper wires inside.
Four such cables make one hundred wires of 40cm each.
Make one bundle.
Twist around brush handle.
Twisting will stay in shape without glue or soldering.
Branches and twigs in winter.
Create branches in temporary horizontal direction to enable construction.
Split up branches in half and twist both halves.
Split halves in half and again into one hundred single twigs.
Use real trees for proportions.
Fasten on base and bend horizontal branches upwards.
SAWDUST BARK
Collect or make fine sawdust.
Apply mix of white glue, acrylic paint, water and a drop of dishwashing liquid detergent on trunk and bigger branches.
Drop of detergent serves to enable glue mix to infiltrate into sawdust
Scatter sawdust throug strainer on tree.
Cover all sides this way.
Repeat adding glue mix and sawdust until trunk and branches are round and little twisted wire is visible.
MICRO FIBRE TWIGS
Decide if copper wire twigs are fine and numerous enough, or if smaller twigs are preferred.
Larger twigs need larger foliage.
Smaller twigs need finer foliage.
Noch long dry grass micro fibre can be used as fine additional twigs
Spray branches with glue and scatter micro fibre over it from all sides.
Cover base and main trunk with plastic foil.
Use dark olive spraypaint for darkening micro fibre
Use shades of olive yellow and beige spraypaint to make trunk, branches and twigs look more lively.
VISCOSE SPONGE FOLIAGE
Advantage of viscose sponge: it gives finer grind compared to plastic sponge.
Disadvantage: only 50% of viscose sponge can be turned into foliage.
The rest of it (pulp) is waisted.
Viscose is both a semi synthetic fabric and a solution of cellulose xanthate.
It can be recognised for its bread-like natural appearance.
It looks just like the typical British food called crumpet (not the ladies but the cakes).
After grinding it turnes into two components: pulp and flakes.
Separate flakes from pulp by straining, cutting or tearing.
Color these flakes with acrylic paint.
It cloths together so strain again.
Spray glue on twigs and scatter flakes through strainer from all sides on twigs.
Remove foliage from trunk and branches by hard brush or fine file.
Be carefull with touching foliage and twigs.
The copper wire will distort easily and stay distorted.
Distorted wireheads can be bended back into place with a fine iron tool.
But that’s a lot of work.
-

Cryns
 Supporting Business
- Posts: 1254
- Member since:
11 Nov 2015, 15:33


Although I'm familiar with this technique it was a pleasure to read it and look at photos. Thanks for details about walnut tree and viscose sponge. Very interesting and useful.
-
Kekso
- Moderator
- Supporting Member (Bronze)
- Posts: 6840
- Member since:
19 Oct 2011, 18:32

Help keep the forum online!
or become a supporting member
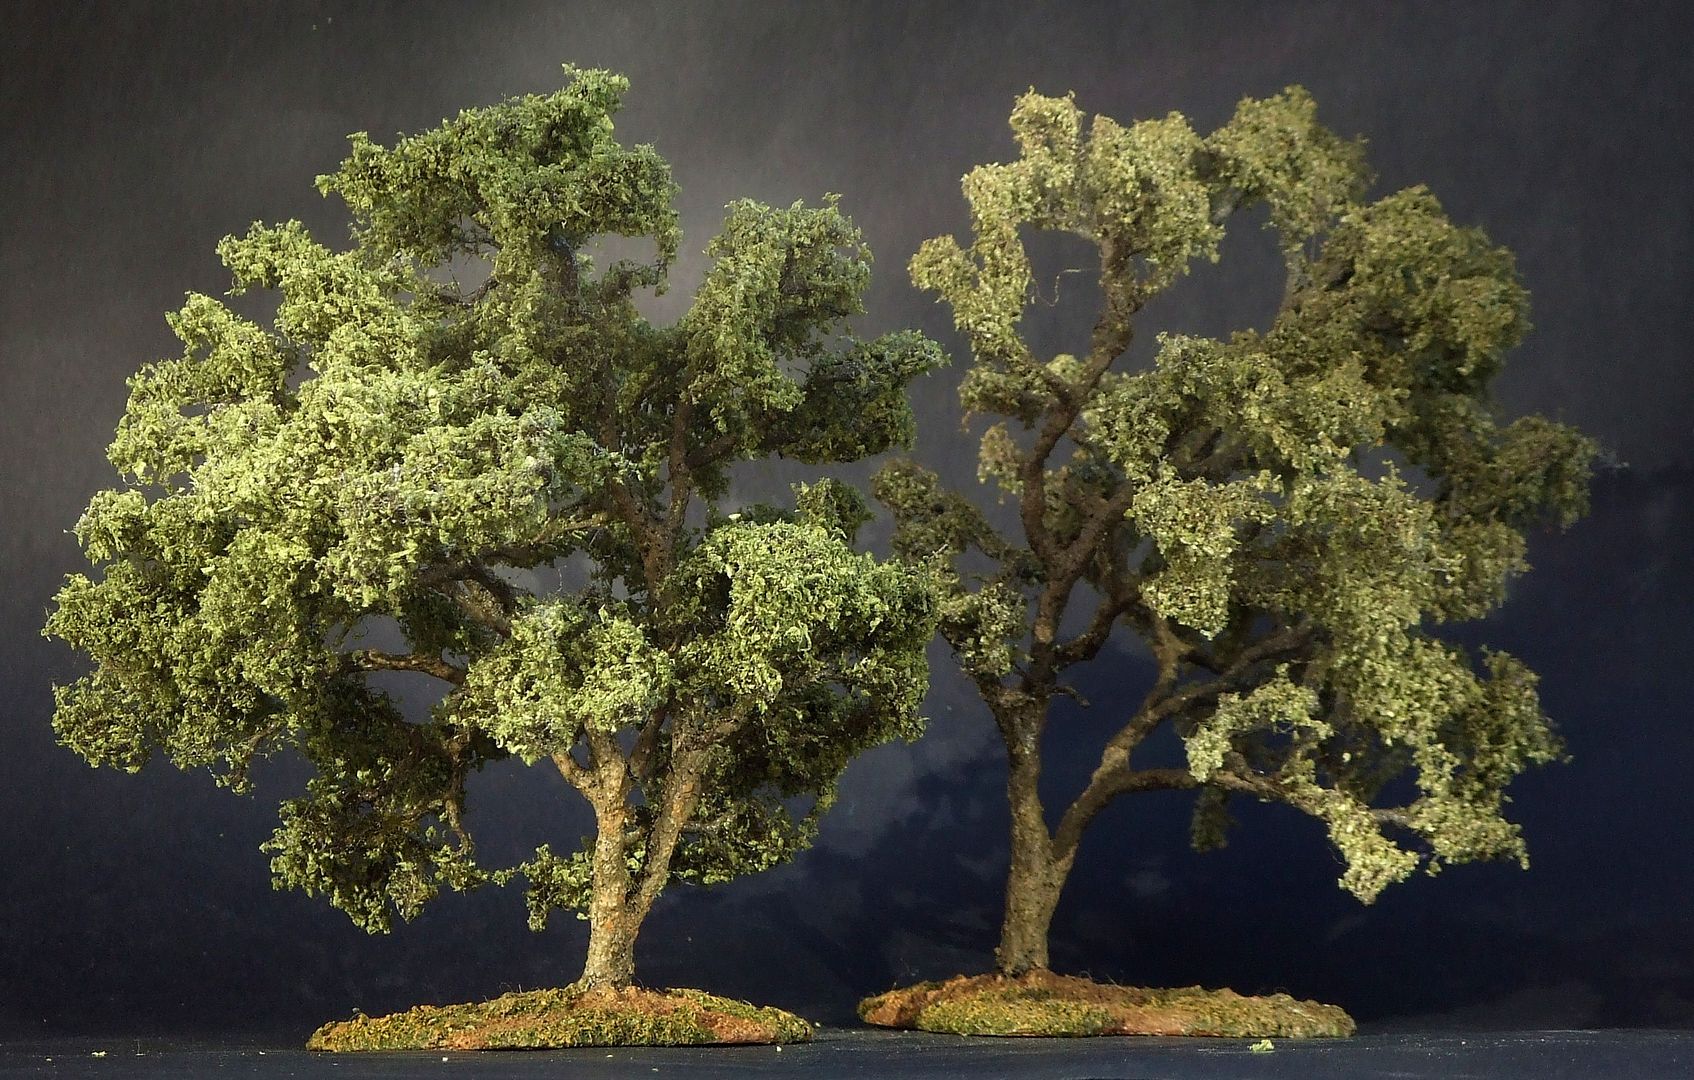
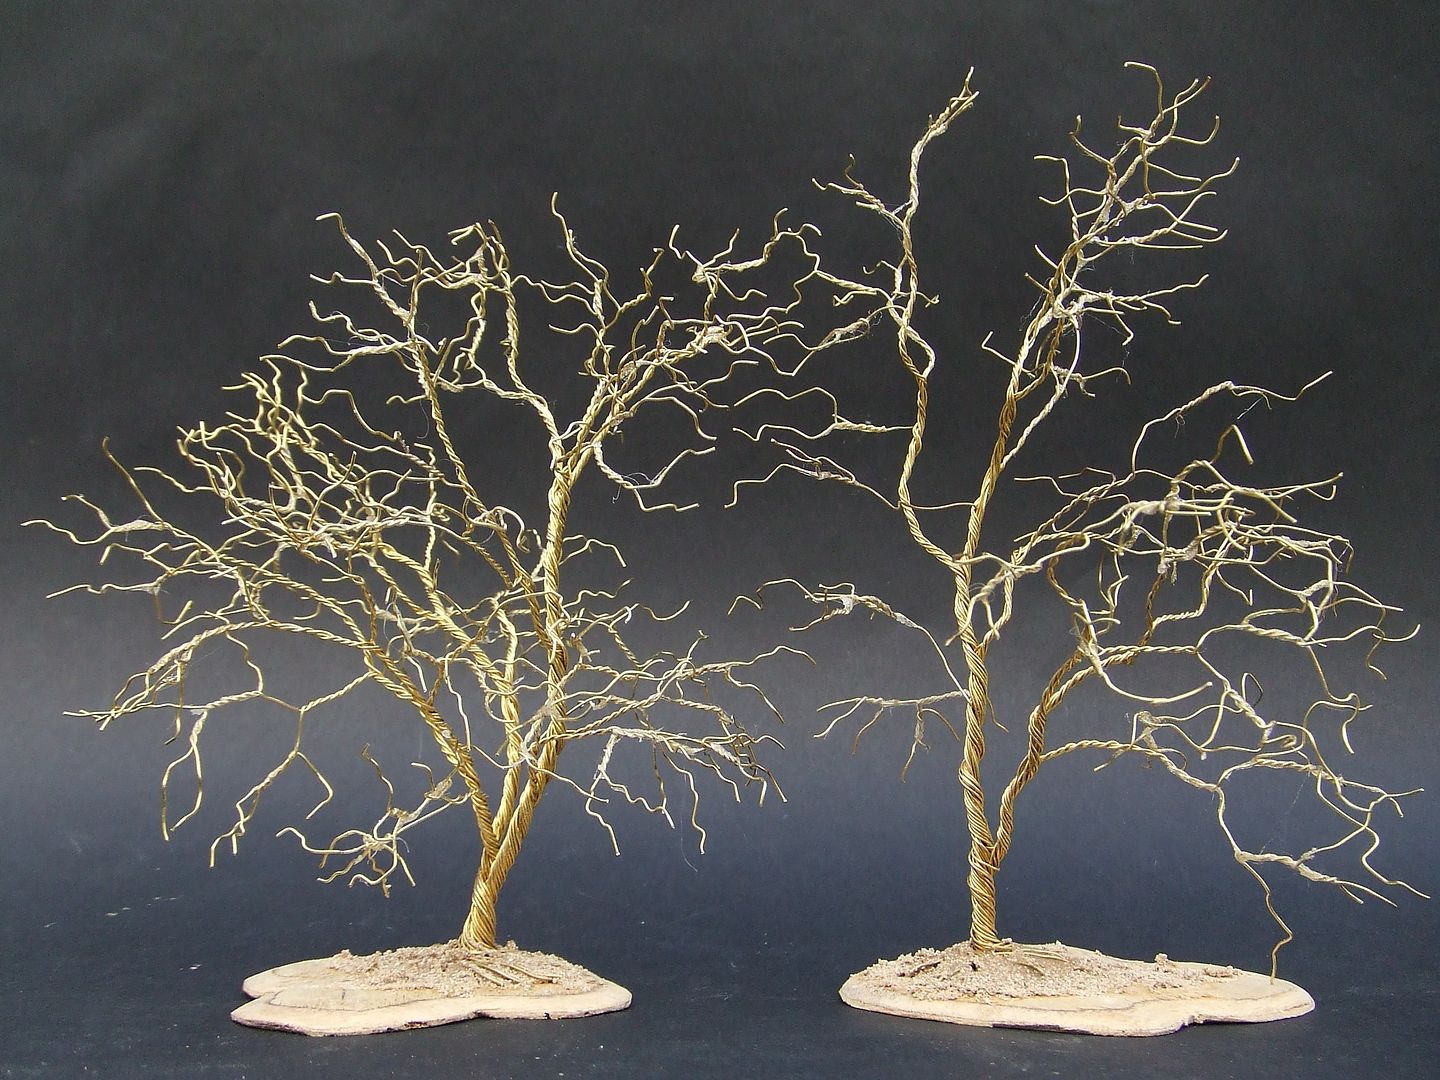
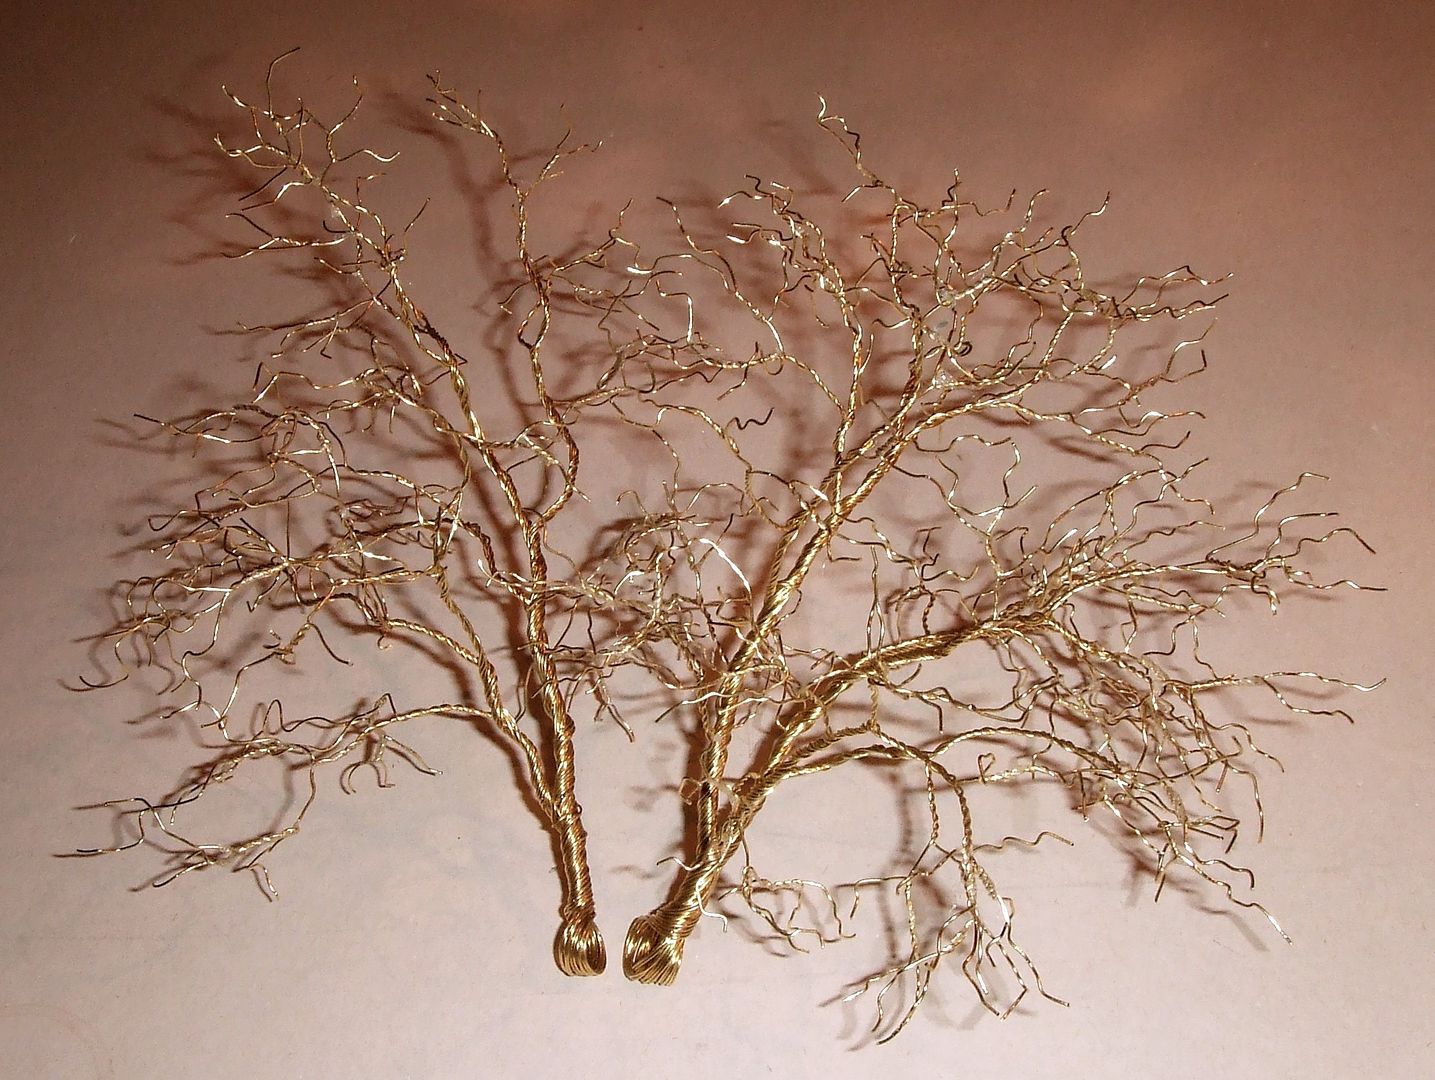
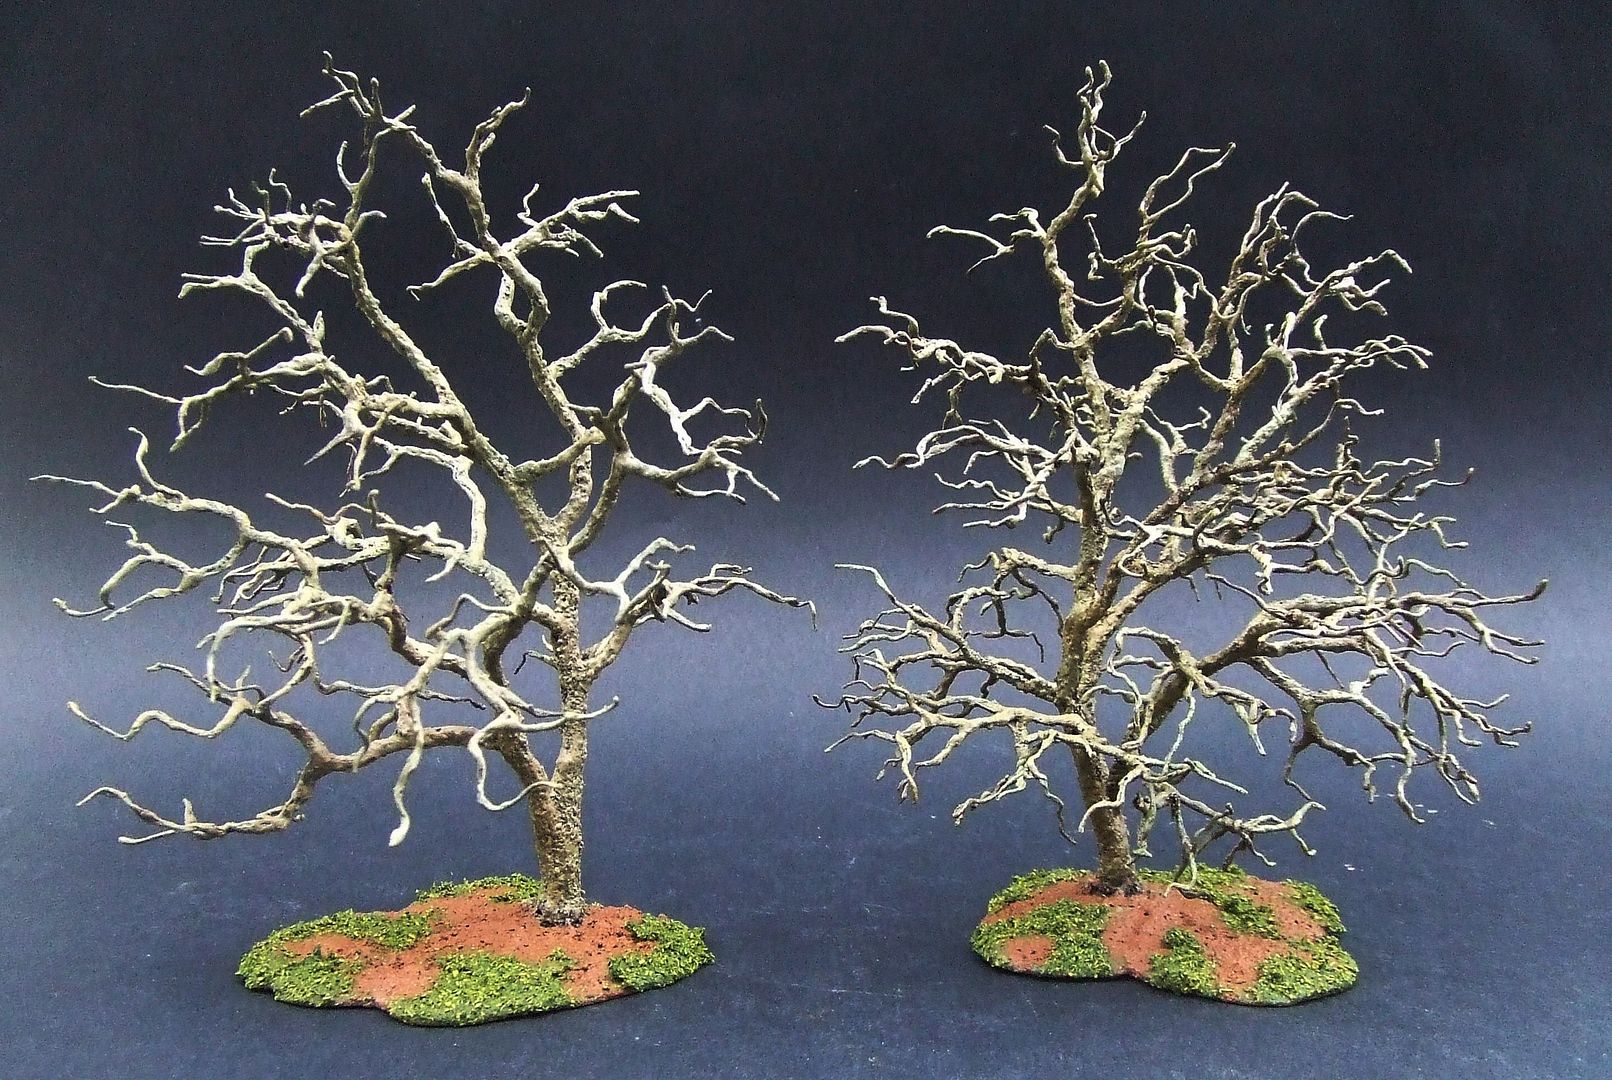
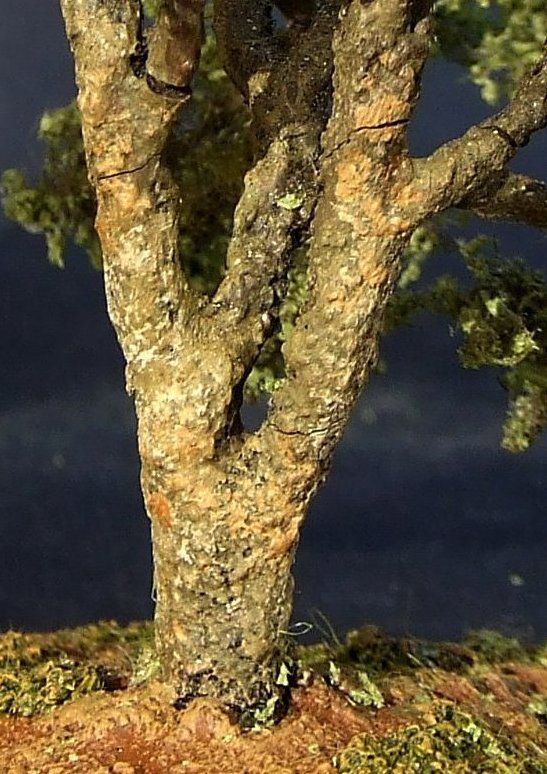
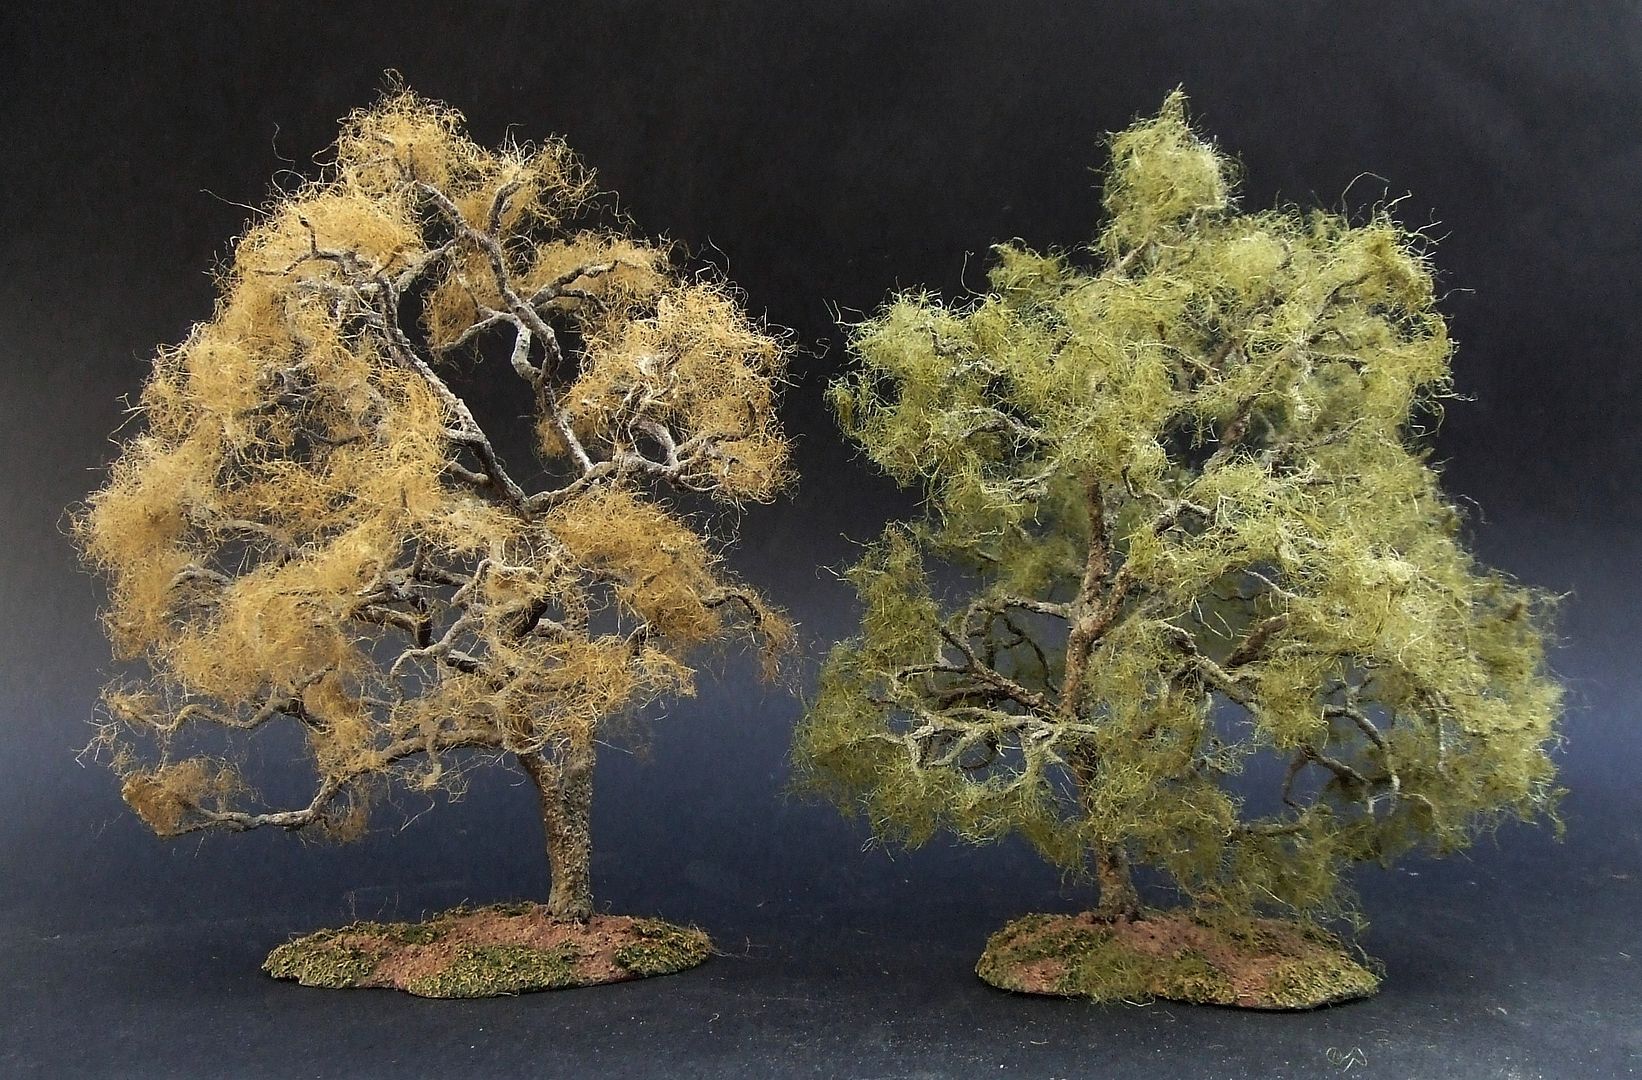
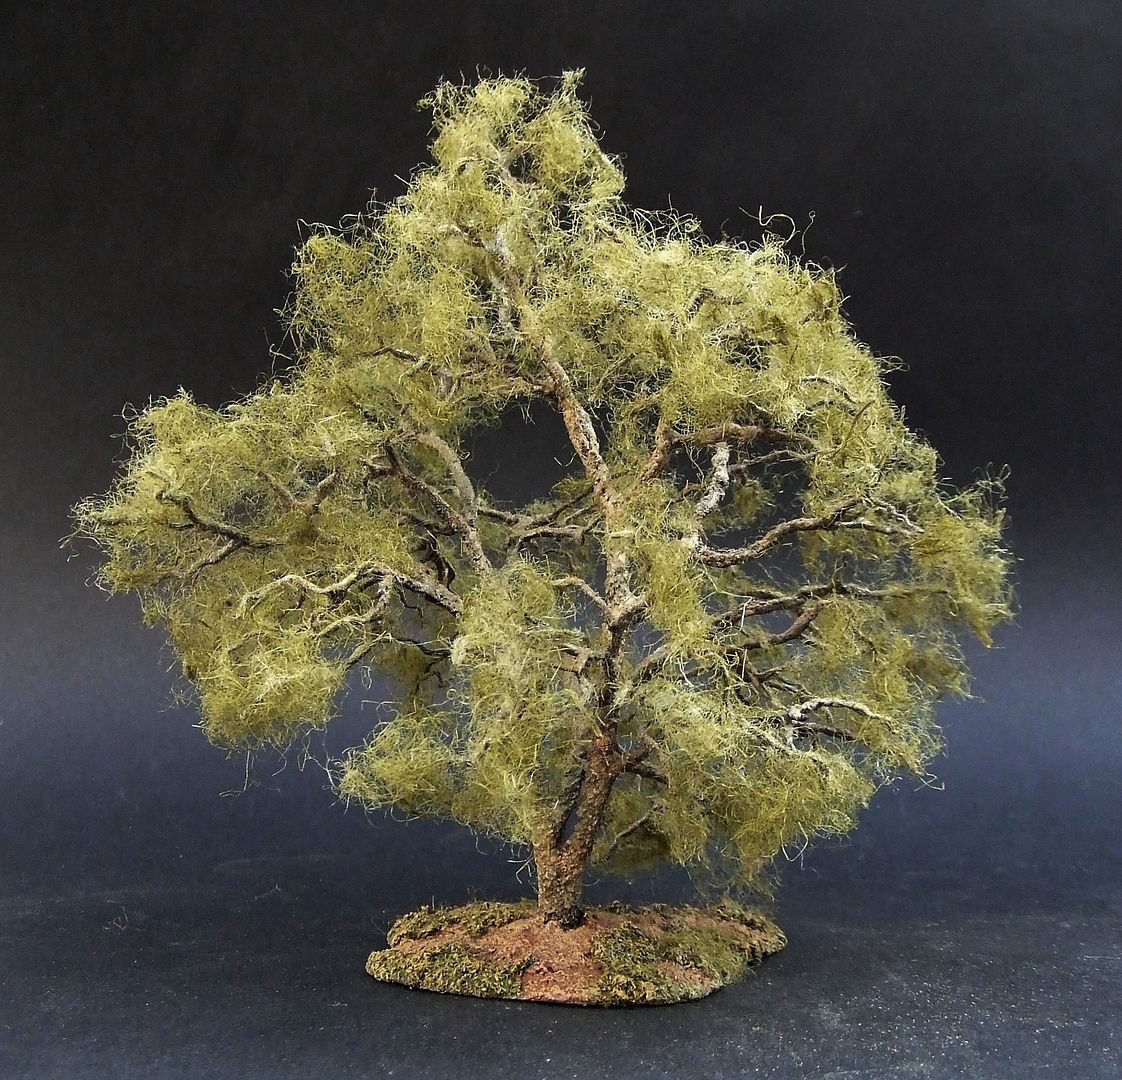
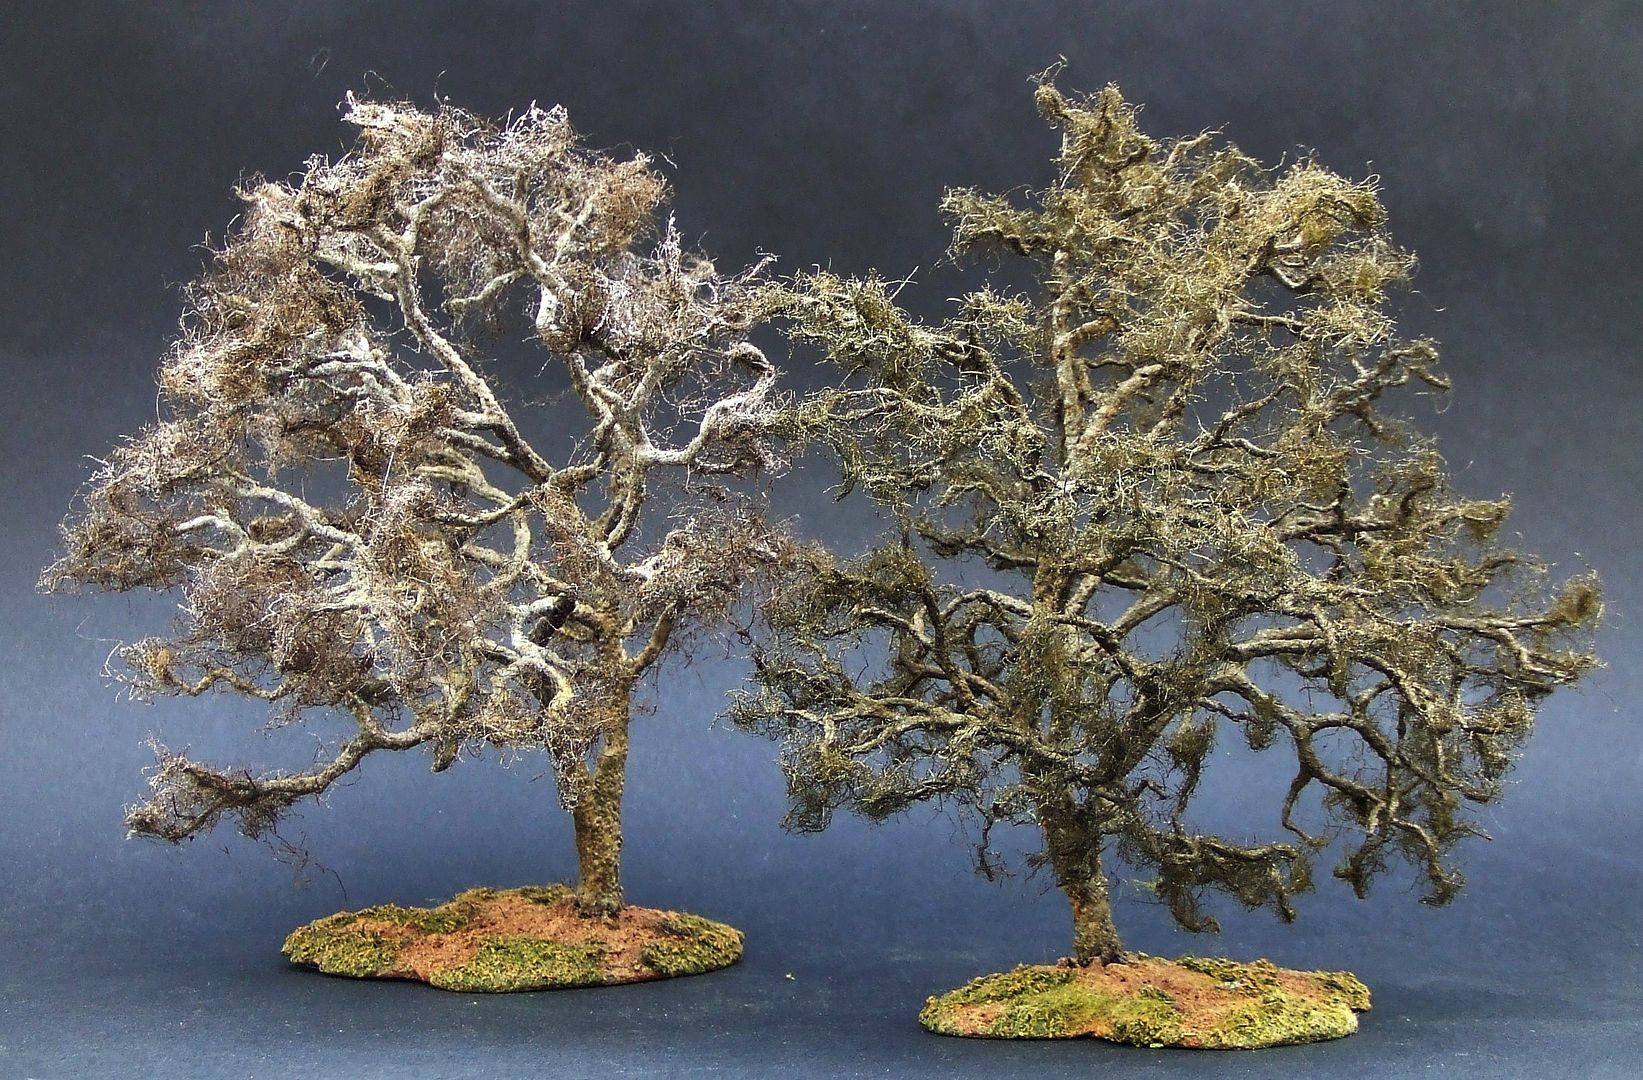
BLACK POPLAR TWINS
The black poplar tree origins from Europe, Central and West Asia and Northern Africa.

Latin name: Populis Nigra

For the frames 0.6mm brass wire is used.
About 20 wires for each tree.
50cm length each wire.
Folding the bunch doubles number of wires.
Ending up with 40 wires going upwards from root to leaves.
Creating 15cm high trees.
TWISTING AND TWINING
For wire twisting see weeping willow tutorial.
Making trunks and branches by twisting only, creates branches that may unwind themselves from the trunk again.
For every new branch it is recommended to twine them between other trunk wires.
So the branch wires leave the main trunk in between other wires.
This does not only create more strengt and keeps the branch in place.
It also creates branches leaving the middle of the trunk in stead of bending away from the trunk.
Splitting up the lower part of the trunk into 2 or 3 minor trunks requires another twining technique to keep it all together.
For making the base see weeping willow tutorial.
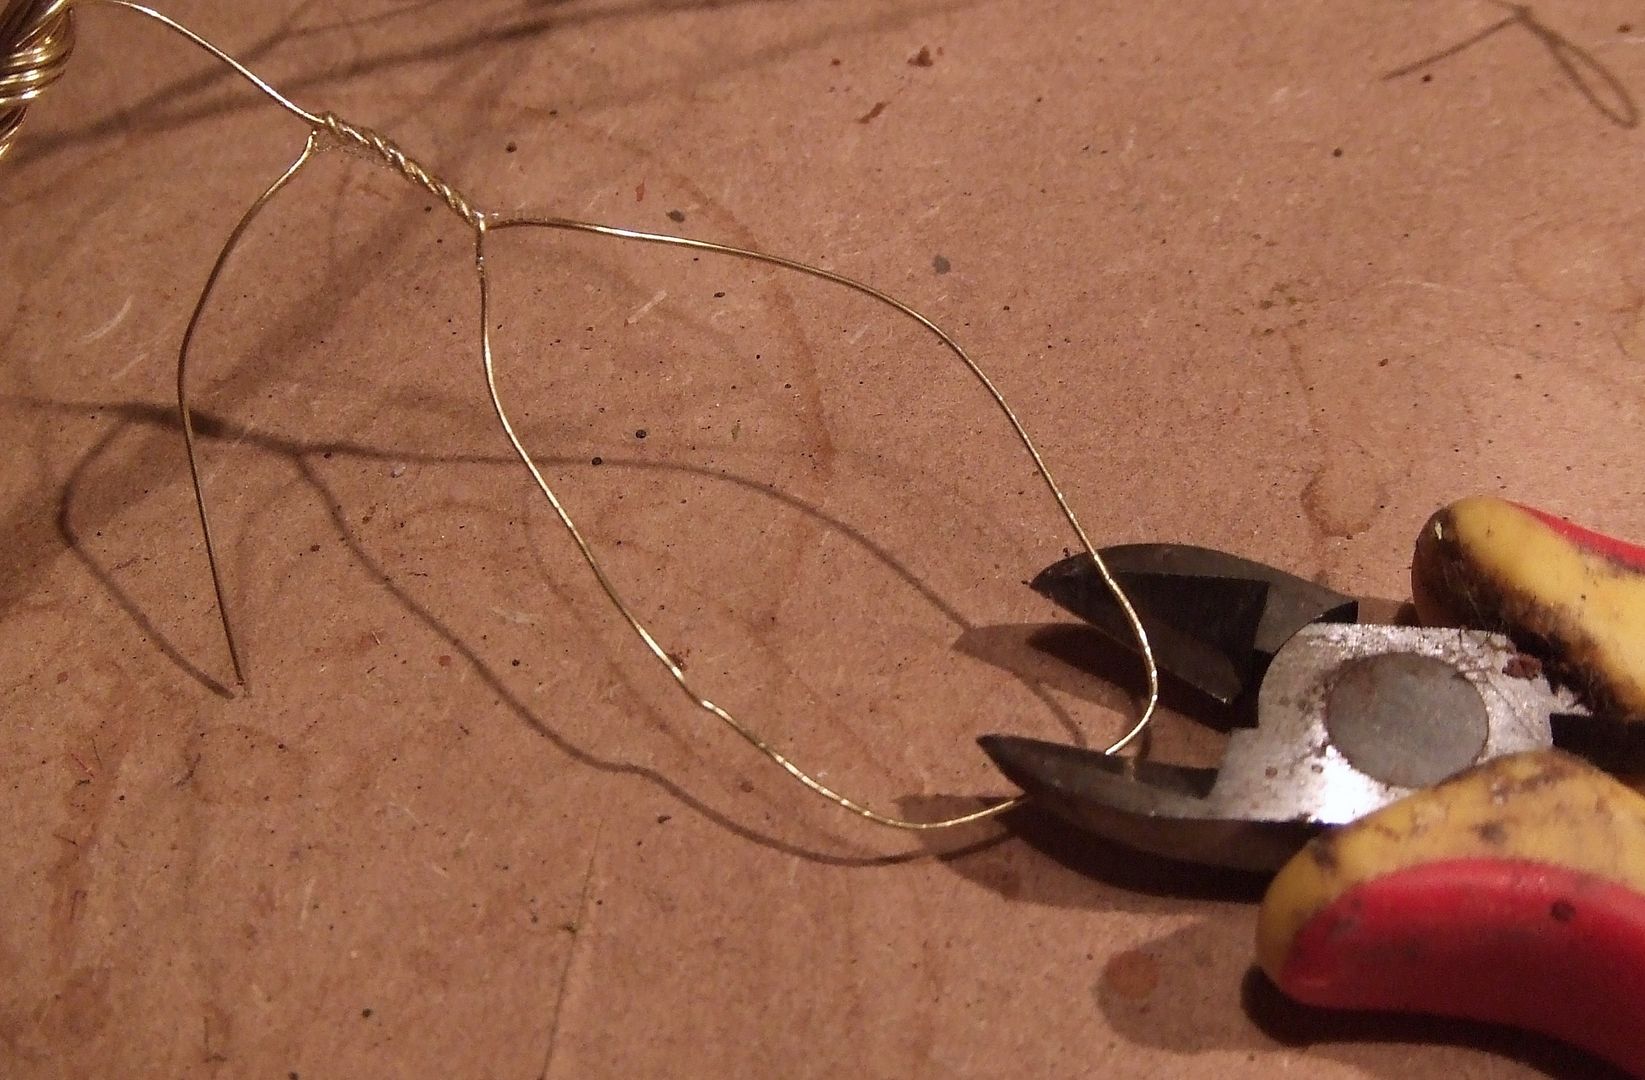
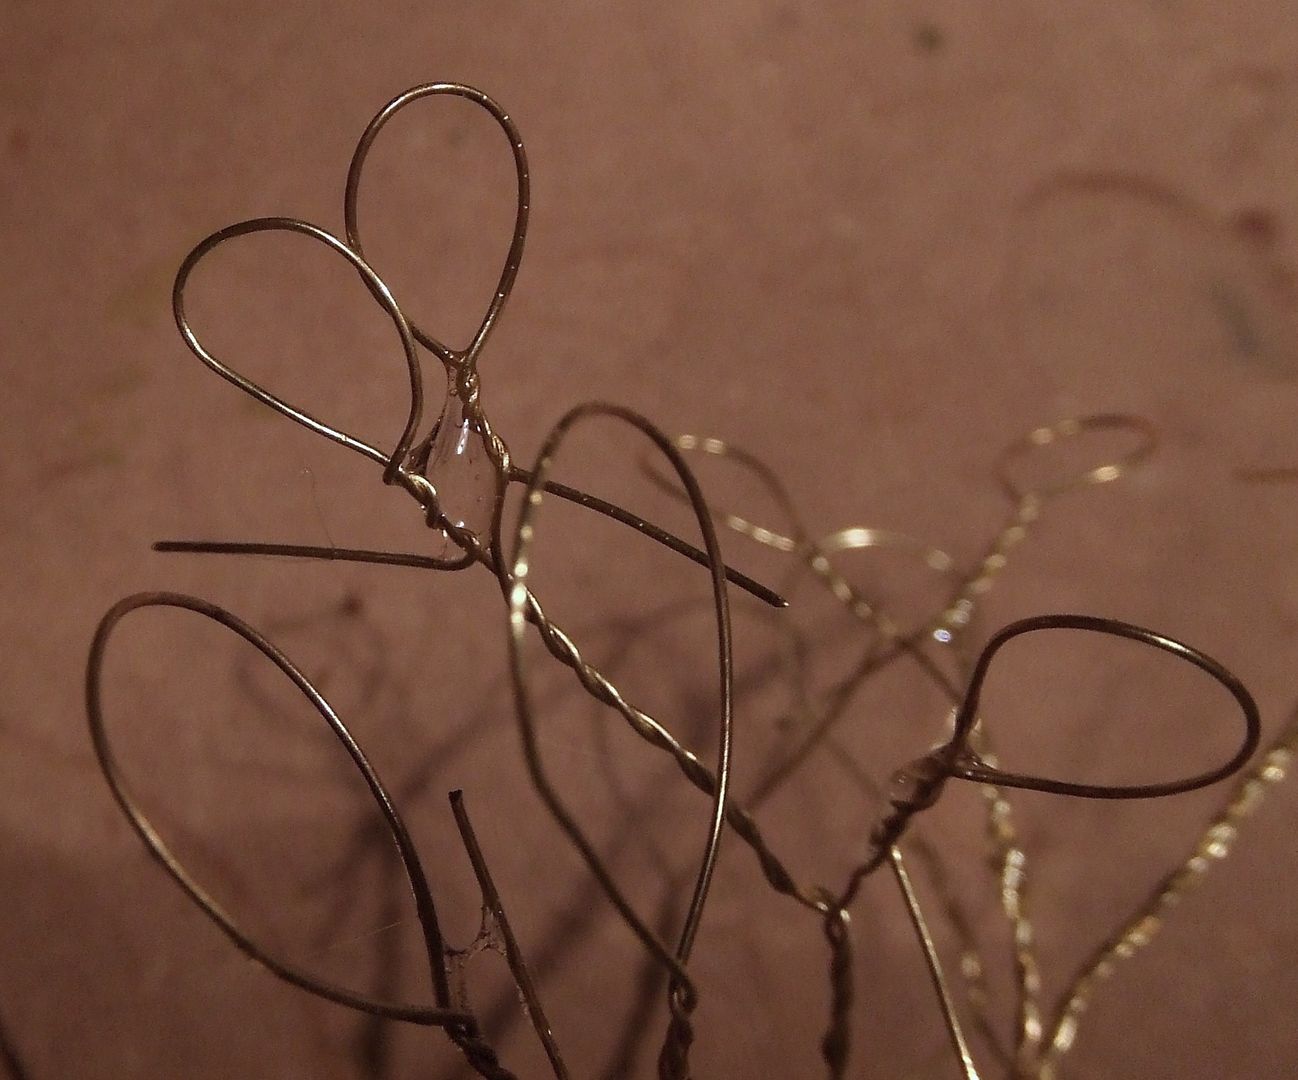
SPLITTING SINGLE BRASS WIRE IN THREE OR NINE

Bend single wire head into a loop.
Twist again.
Leave loose end hanging free as additional third branch.
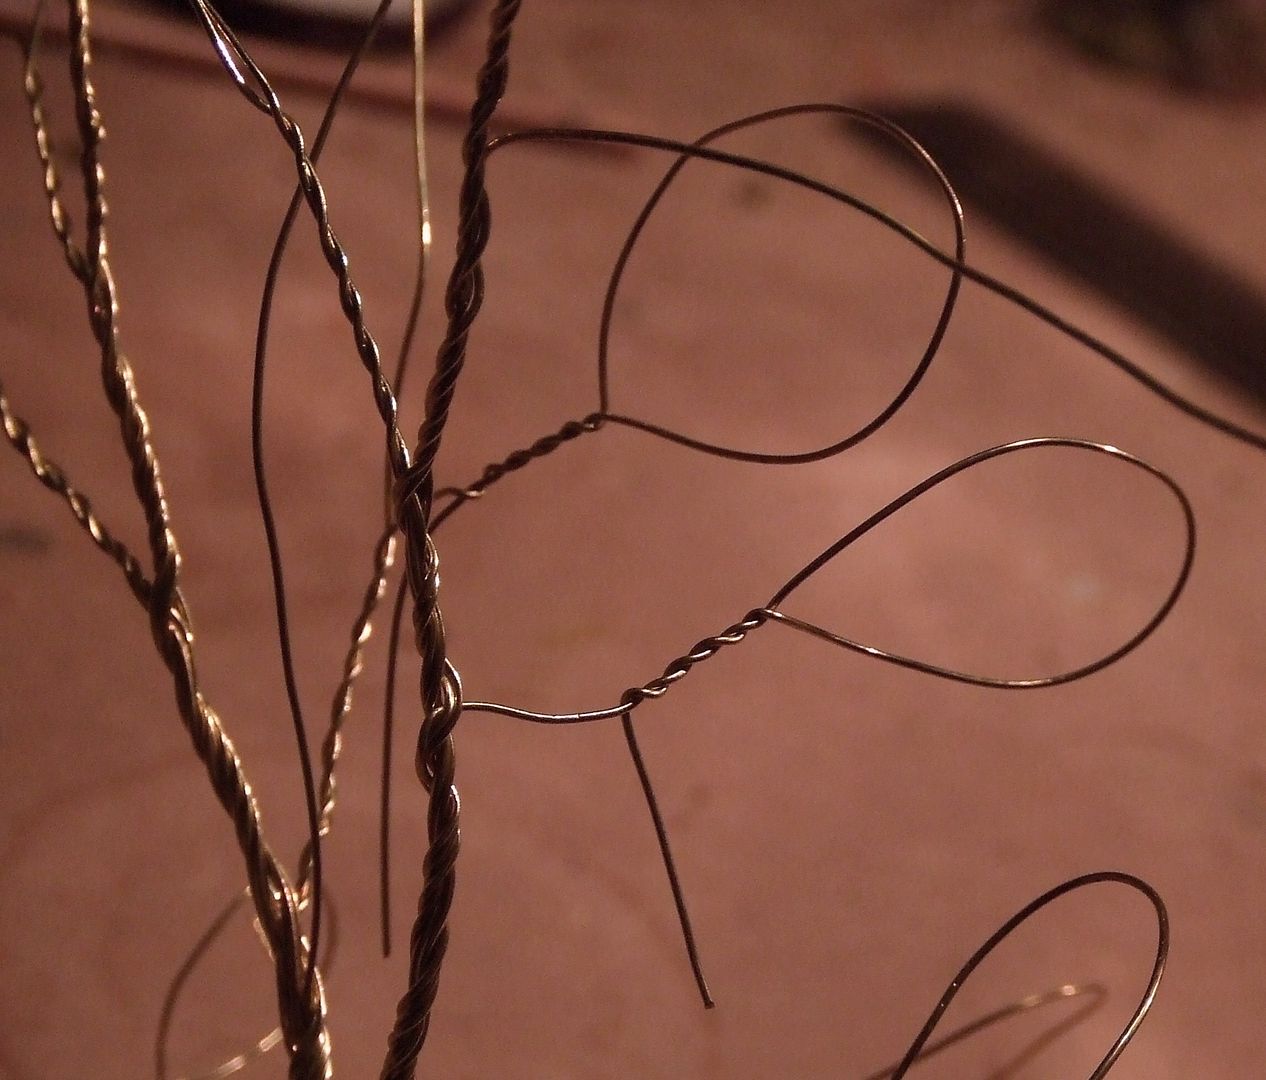
Add glue to twistings so it does not fall apart after cutting loop.
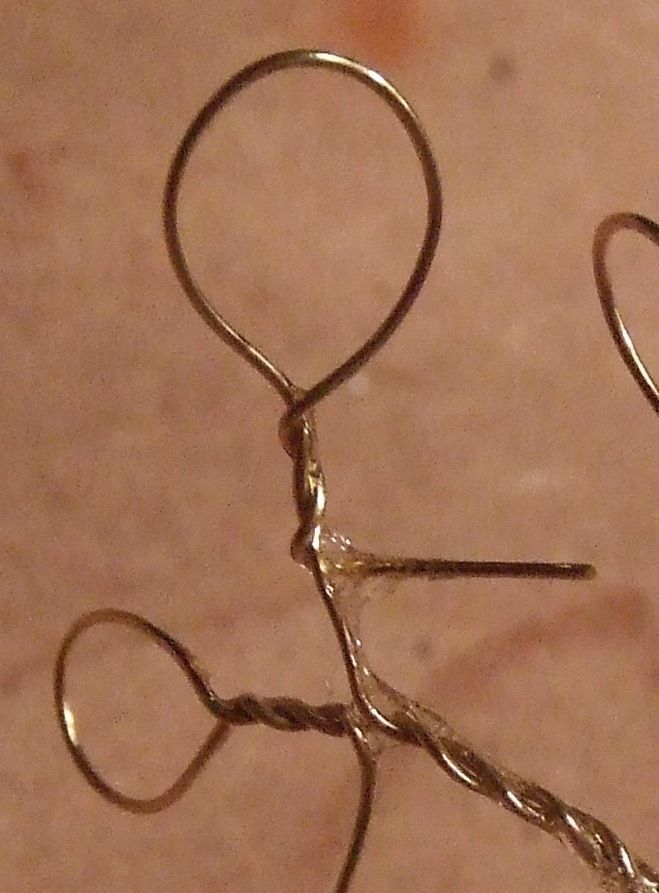
Looping all 40 wire heads.
Cut all of them.
All single wires are turned into 3 different wireheads now.
Creating 120 small branches.
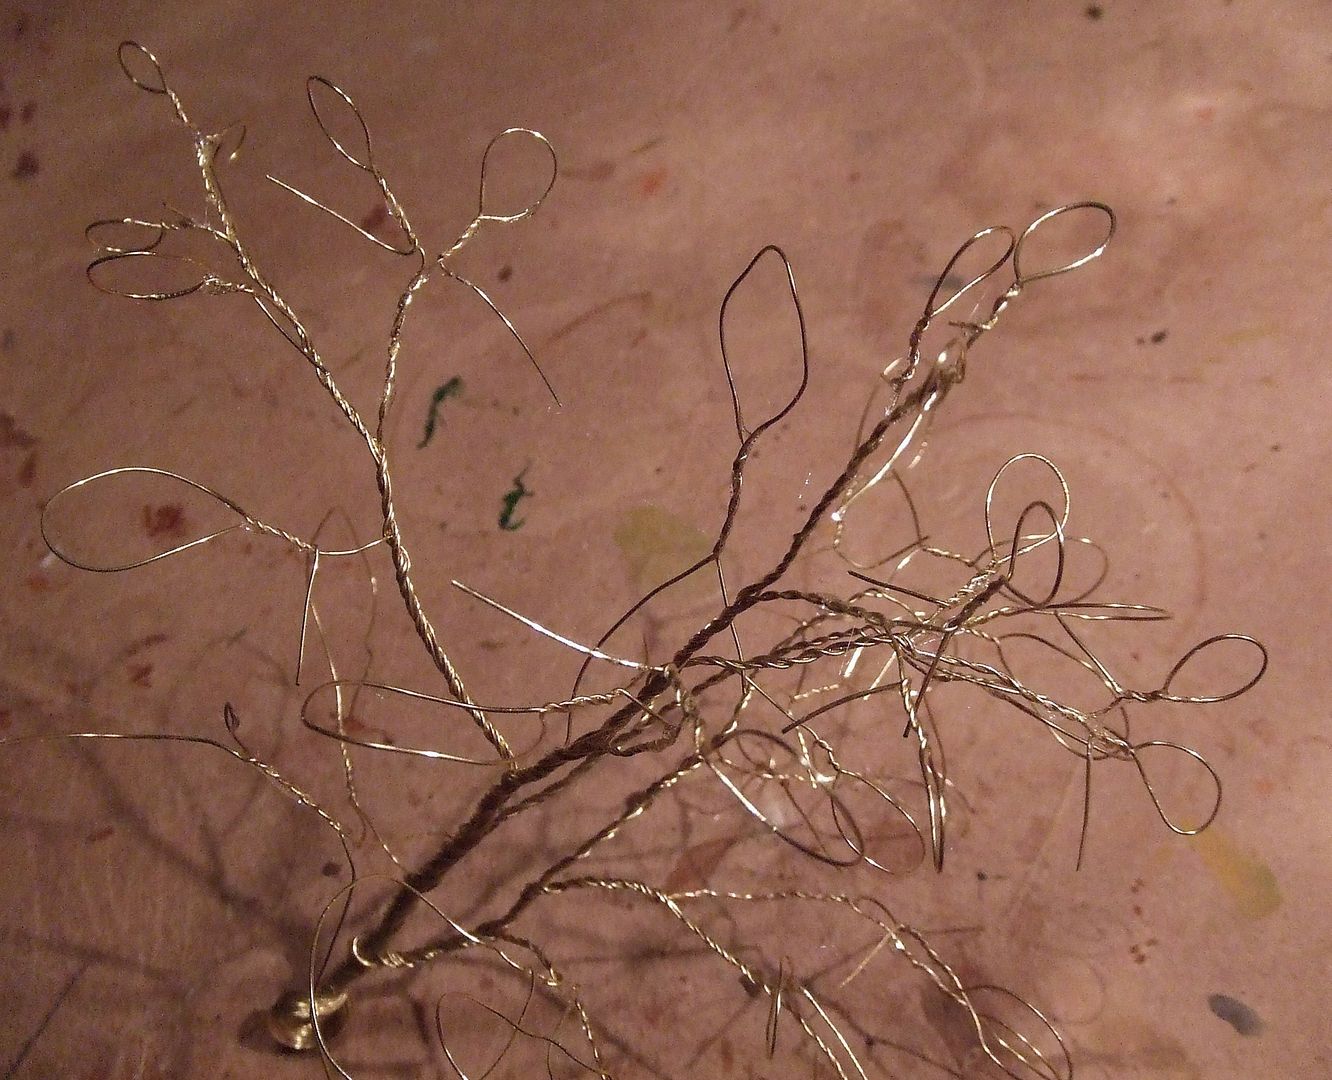
With the longest wireheads this can be repeated.
Make small loops again.
Add glue and cut loops.
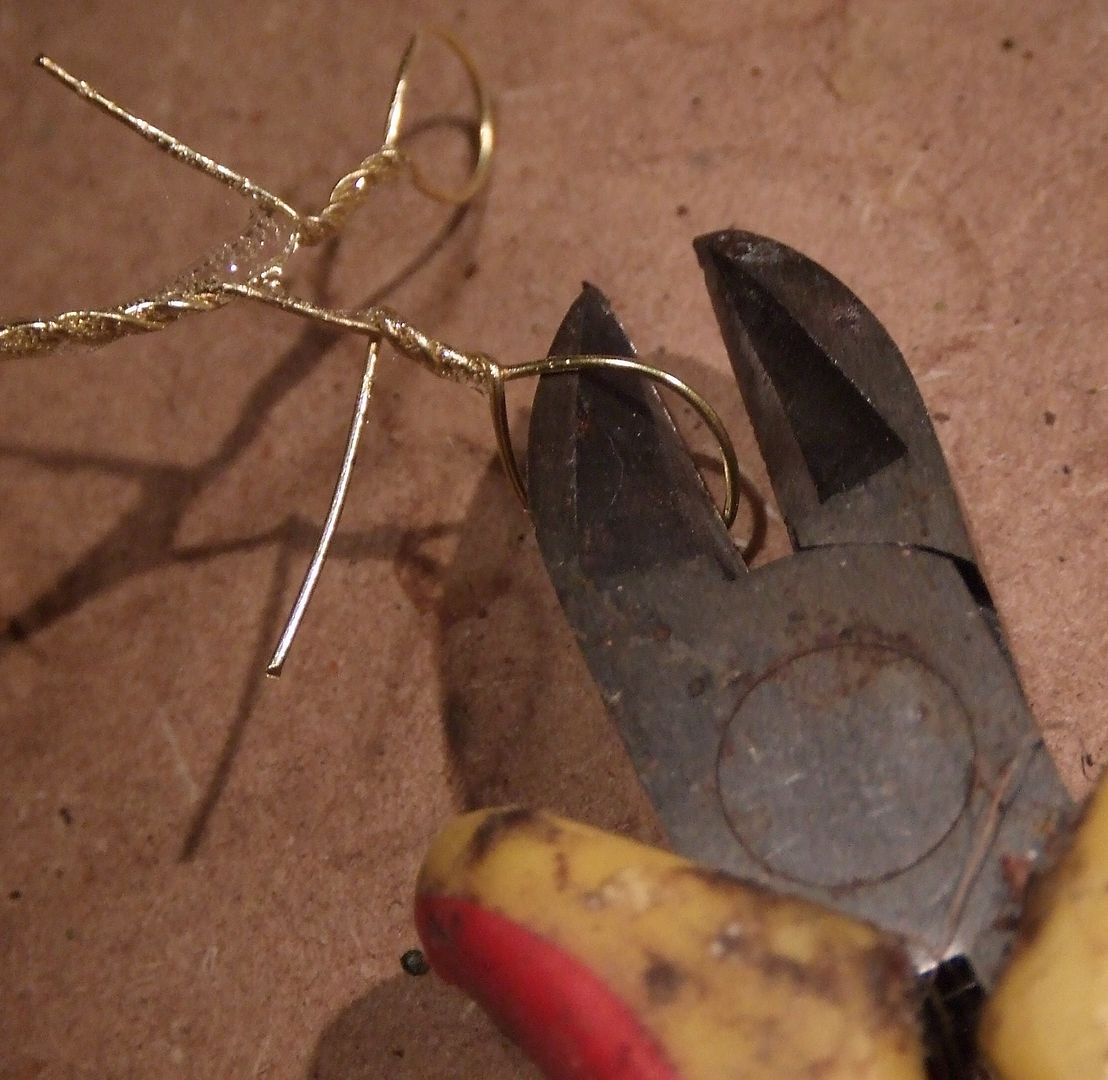
The original single wire can be turned into 9 single wireheads this way.
Starting with an original 20 wires per tree this may end up to 360 branches.
Theoretically this can make up to 720 small branches for the twins together.
But these trees have not even half of this number of wire heads.
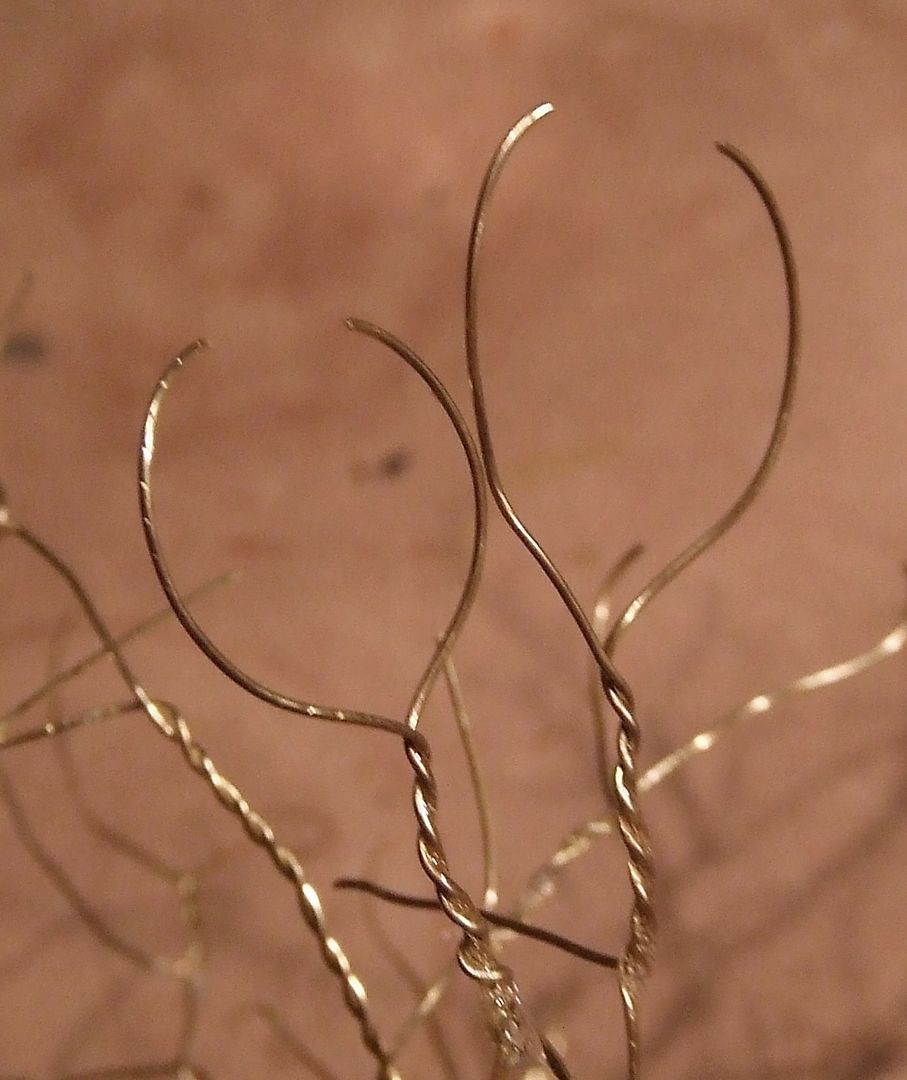
Branches are zigzagged with a pair of round pliers.
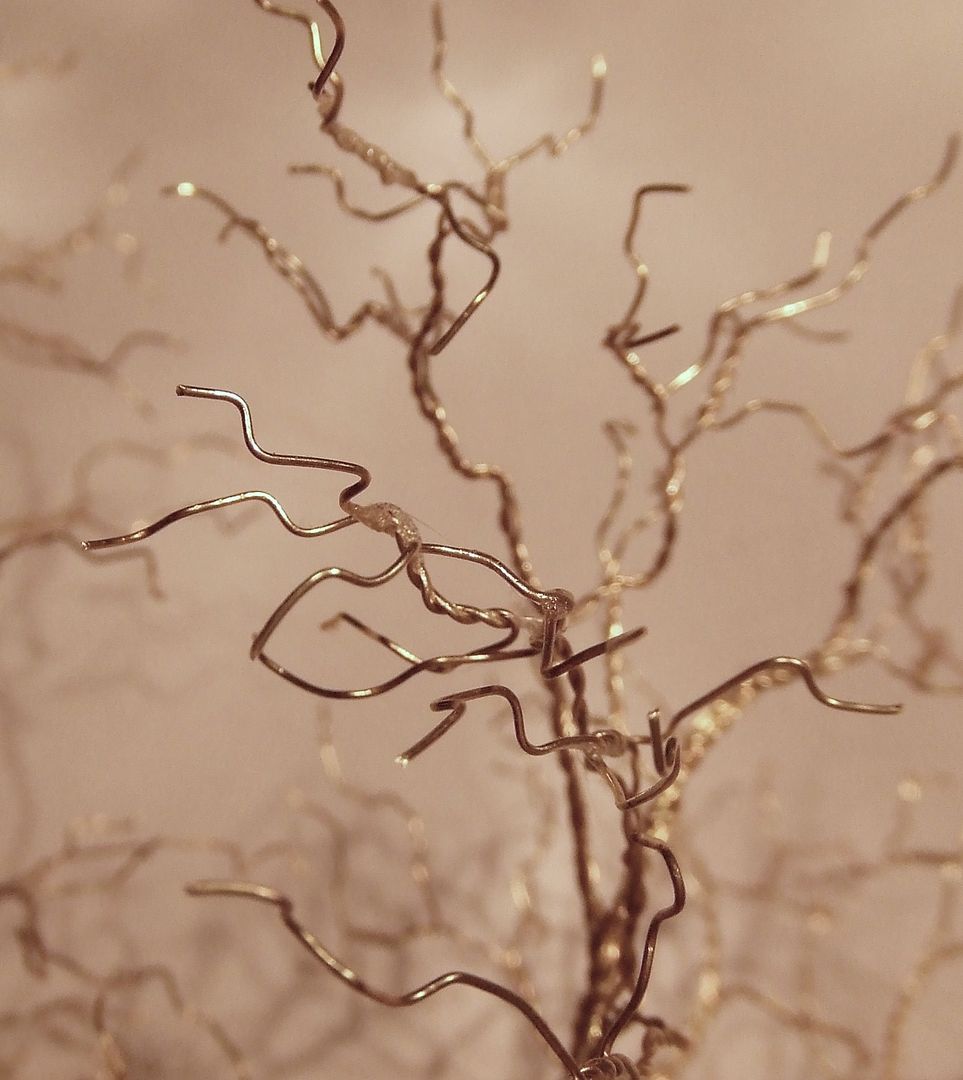
The result is a gentle, slim treetrunk with thin main branches but stil ending into a high number of smaller branches.
The disadvantage is:
There are single wire ‘in between’ parts in every branch, followed up by heavyer double twisted parts.
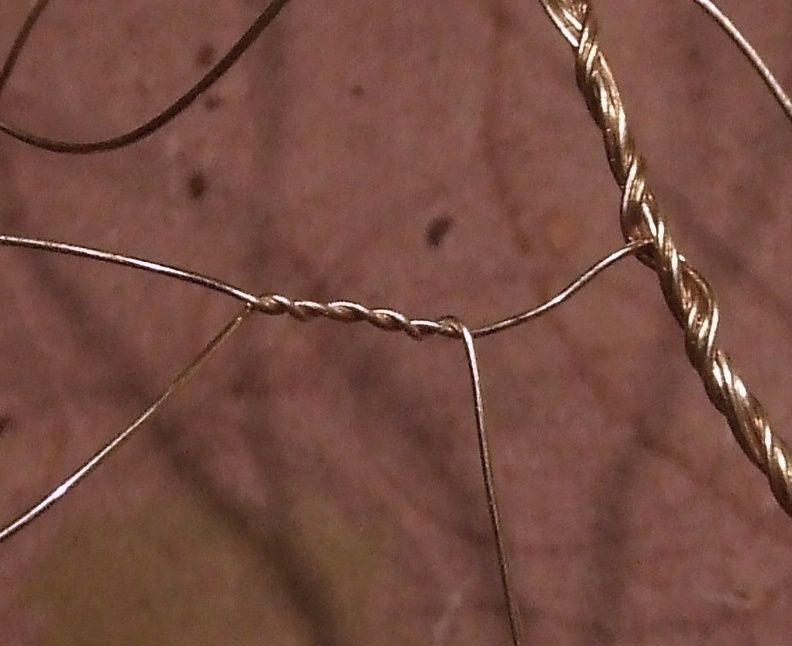
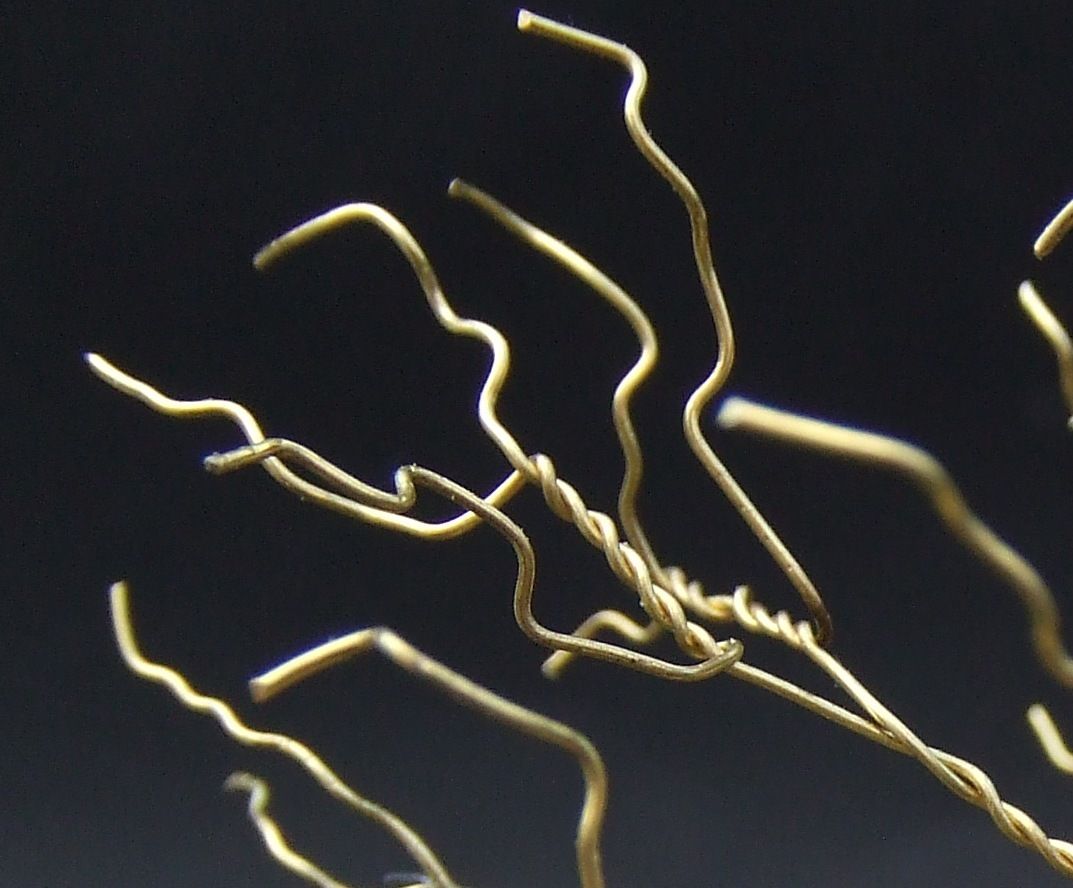
This has to be compensated (camouflaged) later on in the building process.
Basing spray paint.
Apply trunk bark with coffee and white glue mix.
Apply plain white glue to smaller branches.
See weeping willow tutorial.
Here is a test piece.
Paint with acrylics.
Bark on smooth branches is suggested by spray paint drops.
The trunkbark is painted by dotting different acrylic shades with hard pighair brush.

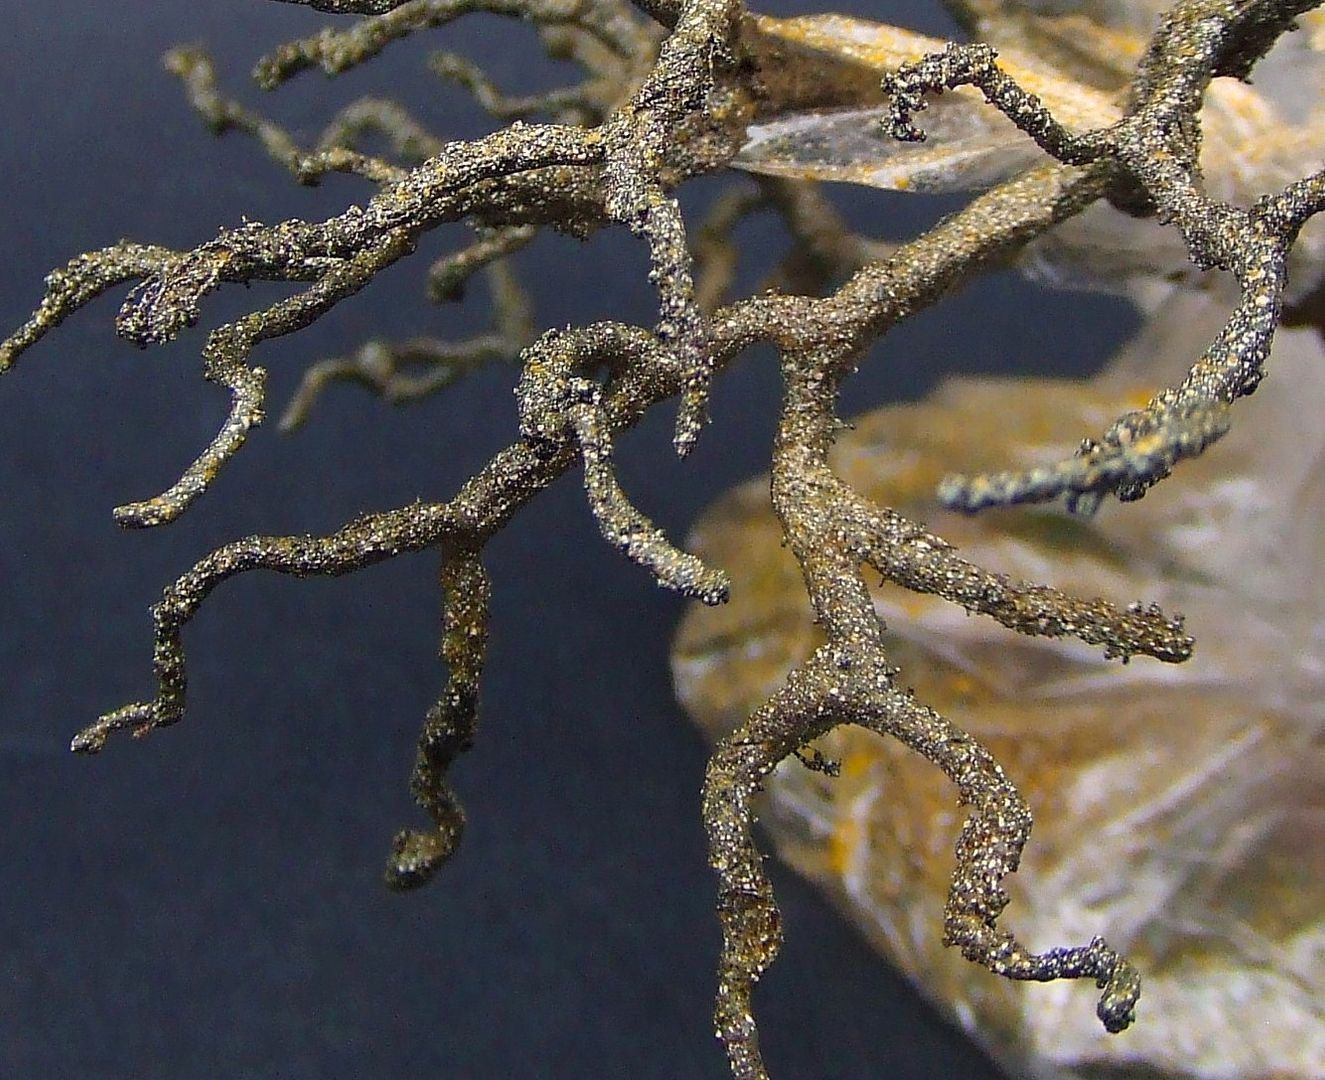
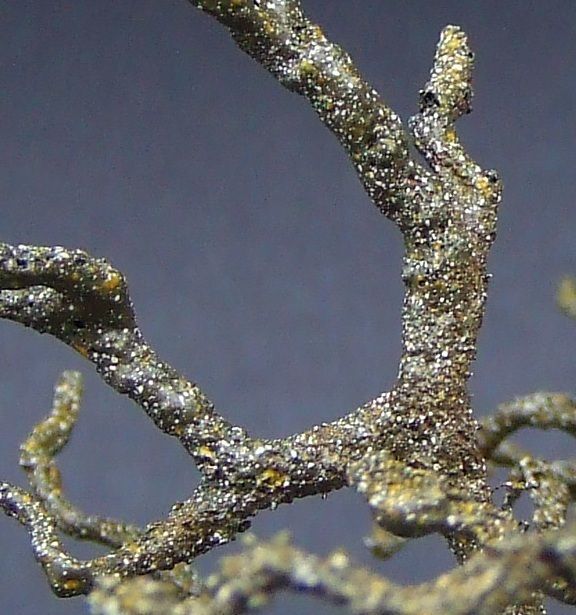
MICRO FIBRE FILTER TWIGS
In a vacuumcleaner…

…behind the paper dustbag…
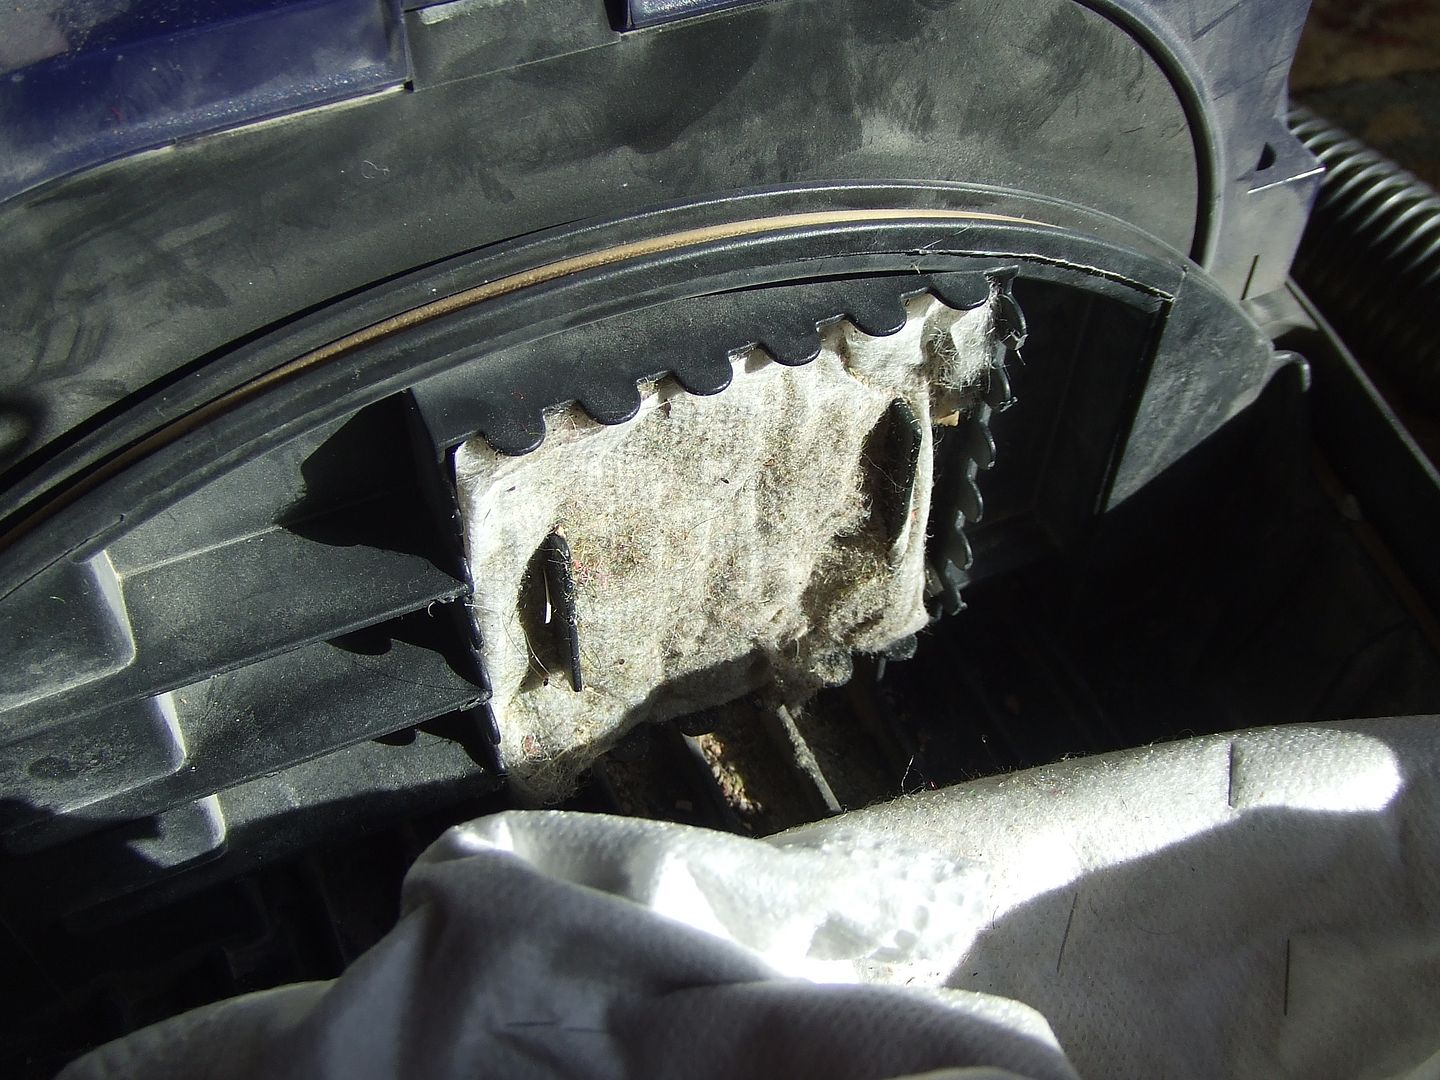
…is plenty of twig material available.
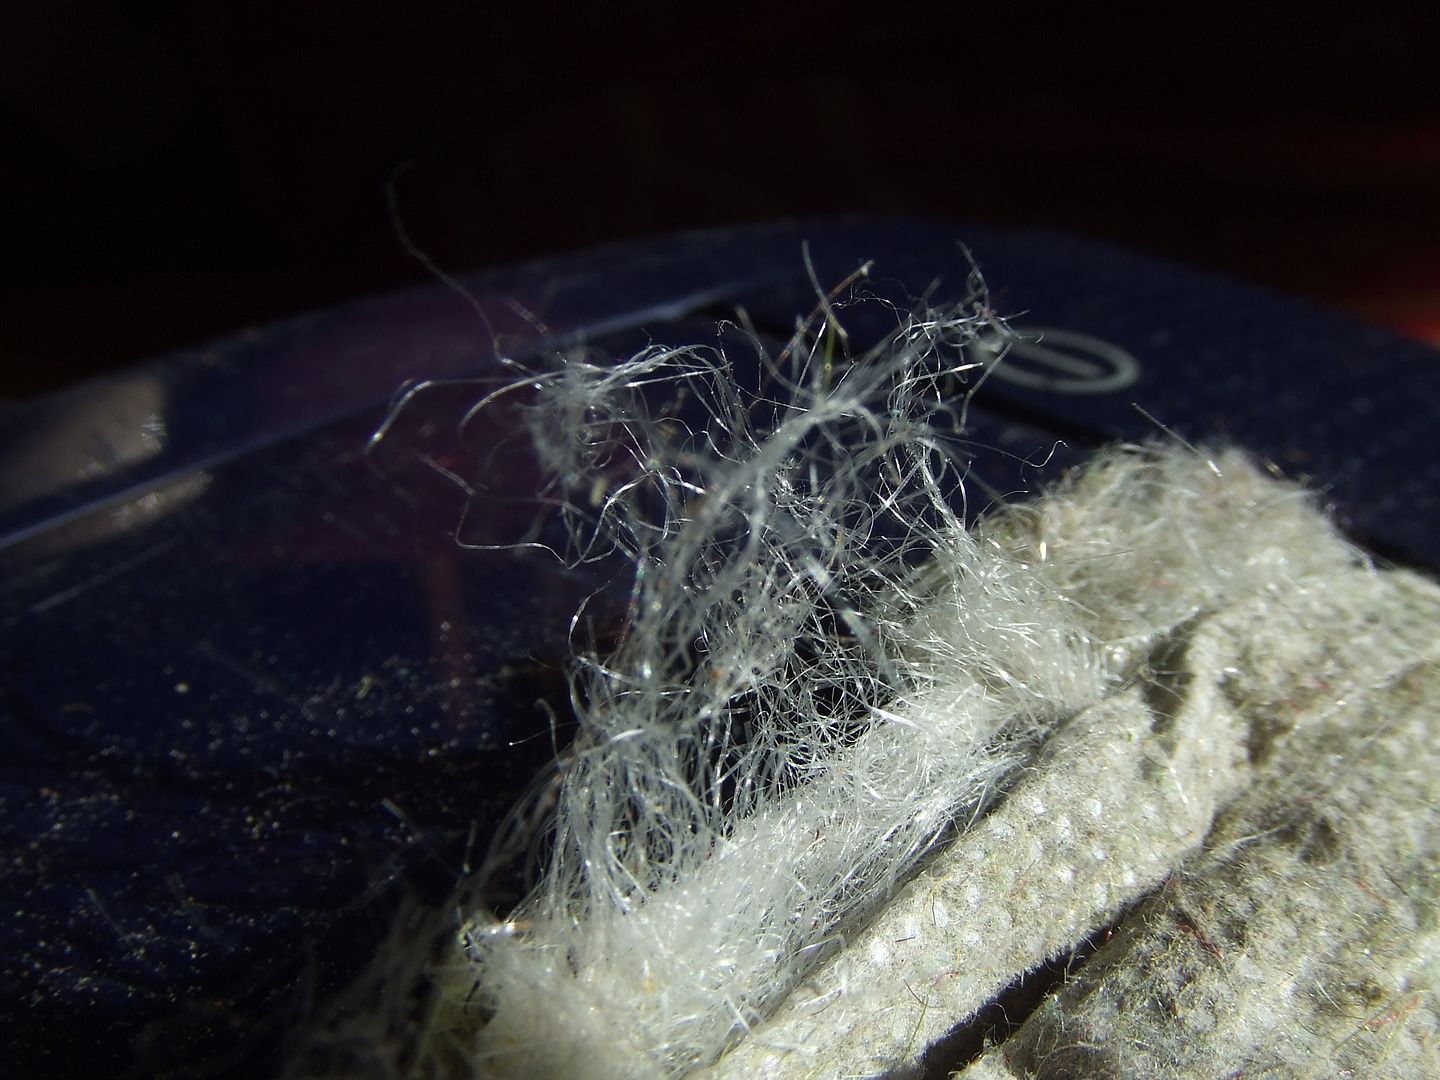
This is polyester fibre or similar material.
There might be a spare, clean filter in the spare dustbags box.
Enoug for several trees.
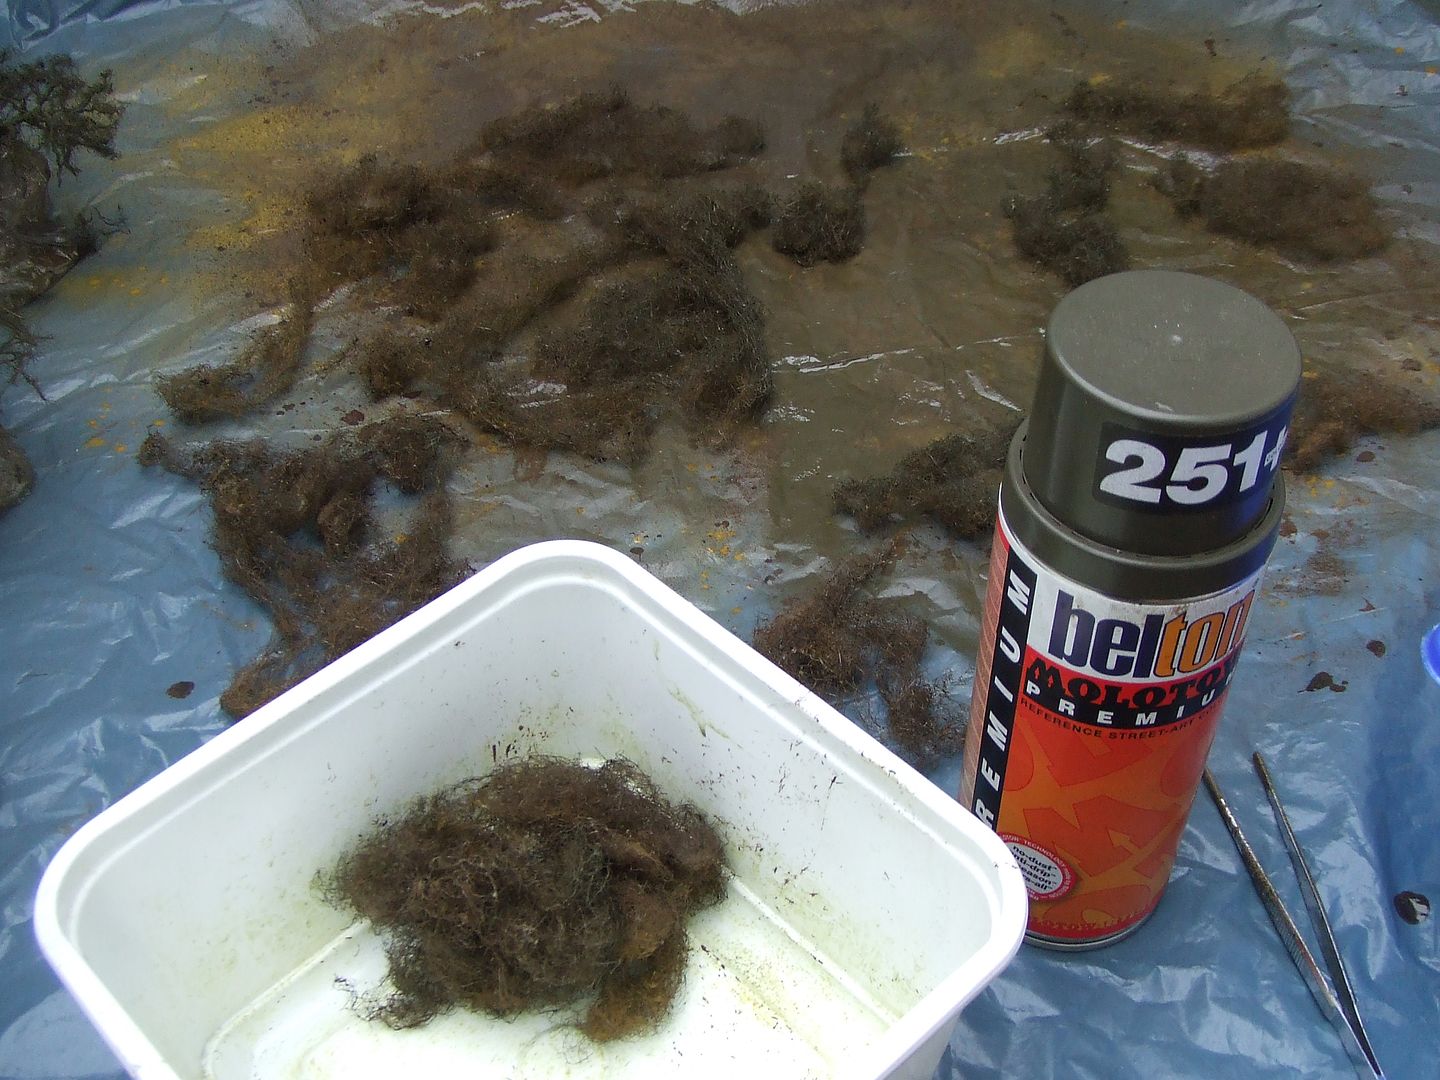
It can be painted with spraypaint.
Acrylic paint sticks best.
Alkyde paint falls off the fibres after drying.
For spraying and drying it needs to be turned over with pincers.
Carefull with this, the fibre will clot and loose its woolly shape.
Two different colors are used here.
The yellow brown fits a real black poplar best.

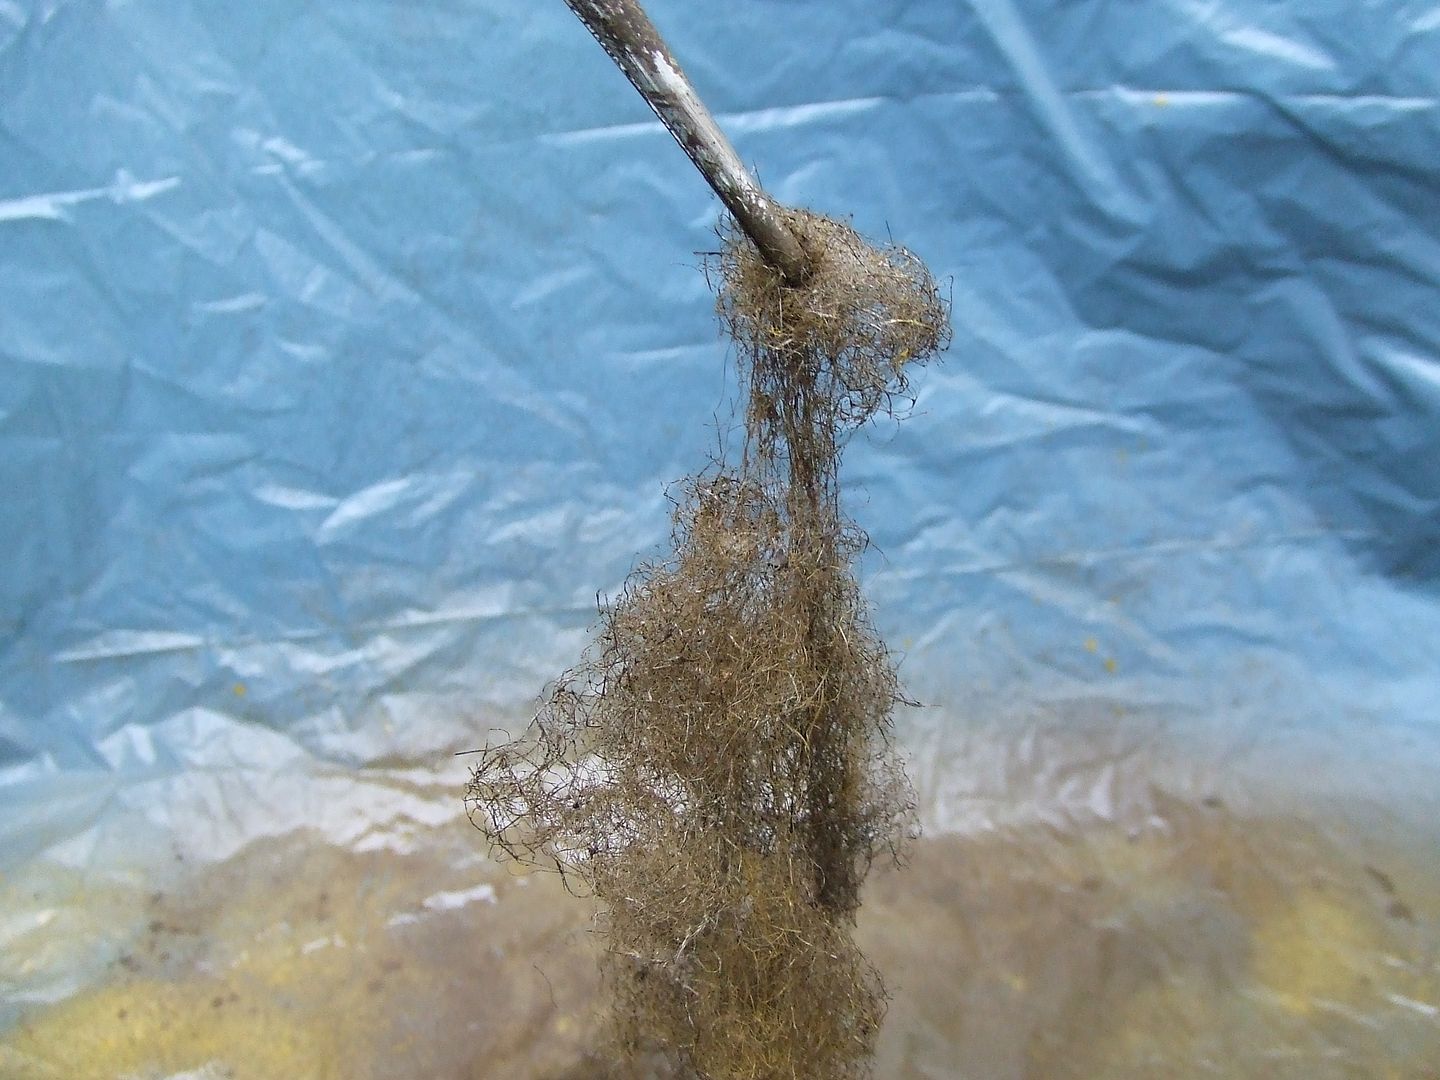
Cut fibre in pieces of 2 to 3 cm.
Spray glue over all branch heads and apply fibre.
Remove excessive fibre and cut long fibre ends.
VISCOSE FOLIAGE
For making foliage out of viscose cleaning sponge see the Persian Walnut tree tutorial.
Spray glue on all twigs and add foliage flakes by straining from top and sides.
Tip off after a few minutes to loose excessive foliage.

Remove foliage flakes from trunk and branches by hard pighair oilpaint brush.
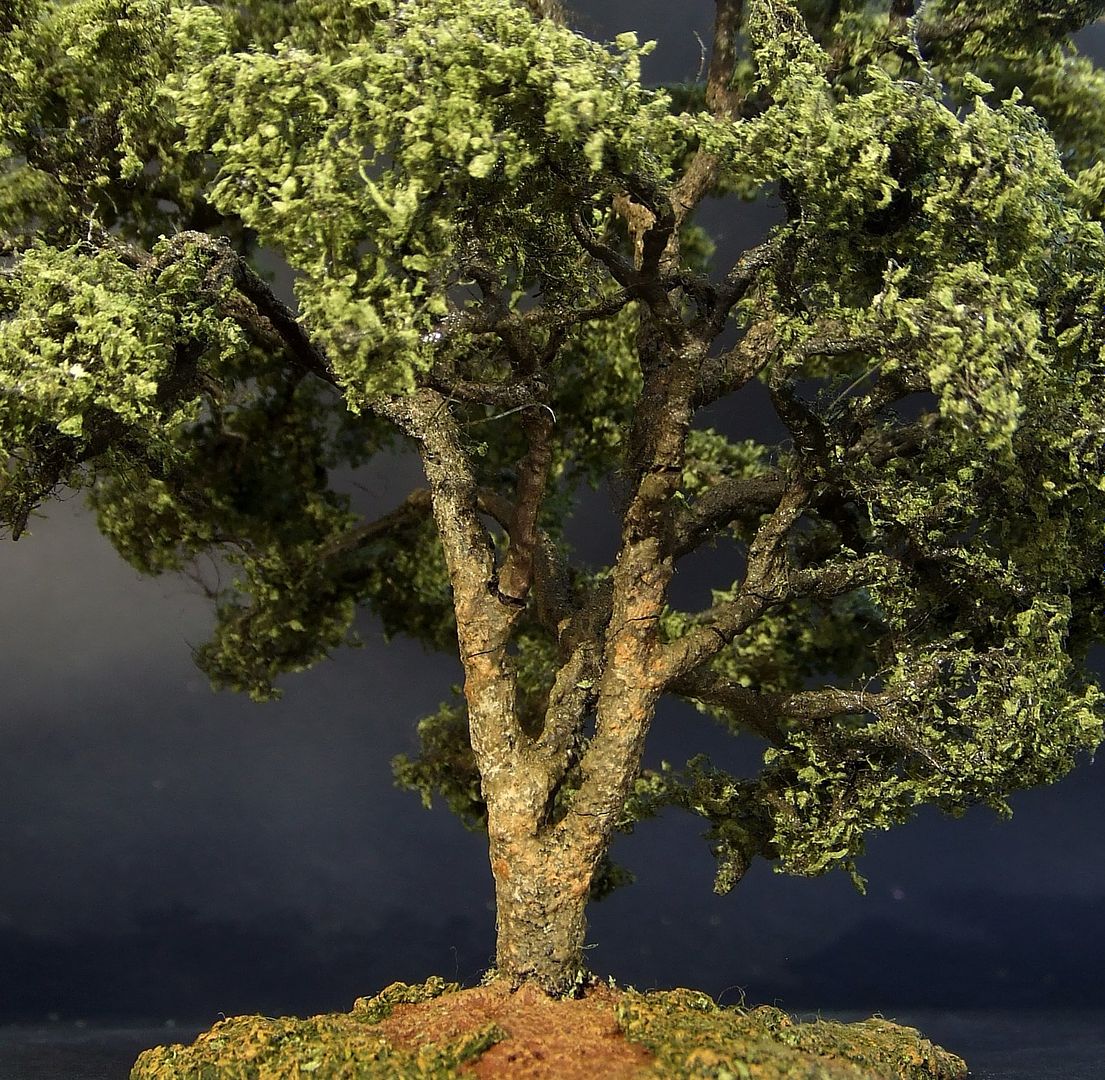
Make sure your tree stays transparent from all directions.
Only transparenty will create threedimensional effect and leaves branches visible.
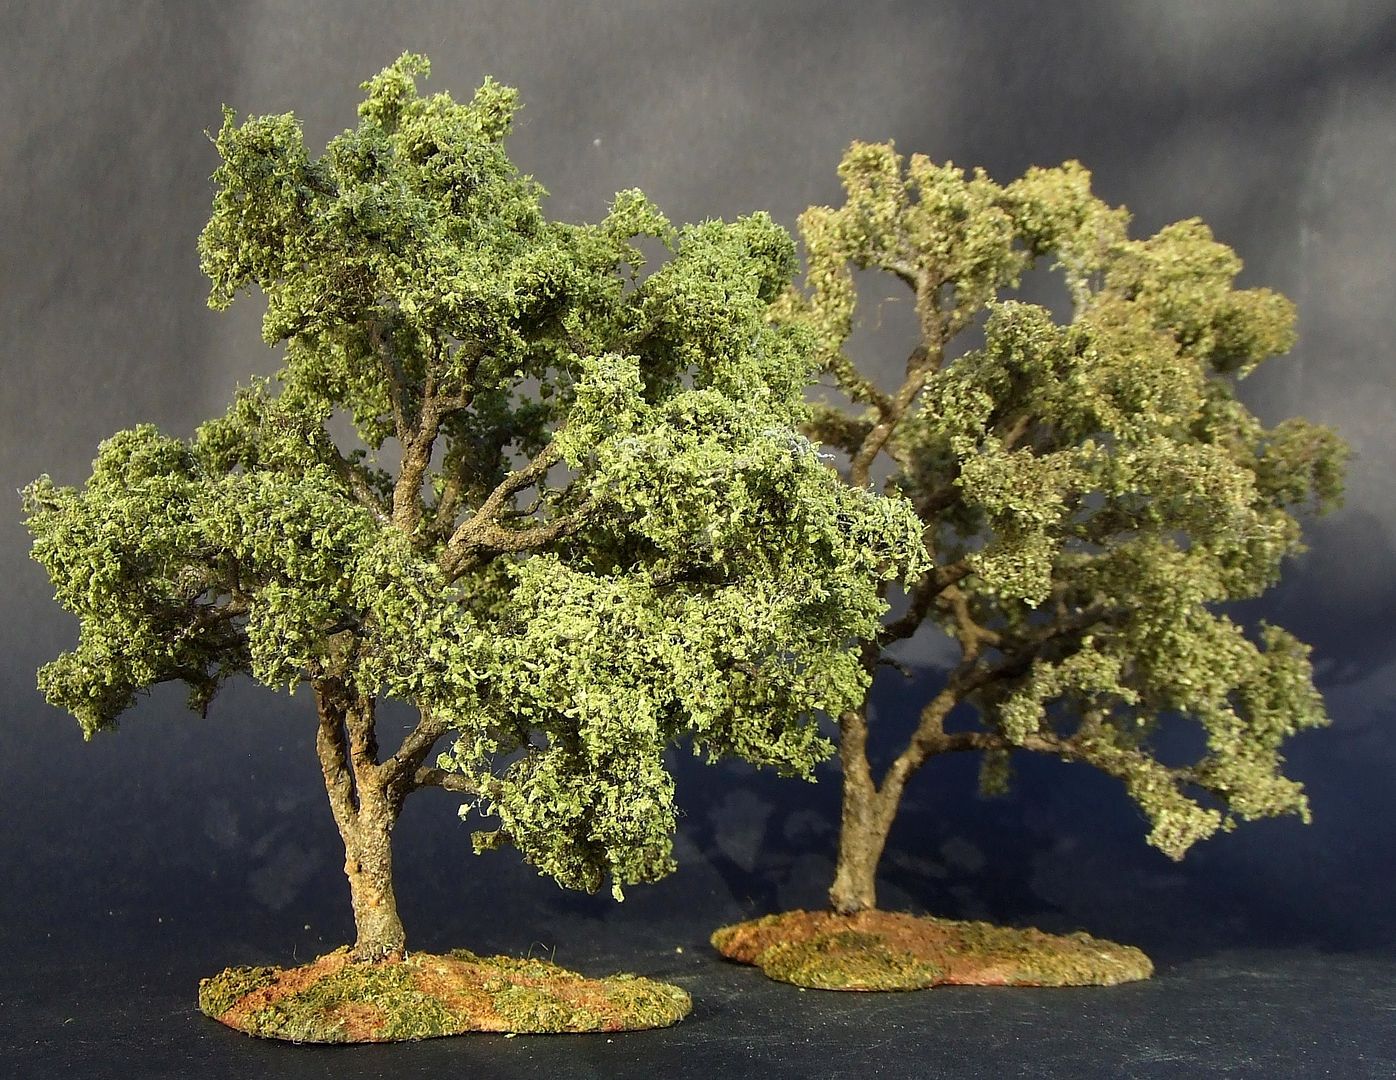
A living example.

One of the black poplar twins.
Its curved and extremely assymetric shape gives a variety of views from different sides.
The other tree got a slightly lighter foliage shade.
The black poplar tree origins from Europe, Central and West Asia and Northern Africa.
Latin name: Populis Nigra
For the frames 0.6mm brass wire is used.
About 20 wires for each tree.
50cm length each wire.
Folding the bunch doubles number of wires.
Ending up with 40 wires going upwards from root to leaves.
Creating 15cm high trees.
TWISTING AND TWINING
For wire twisting see weeping willow tutorial.
Making trunks and branches by twisting only, creates branches that may unwind themselves from the trunk again.
For every new branch it is recommended to twine them between other trunk wires.
So the branch wires leave the main trunk in between other wires.
This does not only create more strengt and keeps the branch in place.
It also creates branches leaving the middle of the trunk in stead of bending away from the trunk.
Splitting up the lower part of the trunk into 2 or 3 minor trunks requires another twining technique to keep it all together.
For making the base see weeping willow tutorial.
SPLITTING SINGLE BRASS WIRE IN THREE OR NINE
Bend single wire head into a loop.
Twist again.
Leave loose end hanging free as additional third branch.
Add glue to twistings so it does not fall apart after cutting loop.
Looping all 40 wire heads.
Cut all of them.
All single wires are turned into 3 different wireheads now.
Creating 120 small branches.
With the longest wireheads this can be repeated.
Make small loops again.
Add glue and cut loops.
The original single wire can be turned into 9 single wireheads this way.
Starting with an original 20 wires per tree this may end up to 360 branches.
Theoretically this can make up to 720 small branches for the twins together.
But these trees have not even half of this number of wire heads.
Branches are zigzagged with a pair of round pliers.
The result is a gentle, slim treetrunk with thin main branches but stil ending into a high number of smaller branches.
The disadvantage is:
There are single wire ‘in between’ parts in every branch, followed up by heavyer double twisted parts.
This has to be compensated (camouflaged) later on in the building process.
Basing spray paint.
Apply trunk bark with coffee and white glue mix.
Apply plain white glue to smaller branches.
See weeping willow tutorial.
Here is a test piece.
Paint with acrylics.
Bark on smooth branches is suggested by spray paint drops.
The trunkbark is painted by dotting different acrylic shades with hard pighair brush.
MICRO FIBRE FILTER TWIGS
In a vacuumcleaner…
…behind the paper dustbag…
…is plenty of twig material available.
This is polyester fibre or similar material.
There might be a spare, clean filter in the spare dustbags box.
Enoug for several trees.
It can be painted with spraypaint.
Acrylic paint sticks best.
Alkyde paint falls off the fibres after drying.
For spraying and drying it needs to be turned over with pincers.
Carefull with this, the fibre will clot and loose its woolly shape.
Two different colors are used here.
The yellow brown fits a real black poplar best.
Cut fibre in pieces of 2 to 3 cm.
Spray glue over all branch heads and apply fibre.
Remove excessive fibre and cut long fibre ends.
VISCOSE FOLIAGE
For making foliage out of viscose cleaning sponge see the Persian Walnut tree tutorial.
Spray glue on all twigs and add foliage flakes by straining from top and sides.
Tip off after a few minutes to loose excessive foliage.
Remove foliage flakes from trunk and branches by hard pighair oilpaint brush.
Make sure your tree stays transparent from all directions.
Only transparenty will create threedimensional effect and leaves branches visible.
A living example.
One of the black poplar twins.
Its curved and extremely assymetric shape gives a variety of views from different sides.
The other tree got a slightly lighter foliage shade.
-
Cryns
- Supporting Business
- Posts: 1254
- Member since:
11 Nov 2015, 15:33
Hello, thanks you for your help. I use natural trunks too. They come from Corsica for me. But il's more difficult to find a material to make the different foliage...your tips seems very interesting
-

christophe
- Posts: 203
- Member since:
30 Dec 2010, 22:51
I know I'm coming in late to the party but I wish to tell you this is eye-candy to someone like me.
I hope you will keep expanding on this series, and as a Canadian, I would dare ask for pine and fir trees, if it is your inclination. Please, pretty please, with sugar on top.

Seriously, that is top notch work, and I will use your tricks.
You complimented me on my Native warriors, and I return the compliment to you: magnificent work.
Sala
I hope you will keep expanding on this series, and as a Canadian, I would dare ask for pine and fir trees, if it is your inclination. Please, pretty please, with sugar on top.
Seriously, that is top notch work, and I will use your tricks.
You complimented me on my Native warriors, and I return the compliment to you: magnificent work.
Sala
-
Salaberry
- Posts: 88
- Member since:
08 Sep 2013, 01:44
Dear Mr.Cryns
I admire your patience,
your craftsmanship,
and the work you do to share it with others.
I am very impressed.
I admire your patience,
your craftsmanship,
and the work you do to share it with others.
I am very impressed.
-

Konrad
") Supporting Member (Gold)
Supporting Member (Gold) 
- Posts: 2632
- Member since:
19 Oct 2007, 12:59
Dear Konrad and Salaberry,
Thank you so much for your nice compliments
I planned to build Mediterranean pine trees and Lebanon Cedars for Tyre 332BC (but that's not the area of your interest at this moment I suppose)
So let me try to help you: Jos Geurts from the Netherlands is one of the true masters of (pine and fir) tree building. His company is called GROVE DEN.
He made some very good tutorials with clear drawings in which he explains the technique he developed for making fir trees. Some is in Dutch, some in English, some in German. I hope his work will help you.
http://www.modelrailroadforums.com/foru ... ubs/page46
https://myp48.wordpress.com/2016/08/26/ ... om-europe/
http://encyclopedie.beneluxspoor.net/in ... modelbomen
https://mbbgroveden.com/over-mbb-grove-den/
Thank you so much for your nice compliments
Salaberry wrote:I hope you will keep expanding on this series
I planned to build Mediterranean pine trees and Lebanon Cedars for Tyre 332BC (but that's not the area of your interest at this moment I suppose)
Salaberry wrote:as a Canadian, I would dare ask for pine and fir trees,
So let me try to help you: Jos Geurts from the Netherlands is one of the true masters of (pine and fir) tree building. His company is called GROVE DEN.
He made some very good tutorials with clear drawings in which he explains the technique he developed for making fir trees. Some is in Dutch, some in English, some in German. I hope his work will help you.
http://www.modelrailroadforums.com/foru ... ubs/page46
https://myp48.wordpress.com/2016/08/26/ ... om-europe/
http://encyclopedie.beneluxspoor.net/in ... modelbomen
https://mbbgroveden.com/over-mbb-grove-den/
-
Cryns
- Supporting Business
- Posts: 1254
- Member since:
11 Nov 2015, 15:33
Hi Mr Cryns,
in spite of having attended your workshop las year I take great pleasure in reading your lessons again.
I h
OK this went off because of a wrong touch - how can I delete it?
in spite of having attended your workshop las year I take great pleasure in reading your lessons again.
I h
OK this went off because of a wrong touch - how can I delete it?
-

Michael Robert
- Supporting Member (Bronze)
- Posts: 825
- Member since:
14 Oct 2009, 19:22
Hi Mr Cryns,
in spite of having attended your workshop las year I take great pleasure in reading your lessons again.
I have made half a dozen trees. Not as beautful as yours but for me - having really not so much time - they represent a milestone improvement of anything ot there.
I would like to underline that your work is particularly outstanding in that you really observe the minute characteristics and détails which make up a specific tree. Like a scientist. This i understood very much when I created my own trees.
One comment / question
I have used spraypaint based on isoprene rubber. That stuff upon drying turns out very white and it is hard to make paint stick on it. So I abandoned it for white paint (polyacryl acetate emulsion) which is not available as spray paint. I put it into a flower spray bottle and used the spray as such : droplets are a bit big and you need to dry afterwards, but good colour and good adhesion. You must well flush and clean the bottle afterwards to prevet clogging.
Again - thank you
Michael
-
Michael Robert
- Supporting Member (Bronze)
- Posts: 825
- Member since:
14 Oct 2009, 19:22
Dear Michael,
Since the day we met It is always my pleasure to read your words anywhere in this forum. Thank you so much for your compliments and upgrade of the progress of your own tree building.
When can we see your 6 new trees?
Your first one, the olive with composite trunk, was a beauty.
That sounds like a great experiment. I must try that myself. I did that once with white glue&water mix but that did not work too well 
Since the day we met It is always my pleasure to read your words anywhere in this forum. Thank you so much for your compliments and upgrade of the progress of your own tree building.
When can we see your 6 new trees?
Your first one, the olive with composite trunk, was a beauty.
Michael Robert wrote:not available as spray paint. I put it into a flower spray bottle and used the spray as such : droplets are a bit big and you need to dry afterwards. You must well flush and clean the bottle afterwards to prevent clogging.
That sounds like a great experiment.
I must try that myself. I did that once with white glue&water mix but that did not work too well -
Michael Robert likes this post. •
- Reply
-
Cryns
- Supporting Business
- Posts: 1254
- Member since:
11 Nov 2015, 15:33
35 posts
• Page 2 of 2 • 1, 2