Work in Progress

French Line Infantry Standard-Bearer, small conversion WIP

Posted by Maurice on 23 May 2009, 21:14

This was actually going to be my entry for the single figure contest, didn't get it finished in time and put it away, but today the mailman brought a bunch of Waterloo flags and so I decided to pick this one up again.

It's a French Line Infantry Standard-Bearer from Italeri's nr 6002 set. On the right is the original figure, on the left the one I'm working on.

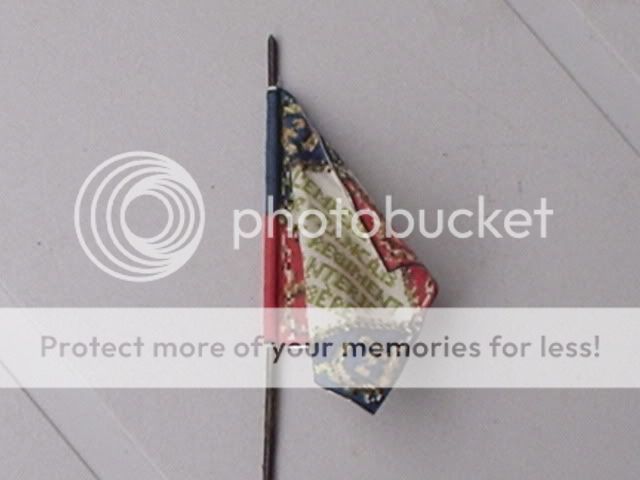
I removed the flagpole and flag, put in a new flagpole with a Rofur paper flag (Au 92. Régiment d'Infantrie de Ligne) and put the eagle back on the flagpole. Still have to resculp the hand with some green stuff and finish painting and then he's done :-D

Image

Hope you like the result so far :)
User avatar
Maurice  
 
Posts: 2925
Member since:
04 Jan 2009, 15:59


Posted by Mai Strac on 23 May 2009, 22:06

Good work mate! :thumbup:
User avatar
Mai Strac  Italy
 
Posts: 2538
Member since:
11 Jan 2009, 19:08

Posted by Peter on 23 May 2009, 22:12

Nice work Maurice! :thumbup:

I've got a question. Some time ago I received some flags to and Martin told me to put some alu-folie between the two parts of the flag. Did you do that? I ask you because the flag isn't "waving".

Greetings Peter
User avatar
Peter  Belgium

Moderator Moderator
 
Posts: 22507
Member since:
25 Mar 2008, 18:51

Posted by Maurice on 23 May 2009, 22:29

hey Peter,

No, there's no foil between the flag, but that is great tip :thumbup: The flag is waving a little, I'll try to make it wave more when the painting is done.
User avatar
Maurice  
 
Posts: 2925
Member since:
04 Jan 2009, 15:59

Posted by Peter on 23 May 2009, 22:46

Thanks goes to Martin. Next week I try one of my own, with folie. I let you know how it works.

Greetings Peter
User avatar
Peter  Belgium

Moderator Moderator
 
Posts: 22507
Member since:
25 Mar 2008, 18:51

Posted by ColeF on 23 May 2009, 22:46

Looks good. :thumbup:
User avatar
ColeF  United States of America
 
Posts: 2269
Member since:
20 Dec 2008, 16:05

Help keep the forum online!
or become a supporting member

Posted by Benno on 23 May 2009, 23:21

I did a conversion of a flag bearer too a while back. When I glued a paper flag to a pole I held the flag curved while the glue was drying. This is the result:

Image

Image

It looks a bit more 'wavy' in the flesh.

Hope this helps you a bit. :thumbup:
User avatar
Benno  Netherlands

Forum Admin Forum Admin
 
Posts: 2395
Member since:
07 Oct 2007, 16:31

Posted by Maurice on 24 May 2009, 08:28

Hey Benno,

That's also a great tip, unfortunatly there's no glue to be used with rofur flags, they are printed on self-adhesive paper ;-)
User avatar
Maurice  
 
Posts: 2925
Member since:
04 Jan 2009, 15:59

Posted by Paul on 24 May 2009, 10:08

The figure looks much better after conversion, why manufacturers bother with the tiny draped flags is beyond me, they must know by now that most people replace them, maybe they should supply a flag or two on paper to attach to a pole holding bod(?)
Maybe you could apply a thin film of wood glue to the flag and `crease`it a bit as it drys???
User avatar
Paul  China
 
Posts: 11724
Member since:
25 Nov 2008, 09:31

Posted by Poniatowski on 24 May 2009, 10:09

I was thinking today about adding a flag to one of my soldier and I was wondering how to do this. Maurice, to be honest I don't like the conversion You have made :( The reason is, that the flad doesn't look naturally, its to stiff... You wrote that its only the begining so I look forward how you do this.

I have some idea, but firstly I want to se the result, then I will show You.
User avatar
Poniatowski  Poland
 
Posts: 82
Member since:
20 Apr 2009, 21:46

Posted by Martin on 18 Jun 2009, 22:01

Peter wrote:Thanks goes to Martin. Next week I try one of my own, with folie. I let you know how it works.

Greetings Peter

Have you tried already?
"Next week" was 2 weeks ago, mate!
PS it is worth trying.
User avatar
Martin  Netherlands
 
Posts: 2259
Member since:
08 Oct 2007, 19:23

Posted by Peter on 18 Jun 2009, 22:04

No not yet. But I did a testcase with a paper flag I made. I'll bring it along sunday.

Greetings Peter
User avatar
Peter  Belgium

Moderator Moderator
 
Posts: 22507
Member since:
25 Mar 2008, 18:51

Posted by Paul on 20 Jun 2009, 17:17

Peter wrote:No not yet. But I did a testcase with a paper flag I made. I'll bring it along sunday.

Greetings Peter


I did one (for fun, Romans etc not having much need for them) using Aluminium foil in the middle, bit like a sandwich. The best thing about it, that when it´s dry the flag can be bent to any required form and it stays there. Bit heavy though.
User avatar
Paul  China
 
Posts: 11724
Member since:
25 Nov 2008, 09:31

Posted by Jaques on 23 Jun 2009, 16:42

Hi Maurice.

Suggestion:

When I use paper flags place before fast inside of water only the time so that she is humid. Later it he can be molded in the form that if he desires drying with heat.

Regards. :thumbup:
Jaques  Brazil
 
Posts: 867
Member since:
21 Jun 2009, 22:02

Posted by Maurice on 23 Jun 2009, 17:39

Thanks for the suggestion :)

Obviously the figure isn't ready yet (no, still not, haven't been able to do anything new on him so far). I'll do my best to put some more life in the flag when the figure is done.
User avatar
Maurice  
 
Posts: 2925
Member since:
04 Jan 2009, 15:59

Posted by Paul on 23 Jun 2009, 18:19

Jaques wrote:Hi Maurice.

Suggestion:

When I use paper flags place before fast inside of water only the time so that she is humid. Later it he can be molded in the form that if he desires drying with heat.

Regards. :thumbup:

But wouldn´t that make the colours run????
User avatar
Paul  China
 
Posts: 11724
Member since:
25 Nov 2008, 09:31

Help keep the forum online!
or become a supporting member

Posted by Paul on 27 Jun 2009, 13:43

Here you go, this is how I did a flag (for fun)

Ist find the flag
Image
Then glue a bit of tin foil on the back, making sure that there´s an edge of paper free to allow complete glue-ing, otherwise the tin foil tends not to stick properly, or slides when putting the two sides together. Best glue I´ve found is normal wood glue.
Image
Lay the flagpole on the paper, here a metal pin and fold carefully together. Here it´s good to rub the two sides flat using a clean cloth (or similar) because the glue tends to collect dirt from your fingertips, no matter clean your hands are.
Image
Let dry, doesn´t take long and the flag can now be shaped as desired!
Image
User avatar
Paul  China
 
Posts: 11724
Member since:
25 Nov 2008, 09:31

Posted by Fenton on 27 Jun 2009, 14:21

I find that if you are quite liberal wih the PVA on the inside of the flag.then you can bend itinto shape and it will hold the new shape..I also paint the flags over top of the printing which I thnk tends to make it a bit firmer when it comes to bending it into place
Fenton  
 
Posts: 508
Member since:
29 Oct 2007, 05:53

Posted by rpardo on 28 Jun 2009, 07:48

Hi
Beware of the purists!... you are using a man with a pre-1812 uniform, carrying a flag with a 1815 design! :mrgreen:
Regards
User avatar
rpardo  Spain
 
Posts: 458
Member since:
15 Oct 2007, 16:23


Return to Work in Progress