
Work in Progress
Tyre 332 BC
Very interesting work process Mr.Cryns. if more moulds are required one can use half of the original mould as an odd side by replacing the pattern back onto it and cast that part up,than after removing the odd side cast that side. This method is used in the industrial manufacturing industry the world over.Congratulations on the work my friend. BB
-
Beano Boy

") Supporting Member (Gold)
Supporting Member (Gold) - Posts: 8086
- Member since:
03 Sep 2013, 14:45
Unbelievable! 
I wouldn't dare to put a sail made with such an effort, in a mold.
Congratulations for the wonderful sail, your courage, but most of all for the final success.

I wouldn't dare to put a sail made with such an effort, in a mold.
Congratulations for the wonderful sail, your courage, but most of all for the final success.
-

Kostis Ornerakis
In memoriam- Posts: 1280
- Member since:
14 Feb 2016, 18:16
Hi mr Cryns,
I have seldom seen such dedication to a subject as in this tread. The difficulties and try and error methode, the will you show to get to that historical perfect object is really astounishing and the new ideas you come up with.... incredible.

I have seldom seen such dedication to a subject as in this tread. The difficulties and try and error methode, the will you show to get to that historical perfect object is really astounishing and the new ideas you come up with.... incredible.
-

dykio
- Posts: 1503
- Member since:
31 Jan 2008, 19:56

Some big companies in the model kit business with all their expensive tools, their production facilities etc. etc. don't have nearly as much creativity and inventive output as you achieve in your living room - I'm very impressed!
-

sberry
- Posts: 934
- Member since:
12 Mar 2010, 20:37
-

Susofrick
- Supporting Member (Gold)
- Posts: 7681
- Member since:
19 Feb 2008, 12:10
Help keep the forum online!
or become a supporting member
I just came across this story here:
http://www.spiegel.de/wissenschaft/mens ... 34420.html
It is about Roman river transport and in German, but at least you can have a look at the pics and video.
http://www.spiegel.de/wissenschaft/mens ... 34420.html
It is about Roman river transport and in German, but at least you can have a look at the pics and video.
-
sberry
- Posts: 934
- Member since:
12 Mar 2010, 20:37
Dear friends and fellow members,
Thanks for your warmhearted replies
Mr. Berry thank you so much for your input. I read it all, the video is worth watching and of course this picture is of special interest to me:

When I made my partly-reefed sail, I ended up with the bottom edge of the sail not being the bottom edge anymore since the reef lines lifted the downside up for 'half a section of the sail' leaving a 'hanging down bag' of double sail. I wonderd if I fastened my lines properly. Did I understand the system well? Should not the reef lines go down around the sail and all the way up to the yard at the back side again? Then the sail could be reefed for 100%.
But this picture of the Roman barge shows exactly the same effect: the bottom edge of the sail is not the bottom edge anymore when reefed.
Thanks for your warmhearted replies
Mr. Berry thank you so much for your input. I read it all, the video is worth watching and of course this picture is of special interest to me:
When I made my partly-reefed sail, I ended up with the bottom edge of the sail not being the bottom edge anymore since the reef lines lifted the downside up for 'half a section of the sail' leaving a 'hanging down bag' of double sail. I wonderd if I fastened my lines properly. Did I understand the system well? Should not the reef lines go down around the sail and all the way up to the yard at the back side again? Then the sail could be reefed for 100%.
But this picture of the Roman barge shows exactly the same effect: the bottom edge of the sail is not the bottom edge anymore when reefed.
-

Cryns
 Supporting Business
- Posts: 1254
- Member since:
11 Nov 2015, 15:33
-

Alex
- Supporting Member (Gold)
- Posts: 1871
- Member since:
26 Feb 2008, 14:54
And the game continues..... I admire really your work, especially your ships and figures, but I am quite sceptical to your buildings. The foam blocks seems to be an interesting material to build with, but It´s limiting also a little bit the range of possibilities to design in the right scale. Your towers are looking wonderful by first view, but their stone-walls doesn´t look very realistic.
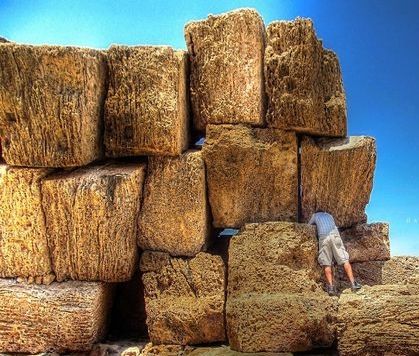
Yes, Mykene used zyklop-stone-works, but I was traveling in Libanon and Syria to study many old towns and excavations areas where I hadn´t seen gigantic stones like yours - stones which are nearly so high like a man! The biggest stones which I had seen there where maximal high like the half length of a man - and these monumental stones were only to find in temples - not in city-walls, living-quarters, palaces etc.
Your are working really so impressive, so I wish you the same quality in your architecture.
exception: only some buildings of the nabateans in southern Syria - a half millenium later - had gigantic stones
-
sansovino
- Posts: 794
- Member since:
27 Mar 2014, 21:42
Thank you Alex for your compliment.
And thank you Sansovino for your compliments and your criticism.
How about this one?

This is what is left of the Phoenician citywall of Arwad on an Island just like Tyrus, opposite the modern Syrian coast.
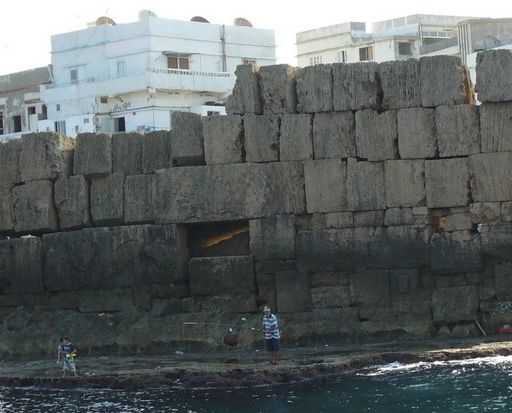
Isn't it marvelous and fantastic!
I tried to recreate the porous, spongy structure by using the blue foam:
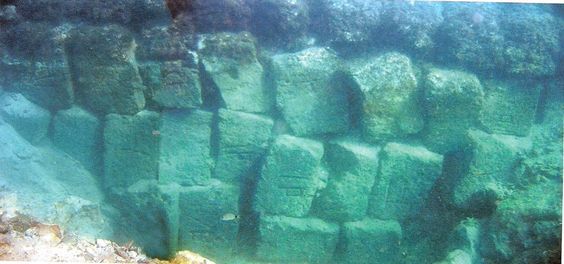
And here a detail of the phoenician pier (submerged) of the northern Phoenician port of Tyre, note the symbols engraved on the stones used to guide the construction: same building structure with the same giant sized blocks:
One of my sources is telling this about Phoenician walls:
When the immovable native rock is no longer available, the resource is to make use of vast masses of stone, as nearly immovable as possible. The most noted example is that of the substructions which supported the platform whereon stood the Temple of Jerusalem, which was the work of the Phoenician builders whom Hiram lent to Solomon. A similar method of construction is found to have prevailed at Tyre, at Sidon, at Aradus, at Byblus, at Leptis Major, at Eryx, at Motya, at Gaulos, and at Lixus on the West African coast. The blocks employed do not reach the size of the largest discovered at Jerusalem, but still are of dimensions greatly exceeding those of most builders, varying, as they do, from six feet to twenty feet in length, and being often as much as seven or eight feet in breadth and height.
Seven or eight feet in height? That as tall as a man I think.
I hope these examples make your scepsis concerning the size of my stone block Phoenician citywalls disappear.
But talking about mudbrick and Classical Greek architecture (what many of my walls are based upon) you defenitely have a clever and important point when you write:
Mudbrick, from Greece to Mesopotamia, was usually bigger than our modern bricks but still small enough to lift by a single person. Not much higher than 15 to 20 centimeters I think. Looking at my foam bricks these get as high as 50cm!
 Also the average stone height for Greek citywalls build of heavy blocks will be about halve a meter indeed and very seldom much higher.
Why I exaggerated much of my stone and brick sizes has multiple reasons:
Like you said the structure of the foam is not perfect for making small details and bricks. Also I was aiming at a simplification of reality. If you count the number of planks creating my ship hulls, you will end up with the same conclusion: only halve the number of planks it should be in reality. Making scale objects in realistic proportions does not always give the best effect. All of this started eight years ago as Greek citywalls for our DBMM game so reality was not the most important aim by then... ignorance, unawareness, speed and freedom of artistic expression are other reasons why my buildings lack proper proportions. Finally my obsession for cyclopic walls plays a part in the sizing. Our dear member Frankzett will call this 'Grosses Kino' I think. Only later on in the process of this Tyrus project I started to search more and more for realistic details and proportions. But a gaming-purpose wall system will always contain a lot of concessions to reality: like the huge, ugly joints between different sections.
What disturbs me most is the giant size of my mud bricks and I will defenitely scale their size down as soon as I continue building walls, with keeping your comments in mind Sansovino.
So do not hesitate to post your criticism again because it is of great importance for me to stay sharp.
And thank you Sansovino for your compliments and your criticism.
sansovino wrote: I was traveling in Libanon and Syria to study many old towns and excavations areas where I hadn´t seen gigantic stones like yours - stones which are nearly so high like a man! The biggest stones which I had seen there where maximal high like the half length of a man - and these monumental stones were only to find in temples - not in city-walls, living-quarters, palaces etc.
How about this one?
This is what is left of the Phoenician citywall of Arwad on an Island just like Tyrus, opposite the modern Syrian coast.
Isn't it marvelous and fantastic!
I tried to recreate the porous, spongy structure by using the blue foam:
And here a detail of the phoenician pier (submerged) of the northern Phoenician port of Tyre, note the symbols engraved on the stones used to guide the construction: same building structure with the same giant sized blocks:
One of my sources is telling this about Phoenician walls:
When the immovable native rock is no longer available, the resource is to make use of vast masses of stone, as nearly immovable as possible. The most noted example is that of the substructions which supported the platform whereon stood the Temple of Jerusalem, which was the work of the Phoenician builders whom Hiram lent to Solomon. A similar method of construction is found to have prevailed at Tyre, at Sidon, at Aradus, at Byblus, at Leptis Major, at Eryx, at Motya, at Gaulos, and at Lixus on the West African coast. The blocks employed do not reach the size of the largest discovered at Jerusalem, but still are of dimensions greatly exceeding those of most builders, varying, as they do, from six feet to twenty feet in length, and being often as much as seven or eight feet in breadth and height.
Seven or eight feet in height?
sansovino wrote:I am quite sceptical to your buildings.
I hope these examples make your scepsis concerning the size of my stone block Phoenician citywalls disappear.
But talking about mudbrick and Classical Greek architecture (what many of my walls are based upon) you defenitely have a clever and important point when you write:
sansovino wrote:The foam blocks seems to be an interesting material to build with, but It´s limiting also a little bit the range of possibilities to design in the right scale.
Mudbrick, from Greece to Mesopotamia, was usually bigger than our modern bricks but still small enough to lift by a single person. Not much higher than 15 to 20 centimeters I think. Looking at my foam bricks these get as high as 50cm!
Why I exaggerated much of my stone and brick sizes has multiple reasons:
Like you said the structure of the foam is not perfect for making small details and bricks. Also I was aiming at a simplification of reality. If you count the number of planks creating my ship hulls, you will end up with the same conclusion: only halve the number of planks it should be in reality. Making scale objects in realistic proportions does not always give the best effect. All of this started eight years ago as Greek citywalls for our DBMM game so reality was not the most important aim by then... ignorance, unawareness, speed and freedom of artistic expression are other reasons why my buildings lack proper proportions. Finally my obsession for cyclopic walls plays a part in the sizing. Our dear member Frankzett will call this 'Grosses Kino' I think. Only later on in the process of this Tyrus project I started to search more and more for realistic details and proportions. But a gaming-purpose wall system will always contain a lot of concessions to reality: like the huge, ugly joints between different sections.
What disturbs me most is the giant size of my mud bricks and I will defenitely scale their size down as soon as I continue building walls, with keeping your comments in mind Sansovino.
So do not hesitate to post your criticism again because it is of great importance for me to stay sharp.
-
Cryns
- Supporting Business
- Posts: 1254
- Member since:
11 Nov 2015, 15:33
Mr. Cryns wrote:When I made my partly-reefed sail, I ended up with the bottom edge of the sail not being the bottom edge anymore since the reef lines lifted the downside up for 'half a section of the sail' leaving a 'hanging down bag' of double sail. I wonderd if I fastened my lines properly. Did I understand the system well? Should not the reef lines go down around the sail and all the way up to the yard at the back side again? Then the sail could be reefed for 100%.
I think you design is 100% accurate. And your half way reefed sail has the right look.
In my opinion, the differences between your job and this photo are consequence of the pictured sail being reefed in total absence of wind and the small size of it. That first fold that gives the baggy effect would be less evident being the sail reefed under wind pressure and on a far bigger sail (does not fold equally a 20 kg sail than a 150 kg one).
Not to mention the fact that, the reefing of the sail is the combined effect of different rope operations: at the same time you pull the lifting ropes (halyards) you must release the rigging ropes. So, under wind pressure, the reefing of the sail would not happen vertically but in angle.
-

despertaferro - Posts: 1754
- Member since:
25 Apr 2009, 18:18
Dear Despertaferro,
Thank you so much for your input. Halyards of course, I forgot about that word already.
Overall I am getting the impression you must be an experienced sailor or boat owner, living somewhere around Barcelona near the coast. Is that right?
Thank you so much for your input. Halyards of course, I forgot about that word already.
Overall I am getting the impression you must be an experienced sailor or boat owner, living somewhere around Barcelona near the coast. Is that right?
-
Cryns
- Supporting Business
- Posts: 1254
- Member since:
11 Nov 2015, 15:33
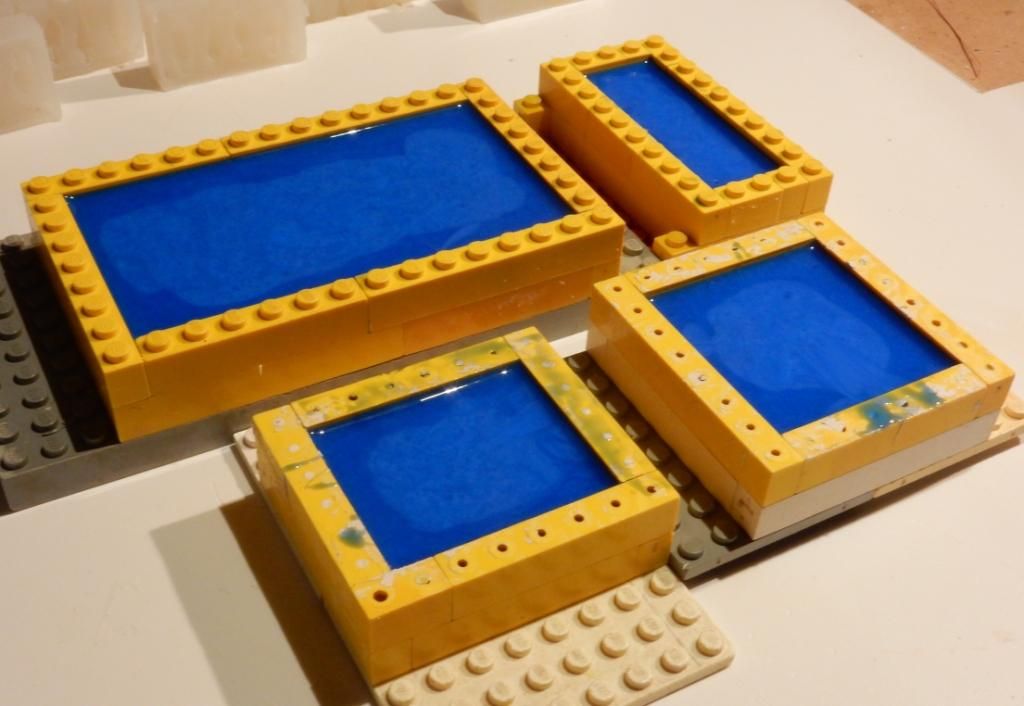
Casting the different parts of the 'Uluburun type' ship.
Front and aft decks embedded in clay:
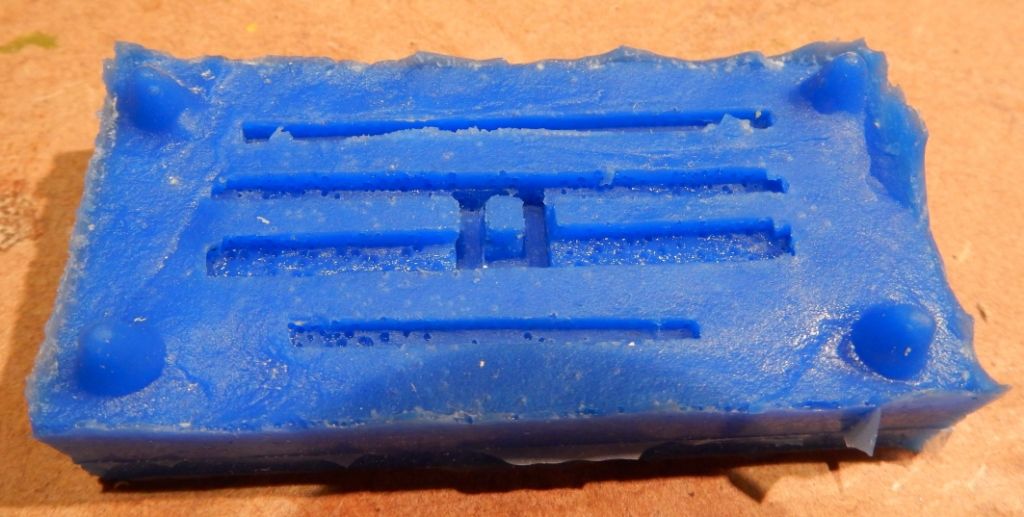
The blue silicone rubber is Moldstar 30.
When the brown resin is still soft, it is removed from the mould and pressed into the shiphull. So it will fit in perfectly by the time it is completely hardened.
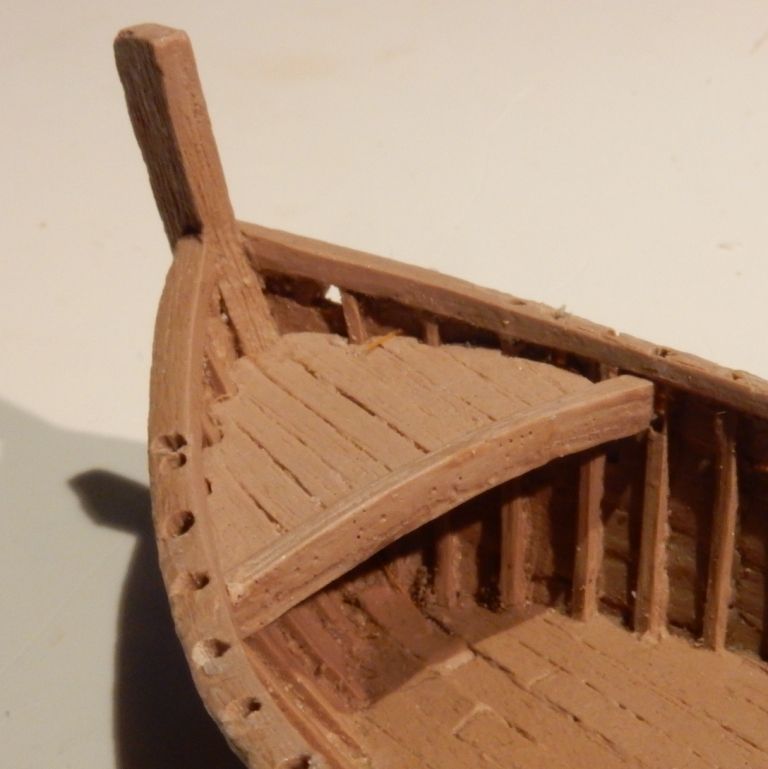
The centre of the beams supporting the deck is pulled up with a finger while the resin is still soft to create the curved shape that is missing in the original wooden deck.
An iron pin to support the mast:

A failed mould: because too much parting agent was applied to the wooden objects to be moulded, in the inside of the mould this created extreme bubbles.
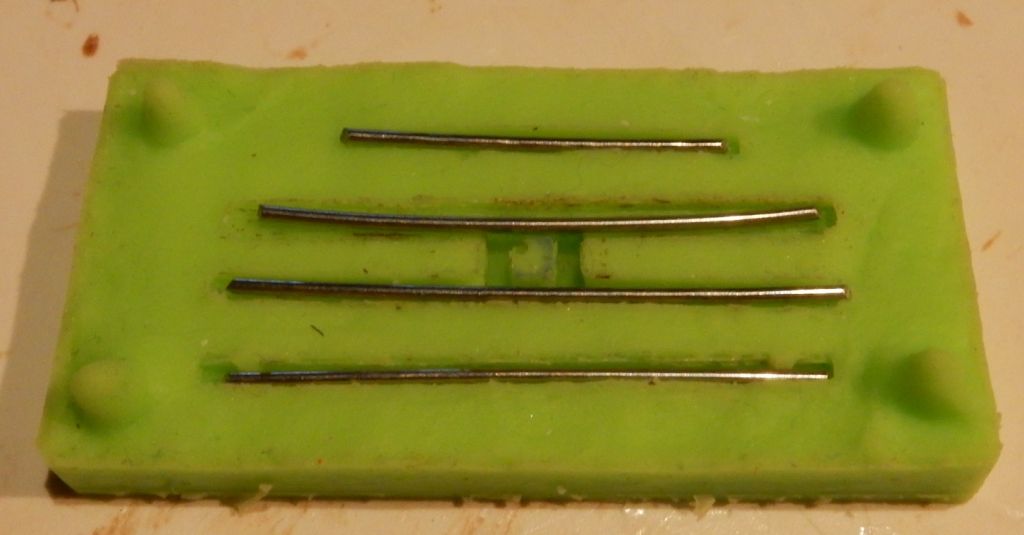
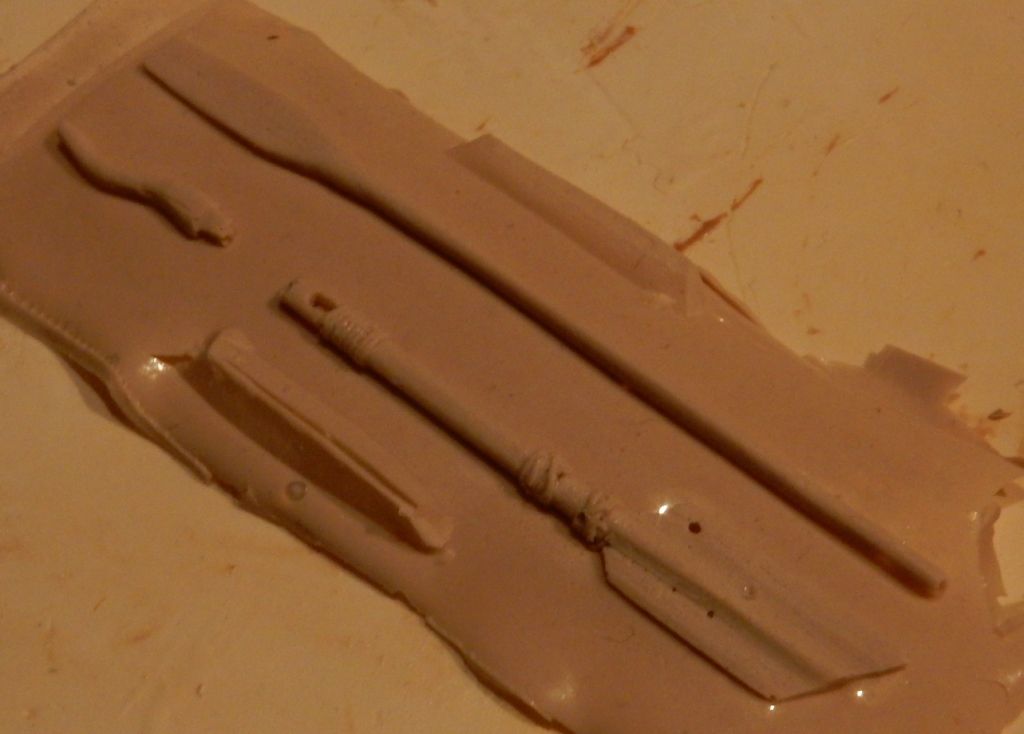
The green silicone rubber sold by Hagen Miniatures is the most expensive of all but also gives the best result until now. So I made a replacement mould with it.
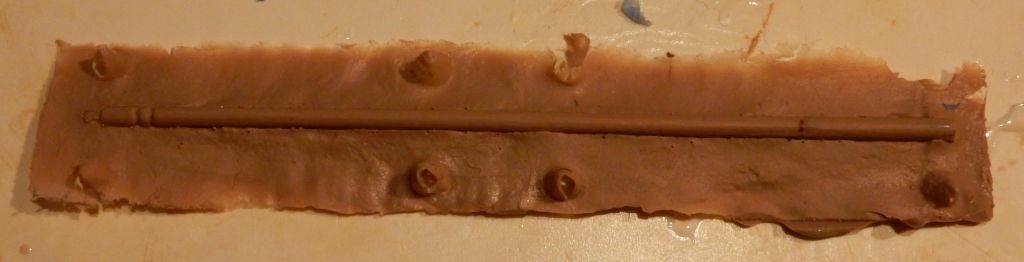
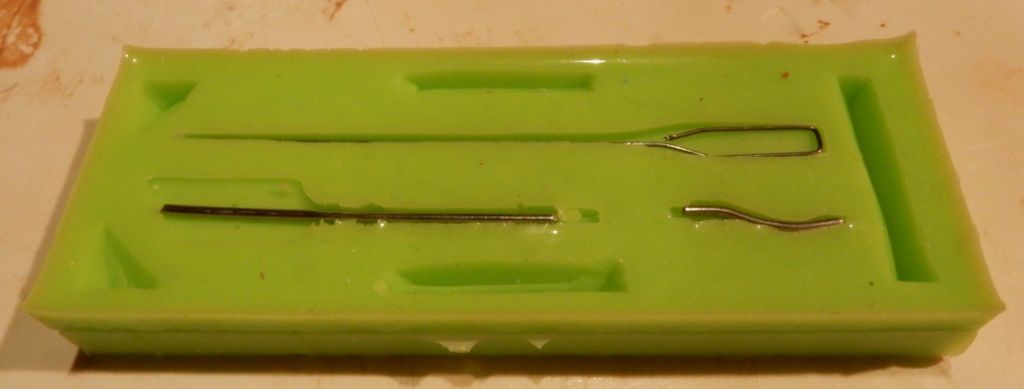
Steering oar and rowing oar: Wooden originals:
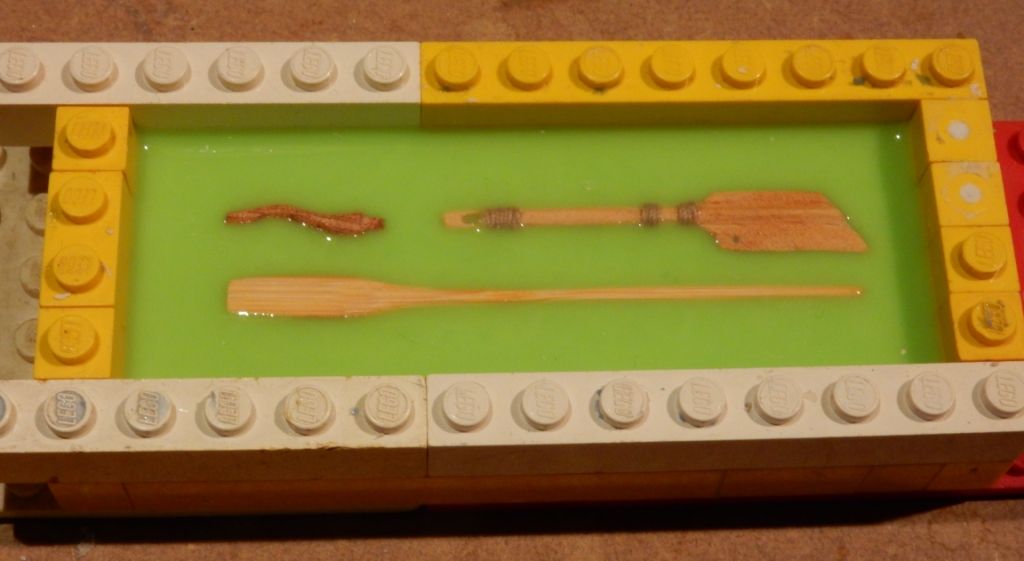
Metal enforcements:
Resin copies:
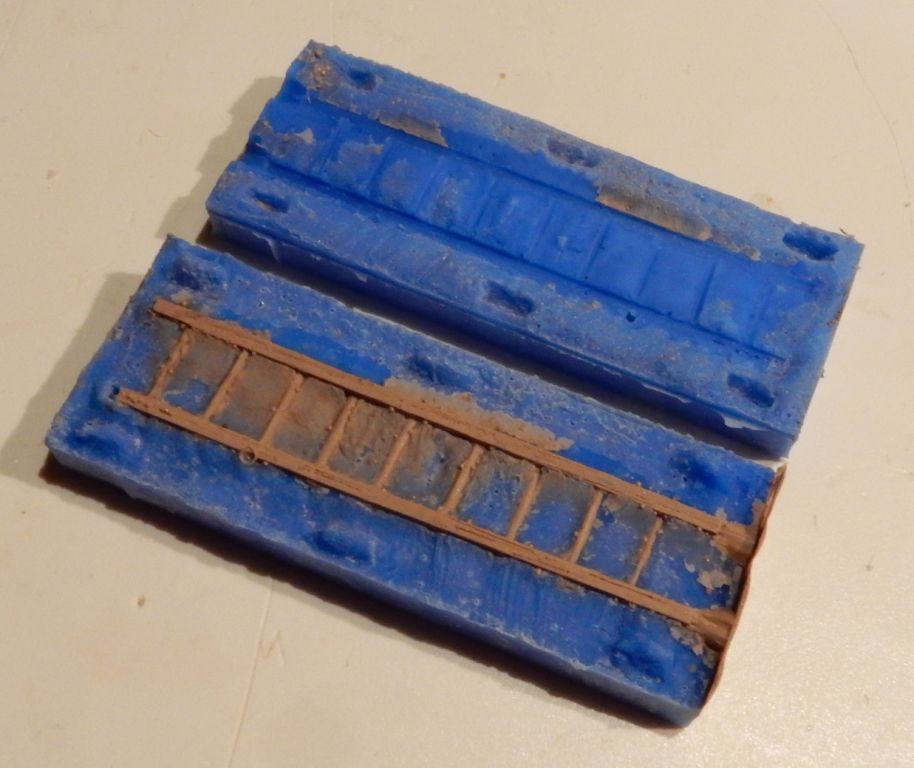
The broken ladder was moulded with silicone gel, the cheapest kind I could find in the tool shop, a technique I learned from Phersu. The result was a disaster, the ladder came out in many pieces, the silicone gel tacked so extremely to plastic, wood, white metal and putty, even a second layer of parting agent did not prevent this:
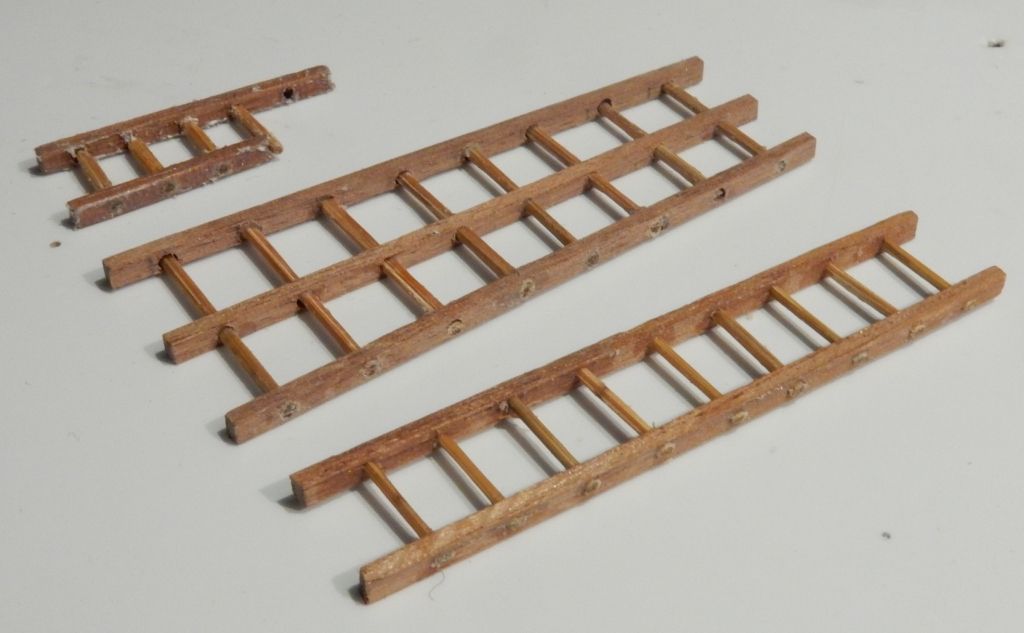
So mold star30 rubber was used again:
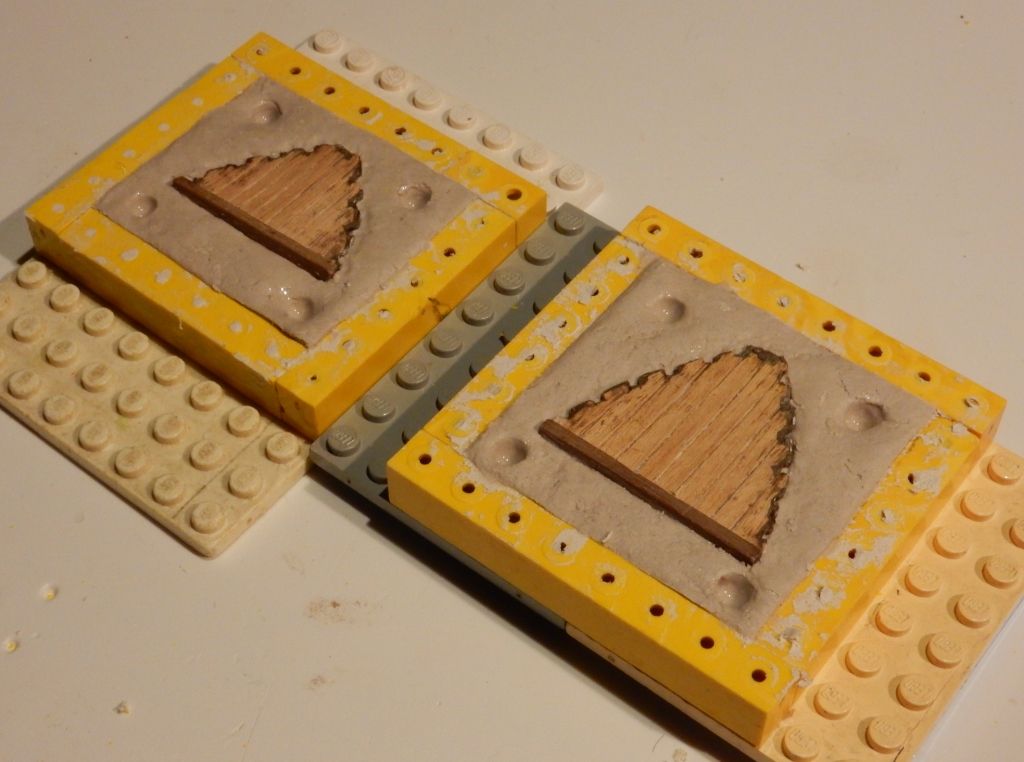
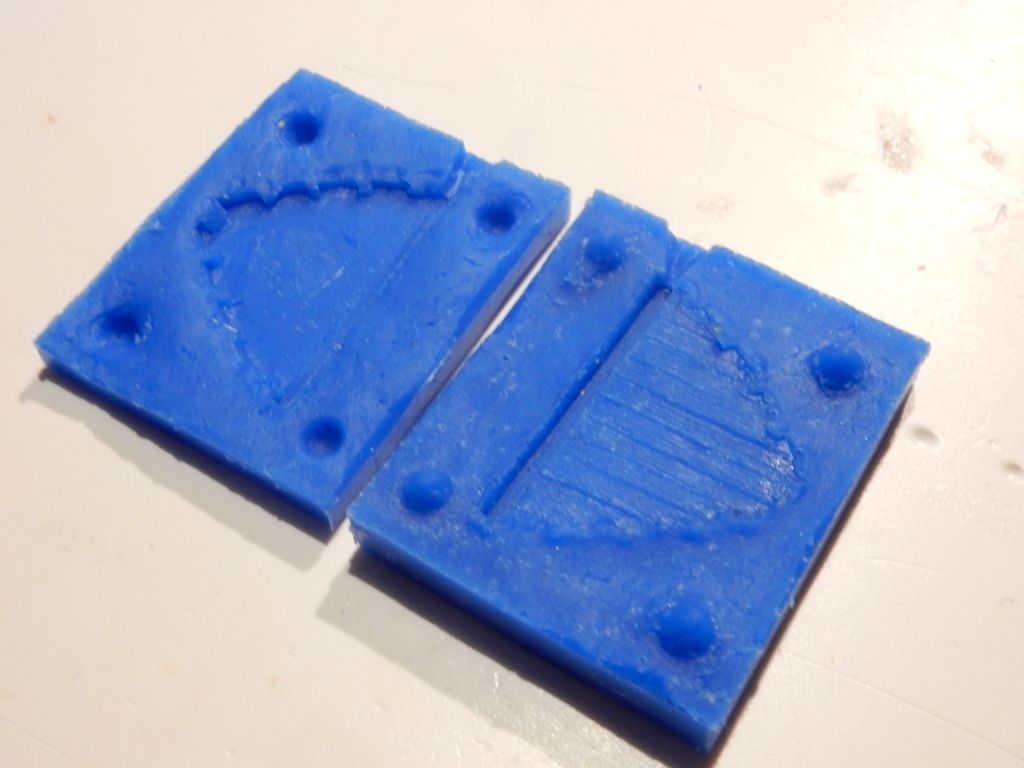
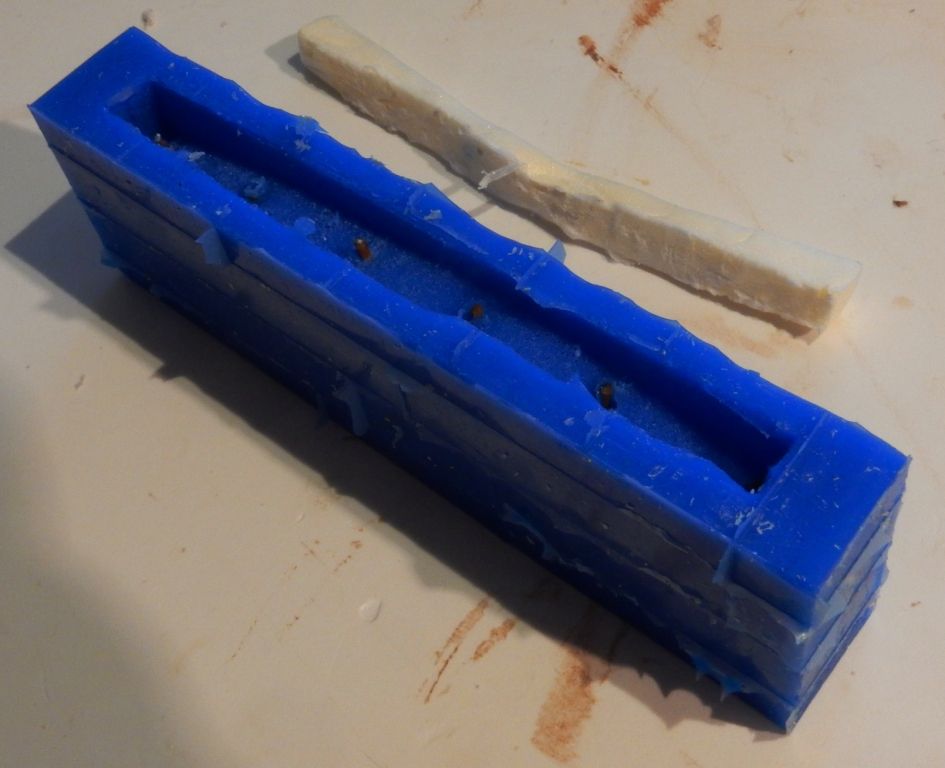
Both shipboard canvases laid together into a single bed of clay to save rubber:
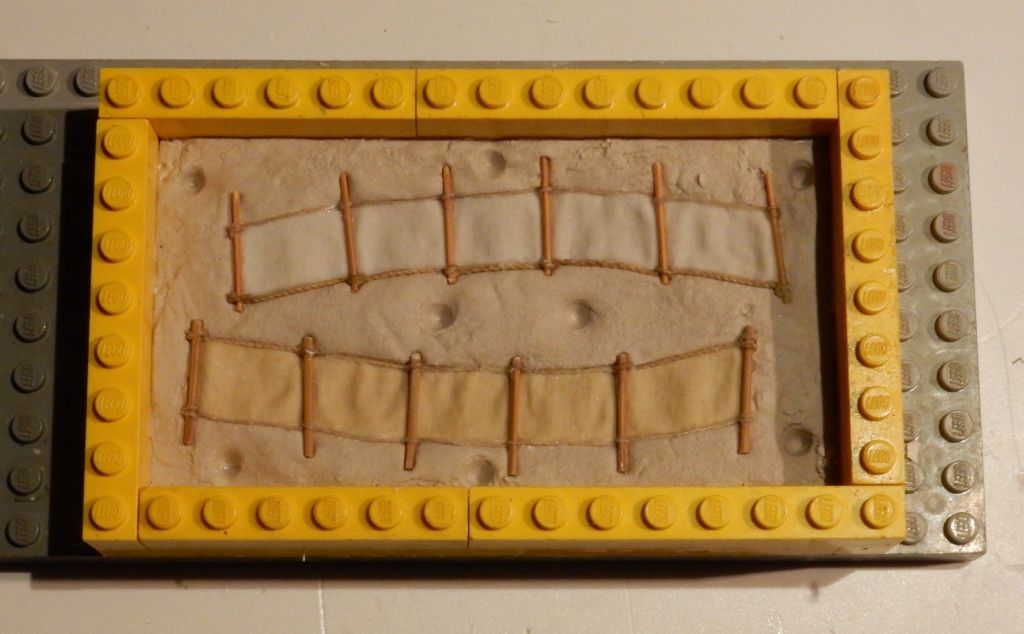
Removing the clay after casting the first mould part:
It turned out to be almost impossible to make two perfect canvas copies at the same time because funnel openings and air duct canals are positioned at both sides:
When casting one canvas at the time, the resin leaked into the hollow space of the second, lower one.
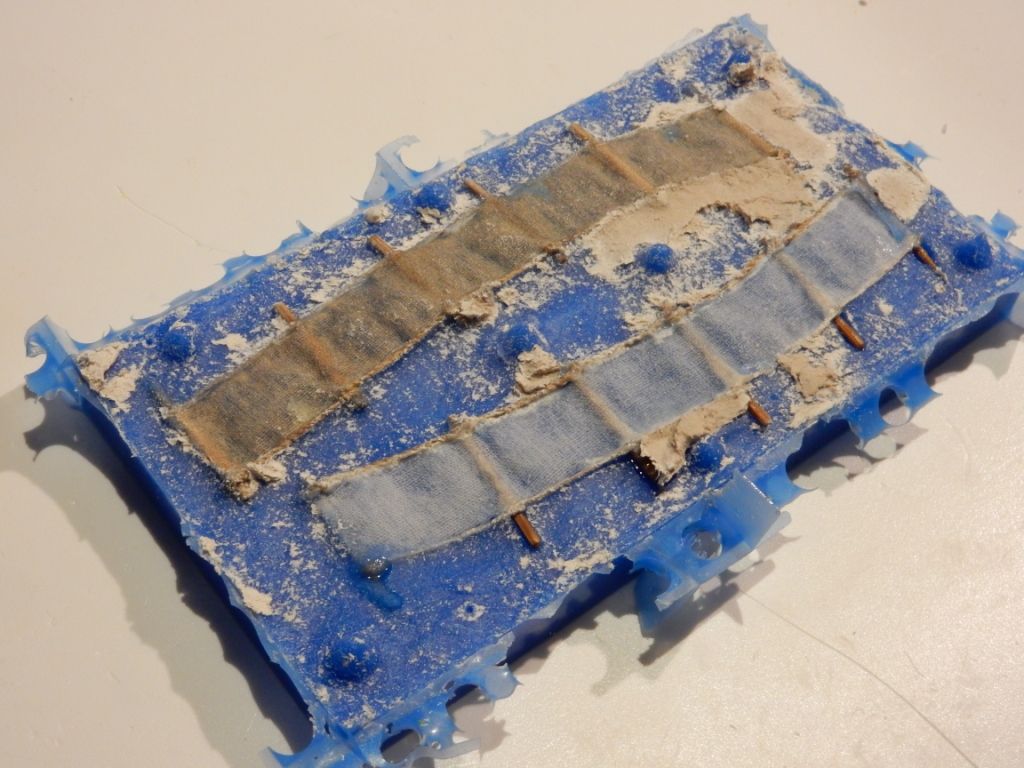
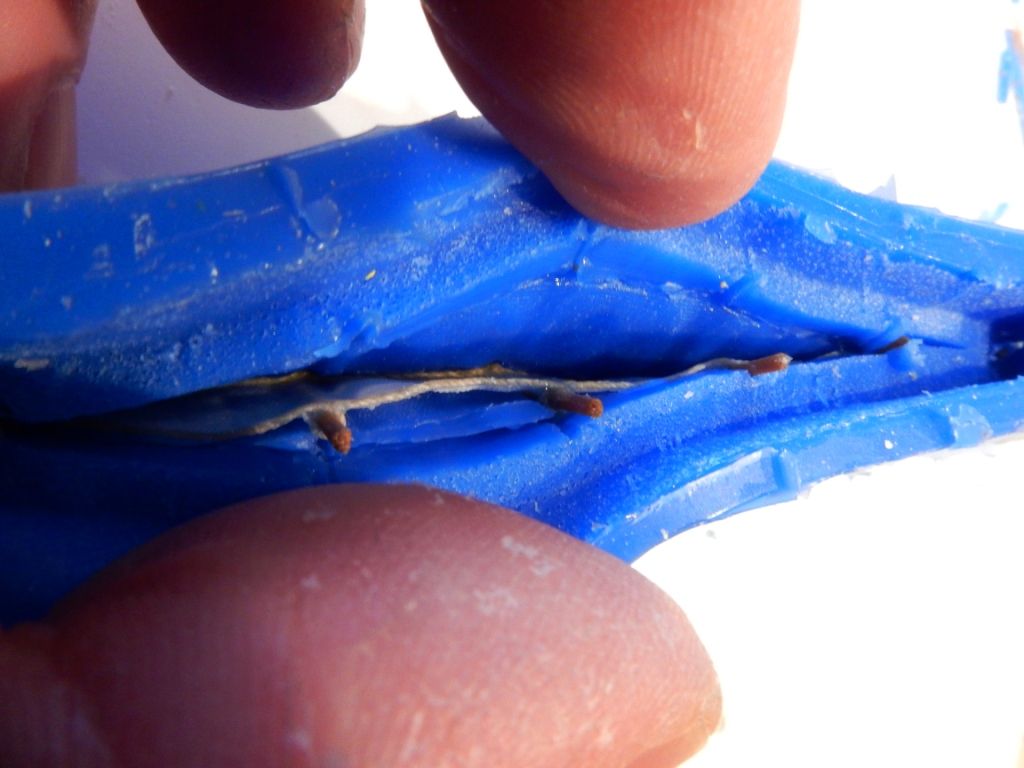
Also lots of small resin bubbles because of a porous rubber mould:
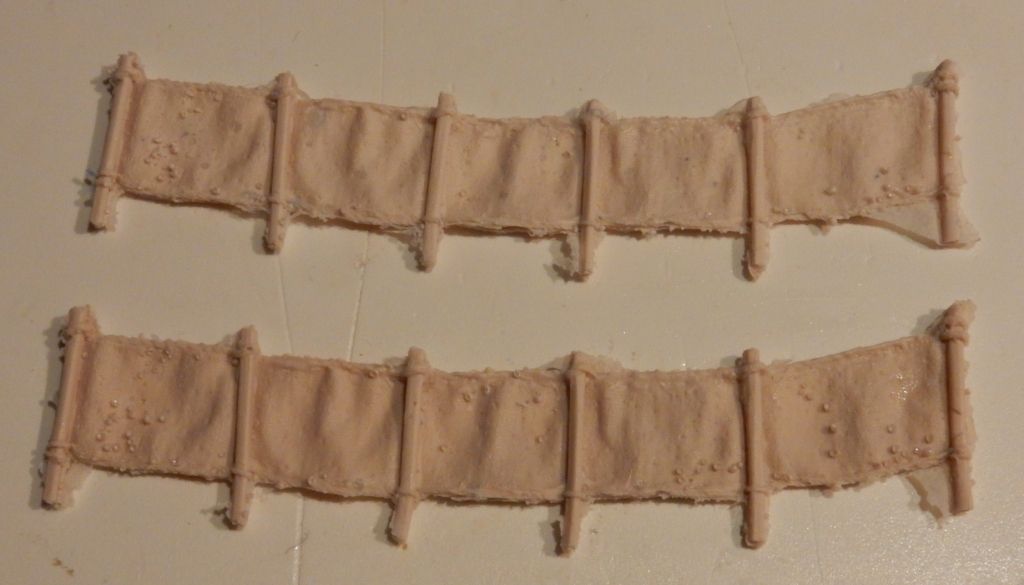
The resin bubbles can be removed easy but it is not perfect:
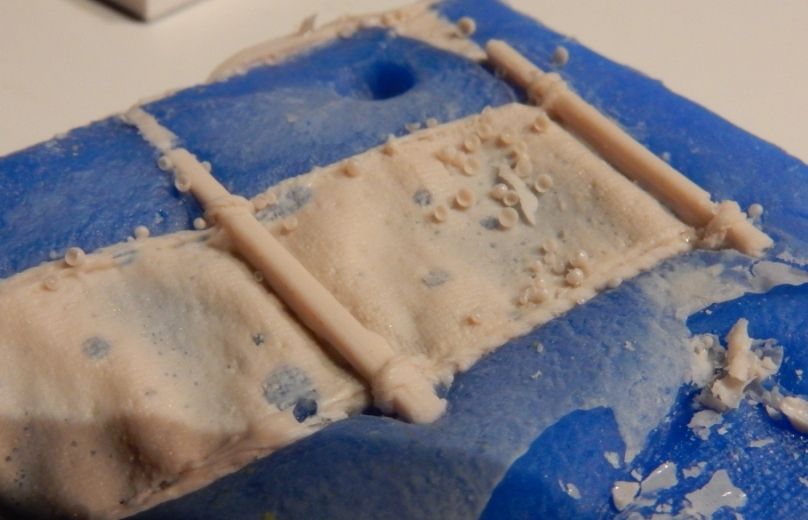
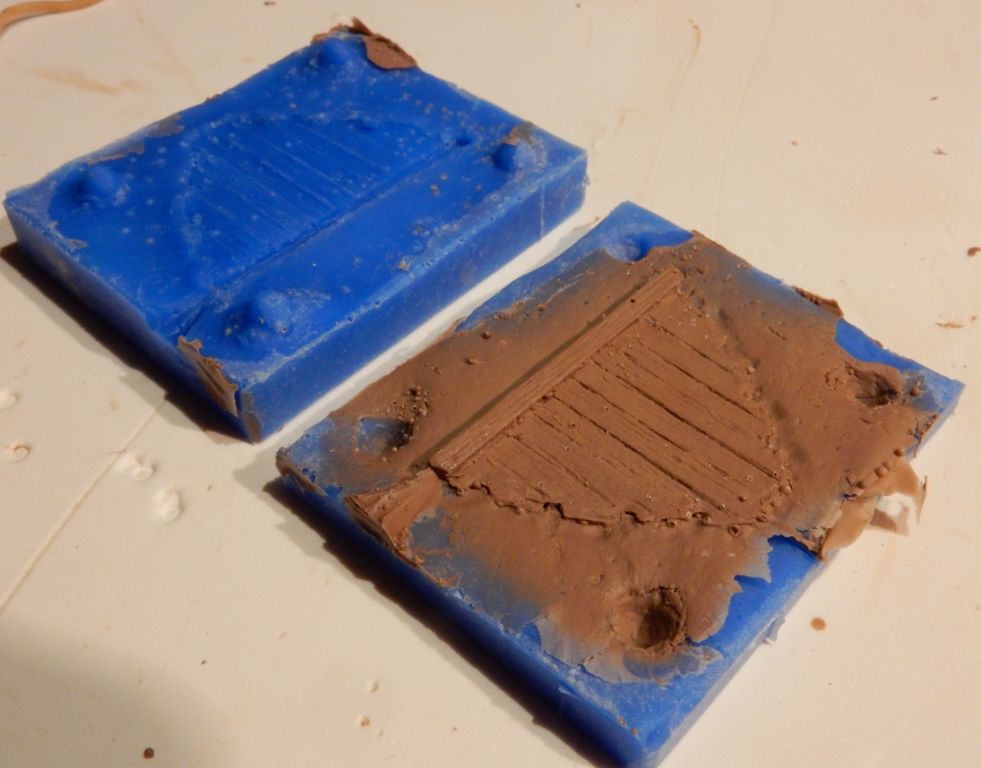
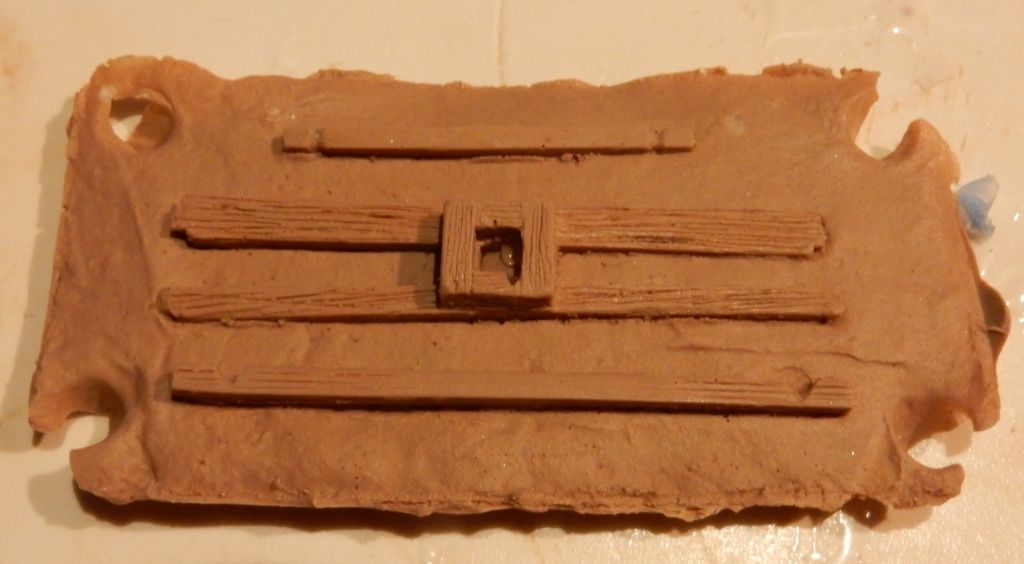
Another plan to cast the shipboard canvases:
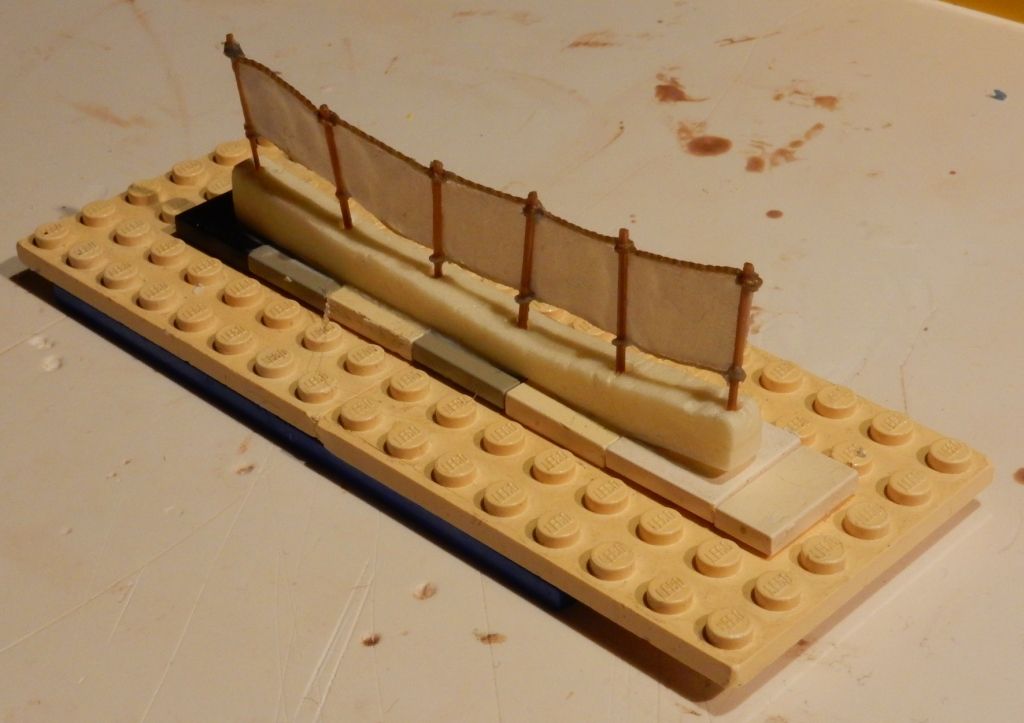
Not two together but just a single one at the time:
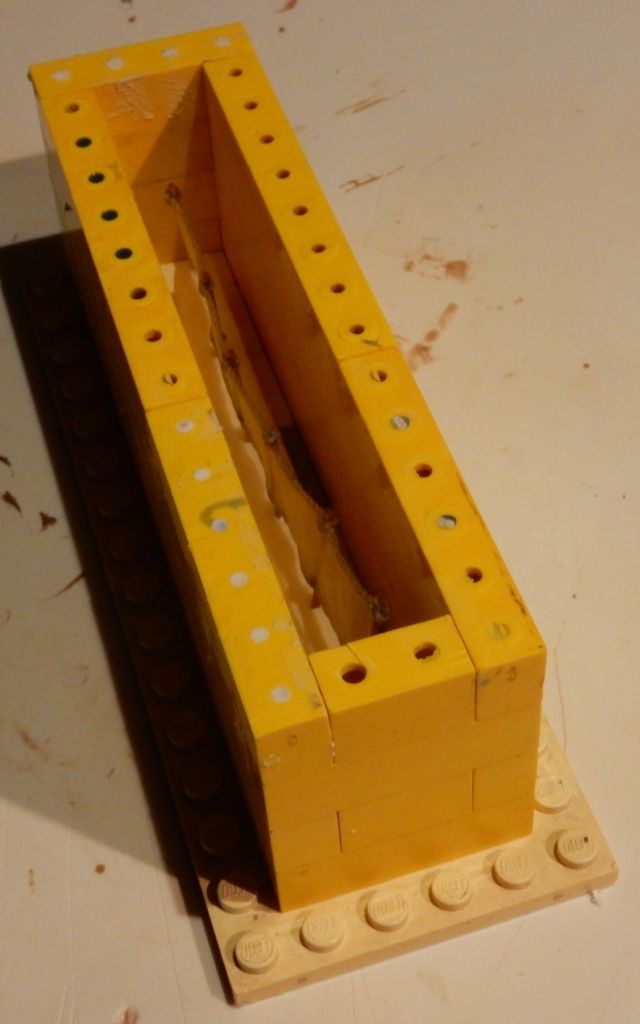
This is the single part mould technique I was thought by Kostis, placing the object on a (foam) stand before moulding, which will serve as a resin reservoir during the casting:
Iron pins to enforce the stocks holding up the canvases:
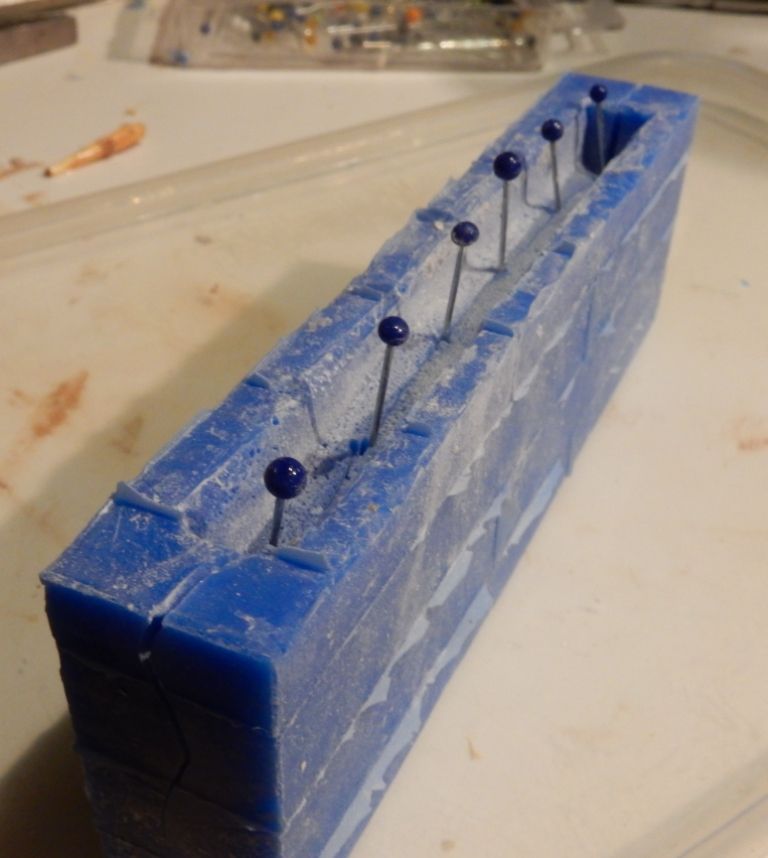
Now some parts of the extreme top corners got stuck in the single part mould during removing the resin casting and got broken.
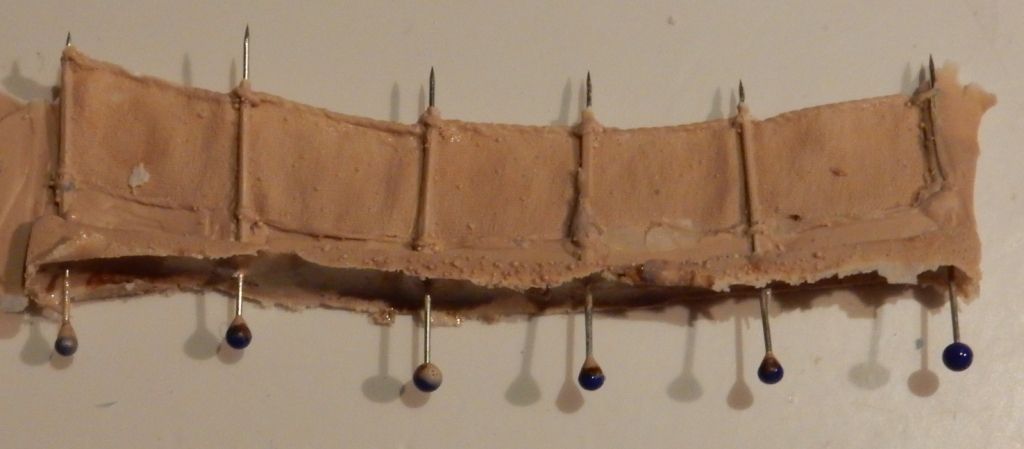
I tried to prevent this to make incisions all the way down at both sides of the mould. Its still very difficult to get it out in one piece.
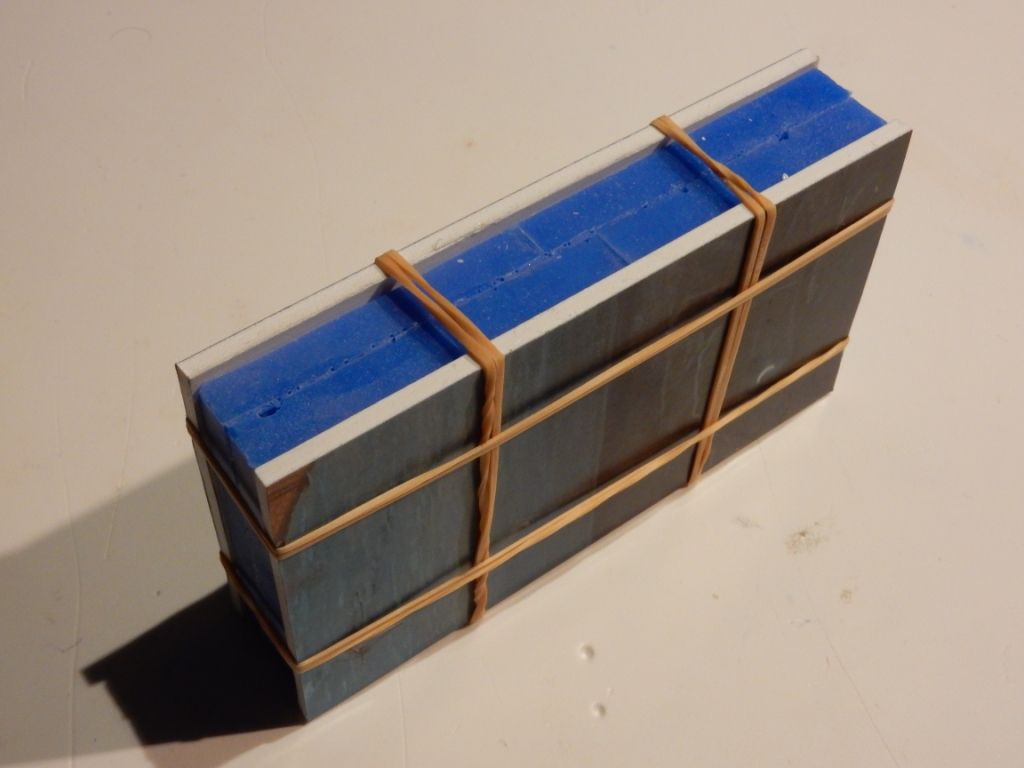
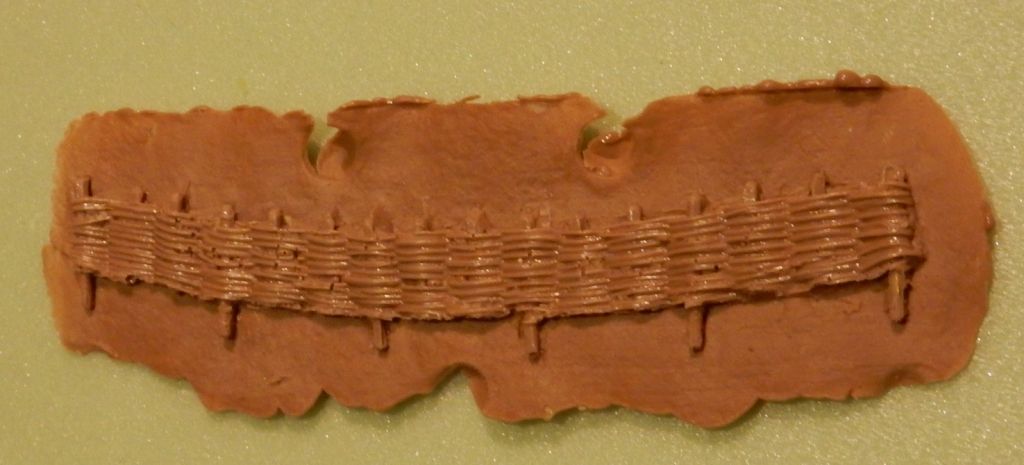
The wicker board sheets: Here is Phersu's method again, it keeps fascinating me: how does he succeed in making a simple two part mould by using ordinary cheap silicone gel?
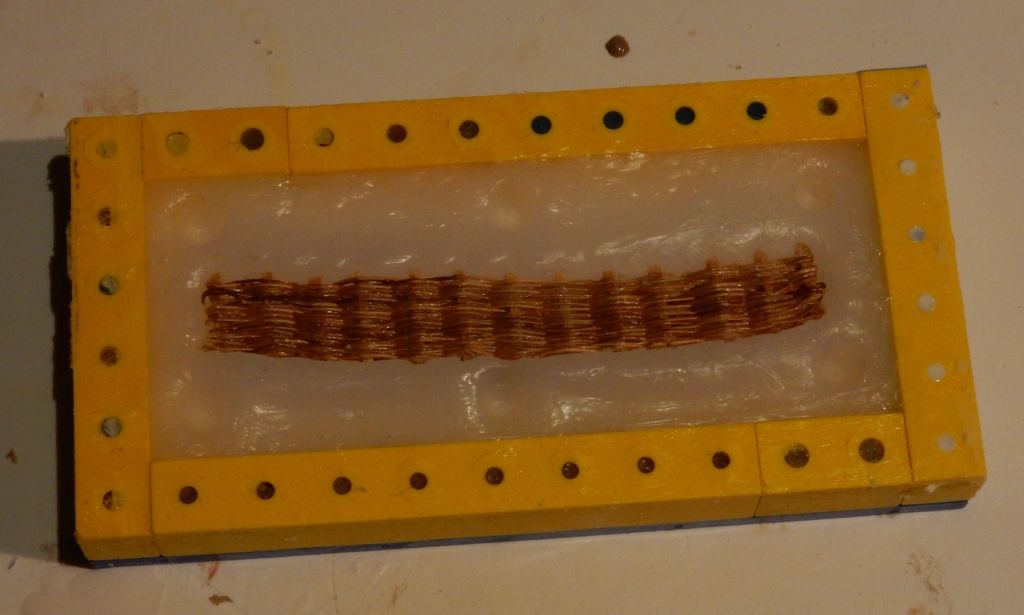
This time I used another, translucent, type of silicone gel. The moulding and casting turned out to be reasonable. Apparently, some silicone gels contain so much grease-solving component (ammonia?) it eats away several layers of parting agent. But others don't. Its the same mystery Phersu told us about in one of his threads and since no content information is given on the silicone tube labels, it will always be a guess which silicone gel is usefull and which one is disastrous.
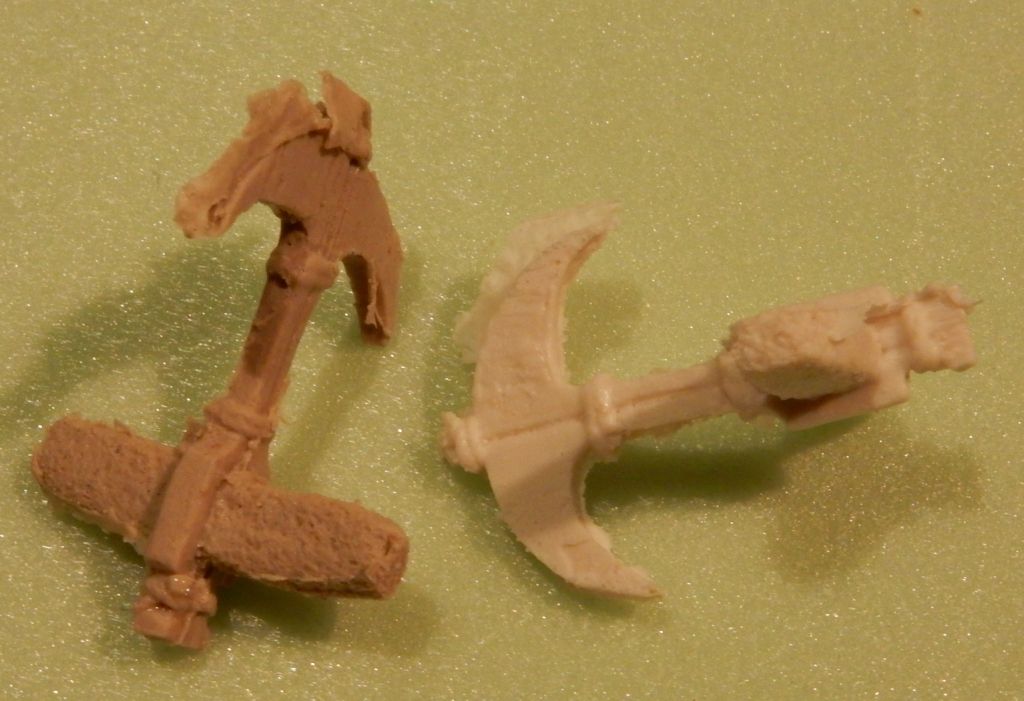
Work on the anchors again:
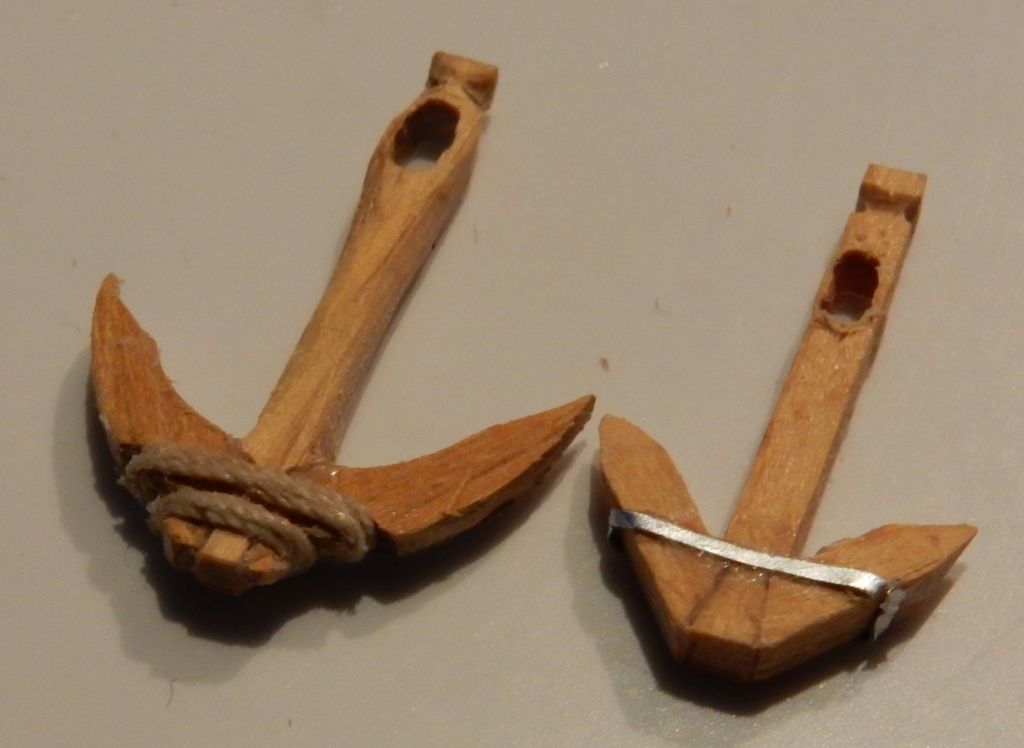
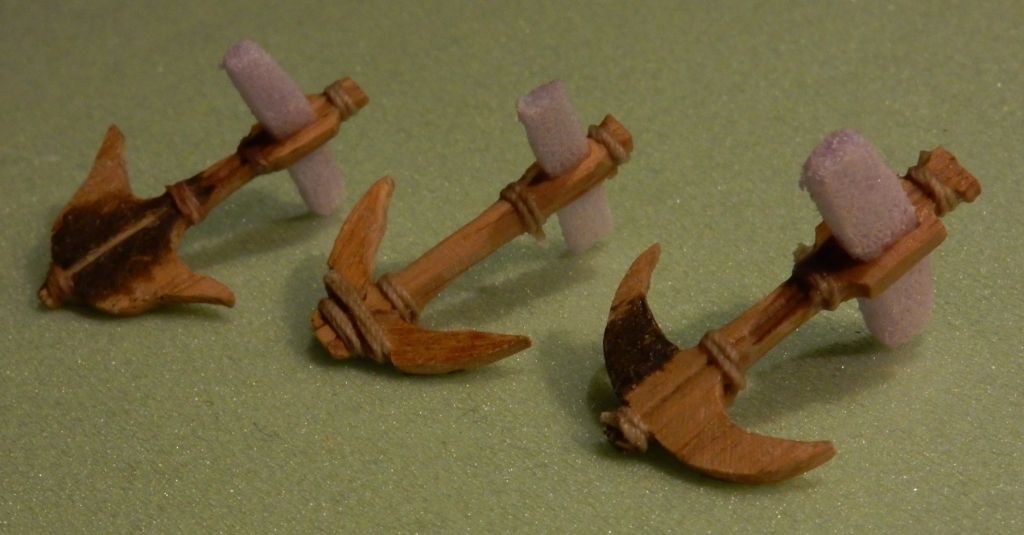
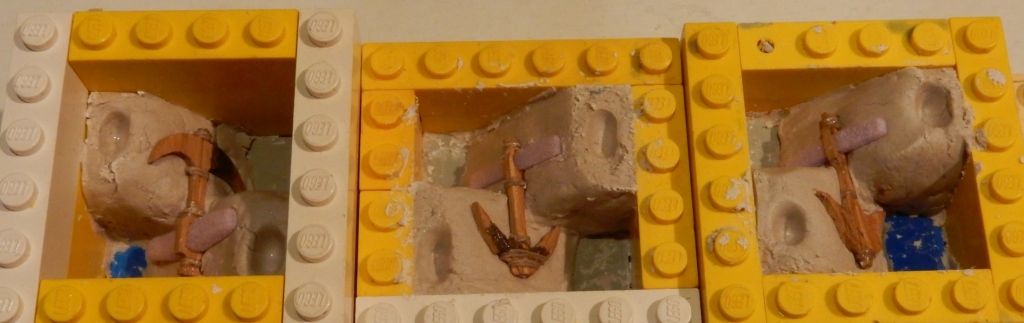

Except for some flash the anchor's one piece resin castings turned out to be perfect:
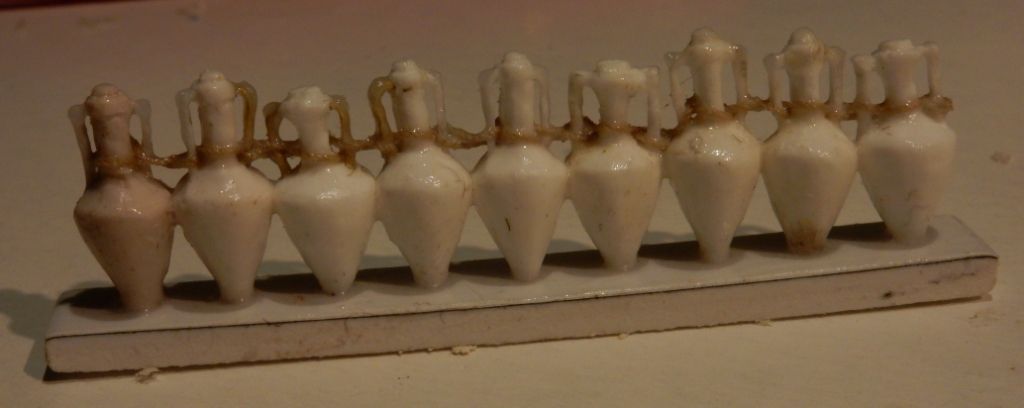
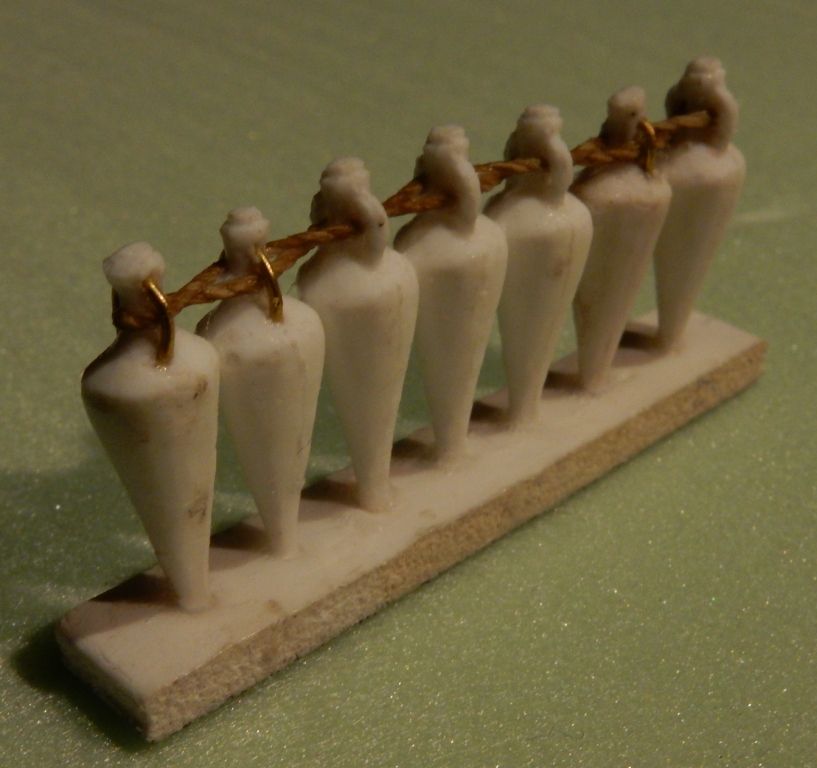
Strips of amphora, tied together for transport, were the main ancient ships cargo:
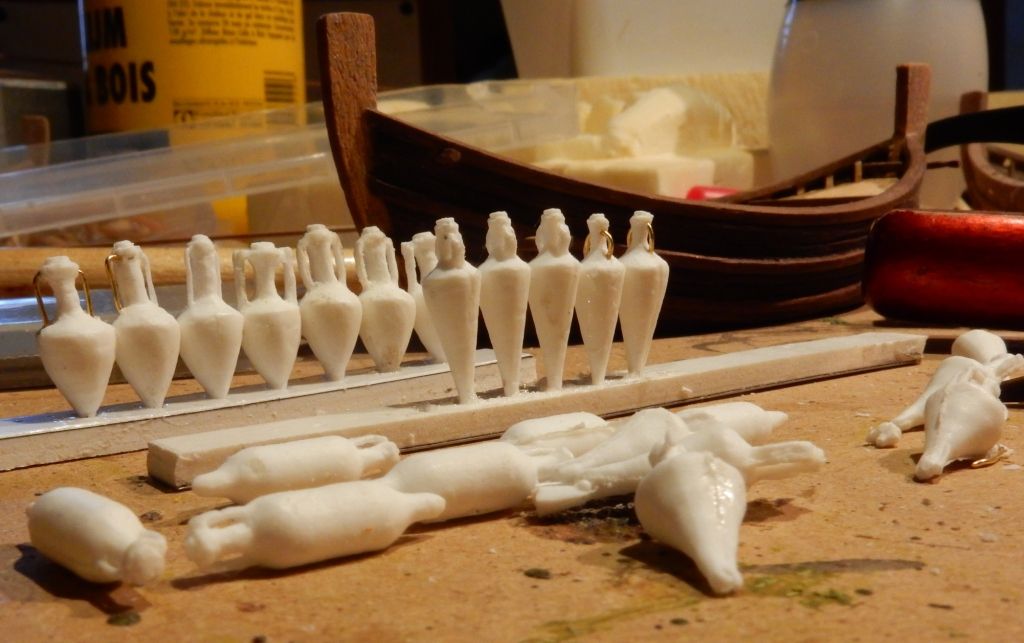
Its very difficult to get the two halves of these complicated shapes fit together: a lot of correctional cutting with a side cutter is done on the first mould halve before the second halve is moulded.
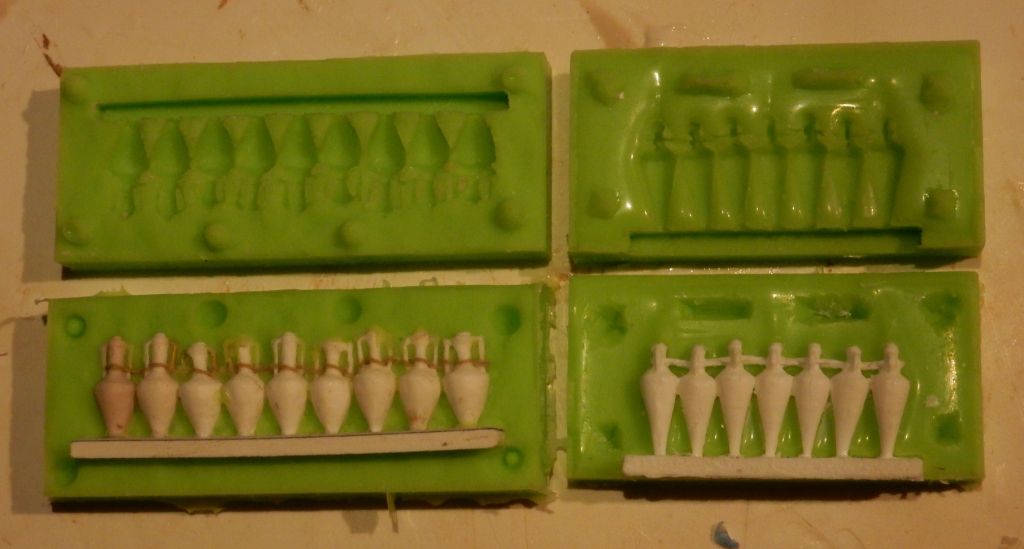
The problem is to get the amphora's back into that deep, complicated mould before pouring the second halve. First results:
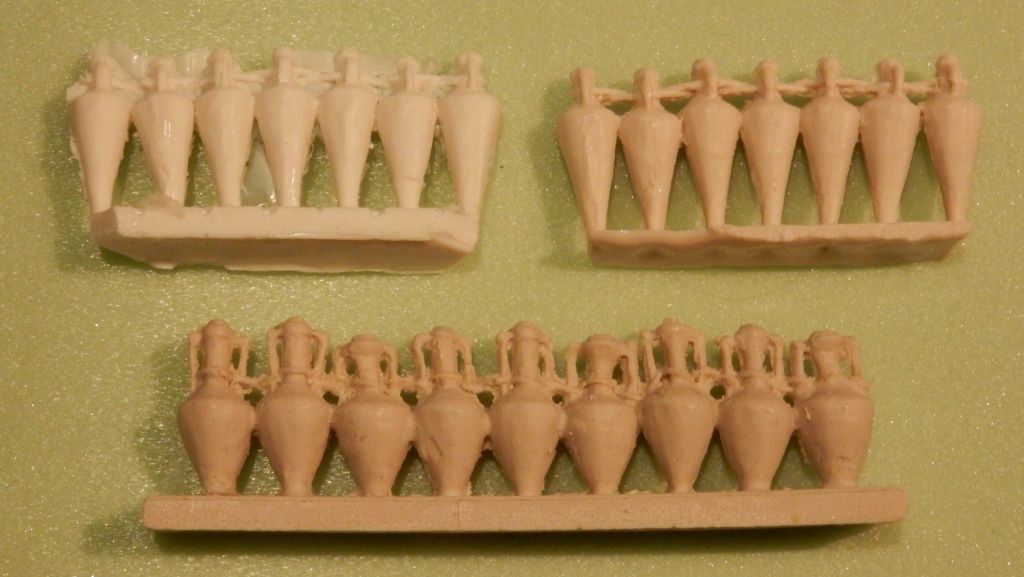
There is another method of casting without making a clay bed first but pouring in the silicone rubber upto exactly half way the object: a method I have to develop and try a little further later on.
Copper and bronze ingots were another important product to be transported by merchant ships during antiquity:

Its rough casted shape is designed with the aim of carrying by men and tying several ones together.

Sculpted with brown stuff and the chopped off injection needle:

Front and aft decks embedded in clay:
The blue silicone rubber is Moldstar 30.
When the brown resin is still soft, it is removed from the mould and pressed into the shiphull. So it will fit in perfectly by the time it is completely hardened.
The centre of the beams supporting the deck is pulled up with a finger while the resin is still soft to create the curved shape that is missing in the original wooden deck.
An iron pin to support the mast:
A failed mould: because too much parting agent was applied to the wooden objects to be moulded, in the inside of the mould this created extreme bubbles.
The green silicone rubber sold by Hagen Miniatures is the most expensive of all but also gives the best result until now. So I made a replacement mould with it.
Steering oar and rowing oar: Wooden originals:
Metal enforcements:
Resin copies:
The broken ladder was moulded with silicone gel, the cheapest kind I could find in the tool shop, a technique I learned from Phersu. The result was a disaster, the ladder came out in many pieces, the silicone gel tacked so extremely to plastic, wood, white metal and putty, even a second layer of parting agent did not prevent this:
So mold star30 rubber was used again:
Both shipboard canvases laid together into a single bed of clay to save rubber:
Removing the clay after casting the first mould part:
It turned out to be almost impossible to make two perfect canvas copies at the same time because funnel openings and air duct canals are positioned at both sides:
When casting one canvas at the time, the resin leaked into the hollow space of the second, lower one.
Also lots of small resin bubbles because of a porous rubber mould:
The resin bubbles can be removed easy but it is not perfect:
Another plan to cast the shipboard canvases:
Not two together but just a single one at the time:
This is the single part mould technique I was thought by Kostis, placing the object on a (foam) stand before moulding, which will serve as a resin reservoir during the casting:
Iron pins to enforce the stocks holding up the canvases:
Now some parts of the extreme top corners got stuck in the single part mould during removing the resin casting and got broken.
I tried to prevent this to make incisions all the way down at both sides of the mould. Its still very difficult to get it out in one piece.
The wicker board sheets: Here is Phersu's method again, it keeps fascinating me: how does he succeed in making a simple two part mould by using ordinary cheap silicone gel?
This time I used another, translucent, type of silicone gel. The moulding and casting turned out to be reasonable. Apparently, some silicone gels contain so much grease-solving component (ammonia?) it eats away several layers of parting agent. But others don't. Its the same mystery Phersu told us about in one of his threads and since no content information is given on the silicone tube labels, it will always be a guess which silicone gel is usefull and which one is disastrous.
Work on the anchors again:
Except for some flash the anchor's one piece resin castings turned out to be perfect:
Strips of amphora, tied together for transport, were the main ancient ships cargo:
Its very difficult to get the two halves of these complicated shapes fit together: a lot of correctional cutting with a side cutter is done on the first mould halve before the second halve is moulded.
The problem is to get the amphora's back into that deep, complicated mould before pouring the second halve. First results:
There is another method of casting without making a clay bed first but pouring in the silicone rubber upto exactly half way the object: a method I have to develop and try a little further later on.
Copper and bronze ingots were another important product to be transported by merchant ships during antiquity:
Its rough casted shape is designed with the aim of carrying by men and tying several ones together.
Sculpted with brown stuff and the chopped off injection needle:
-
Cryns
- Supporting Business
- Posts: 1254
- Member since:
11 Nov 2015, 15:33
Hello Mr C. Your imagination and attention to detail are inspirational. Not my era but magnificent.
Best wishes,
Chris
Best wishes,
Chris
-
C M Dodson

- Posts: 2572
- Member since:
01 May 2015, 18:48
Help keep the forum online!
or become a supporting member
Nice work Mr. Cryns,and good use of Lego bricks i remember seeing it somewhere before,but where? BB
-
Beano Boy
- Supporting Member (Gold)
- Posts: 8086
- Member since:
03 Sep 2013, 14:45
Dear friend Mr. Cryns, you wrote an excellent casting tutorial!
I love your article as much as your fantastic model.
I love your article as much as your fantastic model.
-
Kostis Ornerakis
In memoriam- Posts: 1280
- Member since:
14 Feb 2016, 18:16


Scratchbuilding and casting is art for itself, different from painting and sculpting. I already said it but I will repeat myself, I really enjoy watching this step by step casting progress.
-

Kekso
 Moderator
") Supporting Member (Bronze)
Supporting Member (Bronze) - Posts: 6840
- Member since:
19 Oct 2011, 18:32